Overview
This chapter describes, how Simplifier and SAP need to be configured, that Simplifier connectors access SAP with users identified by the SAP ExtID feature.
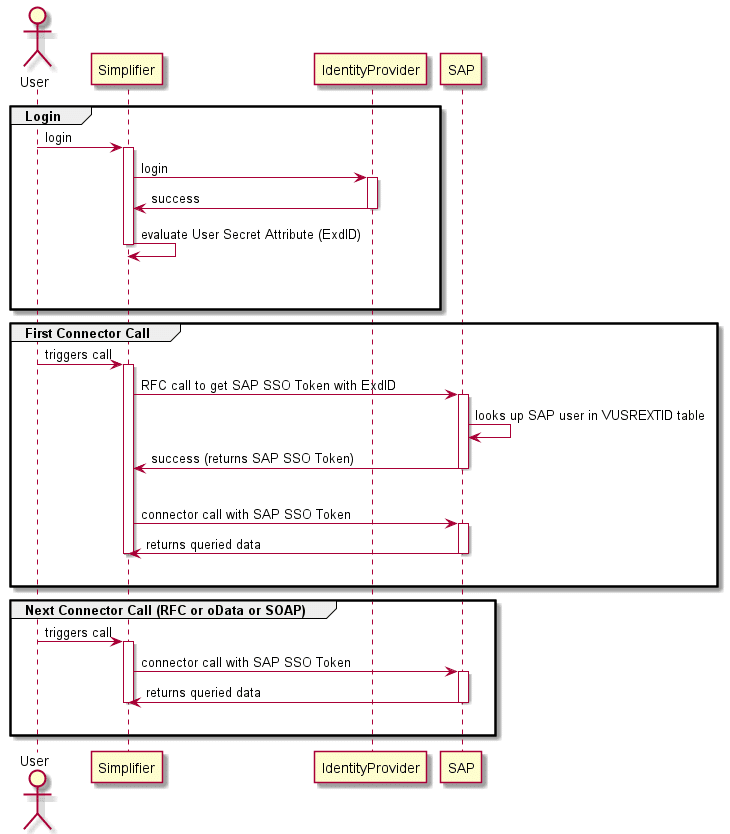
Login
- The User logs in to Simplifier via the configured Identity Provider
- The User Profile of the Identity Provider contains all information, that is needed to construct the ExtID for SAP.
First Connector Call
- Before the first connector call takes place, Simplifier will implicitly call the SAP system via the RFC SNC protocol and ask for a SAP SSO Token
- As SAP trusts the Simplifier instance (identified by the certificates from the PSE keystore) SAP will look up the mapped SAP user from the table VUSREXTID and return the personalized SAP SSO Token
- This SAP SSO Token is then used by Simplifier to do the actual connector call (RFC, SOAP or oData)
Next Connector Call
This article is split into these topics:
Configure the SNC security layer
The SNC security layer adds security features to e.g. RFC and CPIC connections between SAP and other products.
Here are the steps described to configure Simplifier and the SAP system to use SNC secured connections. The ExtID feature requires SNC connections – but also if you don’t use ExtID, you can configure SNC for Simplifier and SAP.
Configure the SAP Cryptolib in Simplifier
Simplifier needs the SAP Cryptolib to create a PSE keystore file. The PSE keystore will contain the certificates, so that Simplifier and SAP can identify each other as trusted communication partners of a RFC SNC connection.
Create PSE Keystore
In the PSE Keystore we will need two certificates. The “own” certificate of Simplifier (created when the Keystore is initially created) and the “foreign” certificate of the SAP system.
Create Keystore and own Simplifier certificate
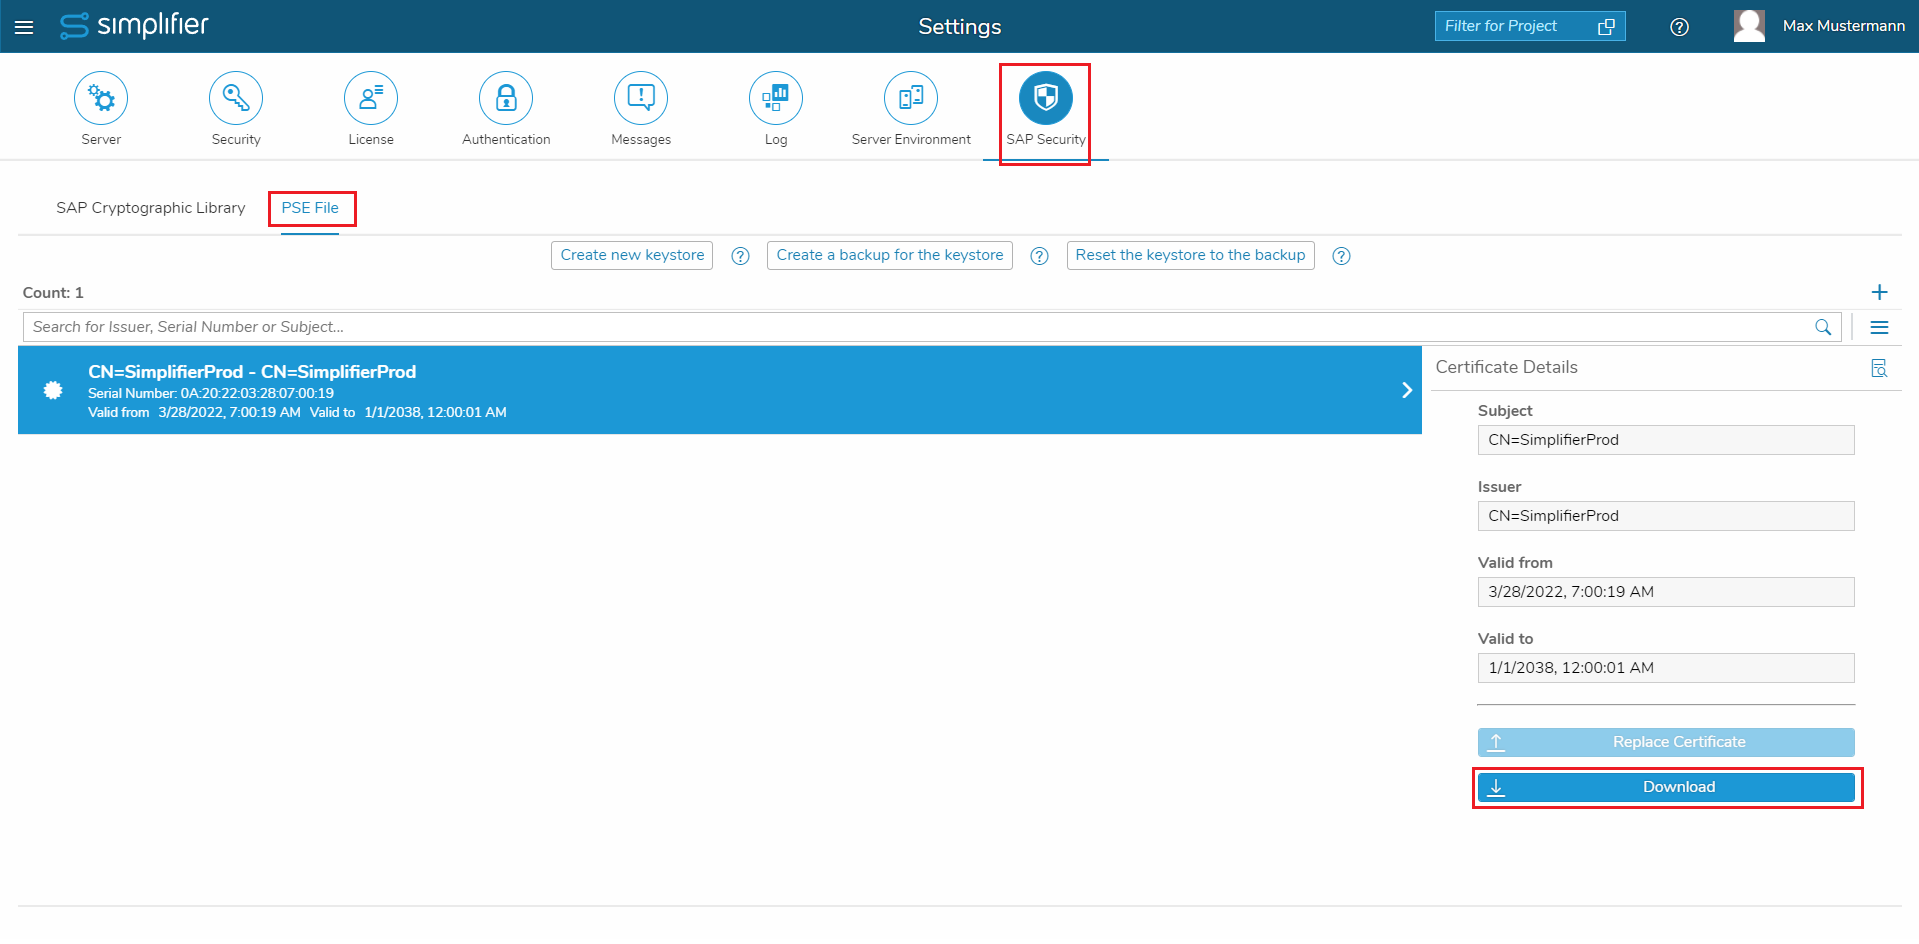
- Within the main tab “SAP Security” navigate to the sub tab “PSE File”
- Click “Create new keystore”
- When prompted, enter a Common Name for your own Simplifier certificate (e.g. SimplifierProd). This name will later also be seen by the SAP administrators – so we should have a describing name.
- Now the PSE Keystore is created and contains the own certificate, which we should download and name it “certificates_Own_Certificate.pem”
Get SAP certificate as foreign certificate
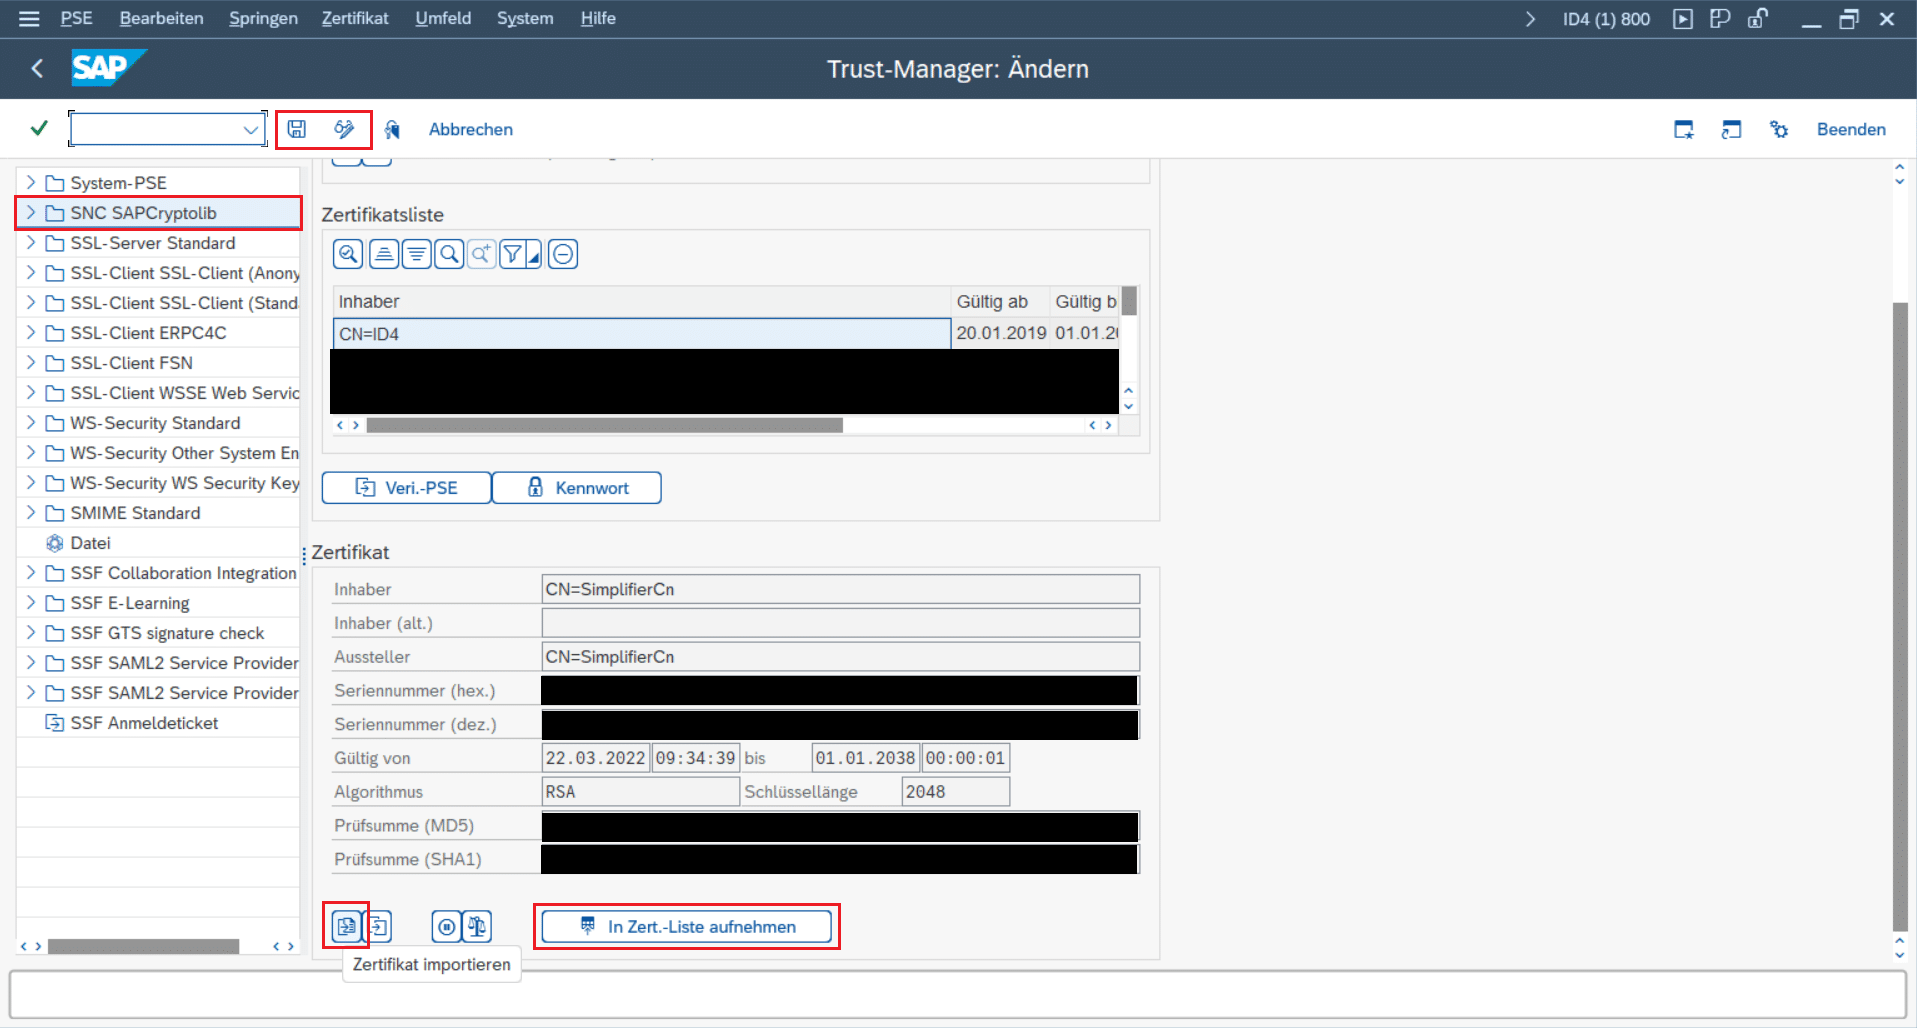
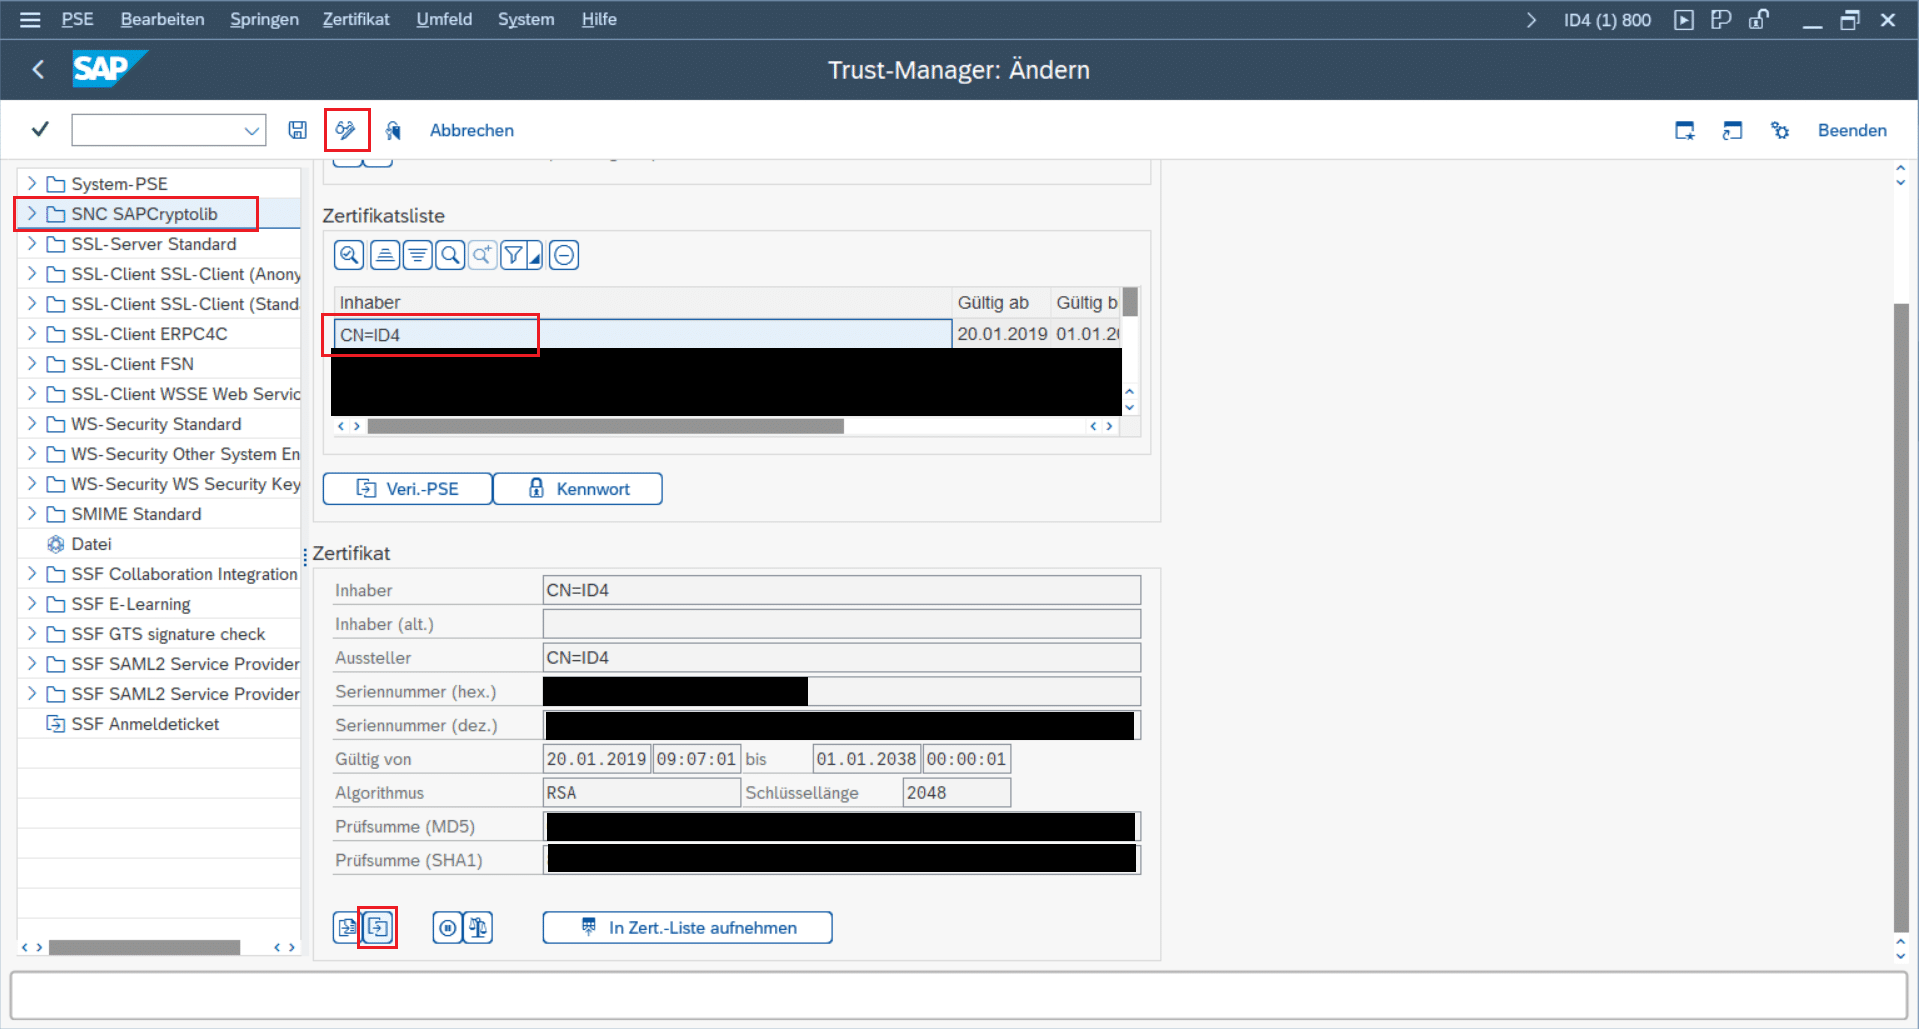
- Stay in transaction “STRUST” -> “SNC SAPCryptolib”
- Select SAP’s own certificate (usually it is the first in the list),
- export it as “Base64” and save it as “sap_snc_certificate.pem”
Import SAP certificate into Simplifier
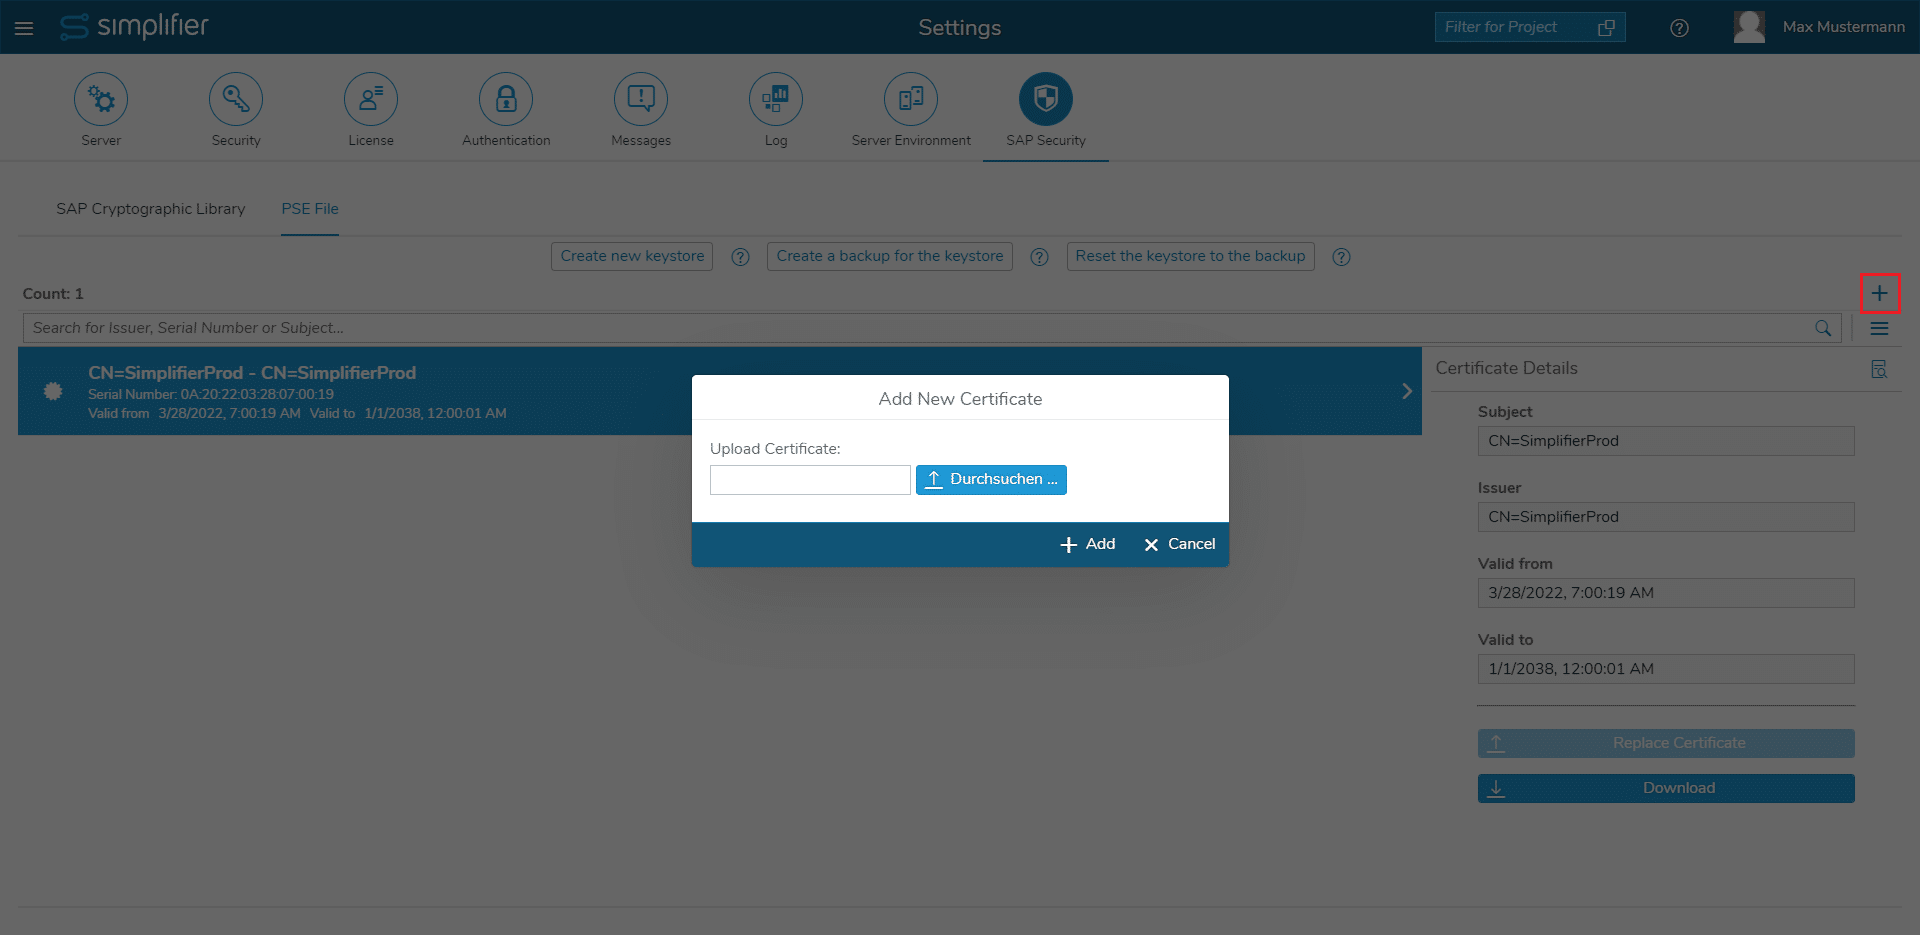
- In Simplifier go to “Settings” -> “SAP Security” -> “PSE File”
- Click the upper right “+” symbol
- Import the “sap_snc_certificate.pem”
Signing
During creation of Simplifier’s PSE Keystore also a certificate request file has been created. The file ‘certificates_request.p10’ has been created on the file system in the respective Simplifier shared directory e.g. ‘/opt/simplifier/data’ in the directory ‘SapSecurity/SapPse’.
This file can be used to sign the respective PSE file if required.
Summary
Now it should look like this, that both sides can identify each other with the known certificates.
In Simplifier we have e.g “SimplifierProd” as the “own” certificate and we have the exported certificate of SAP as a foreign certificate.
On the SAP side SAP has its own own certificate and has the “SimplifierProd” as a foreign certificate in the “SNC SAPCryptolib” keystore.
Establishing Simplifier as a trusted partner
Now that Simplifier is known to SAP, we can go on and tell SAP, which actions Simplifier is authorized to do.
- Log on to SAP
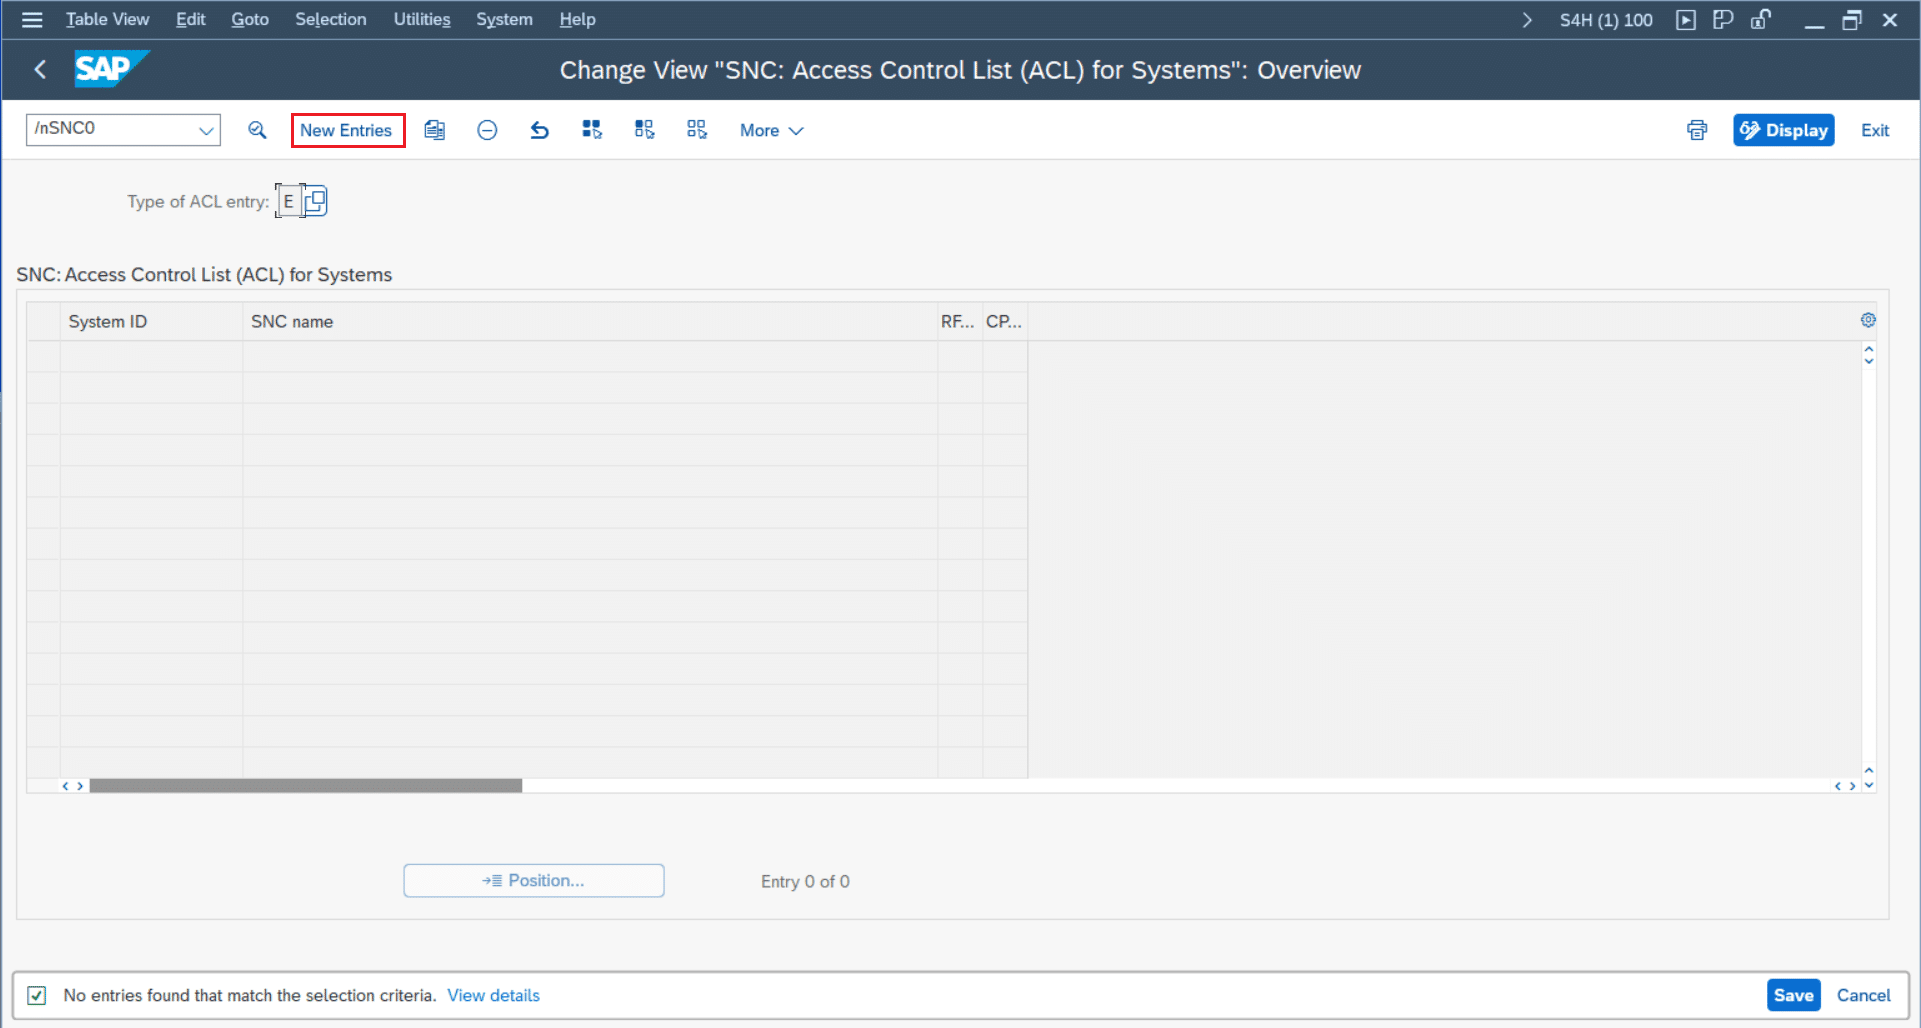
- Navigate to transaction “SNC0” (e.g. “/nSNC0”)
- Create a new entry in the Access Control List
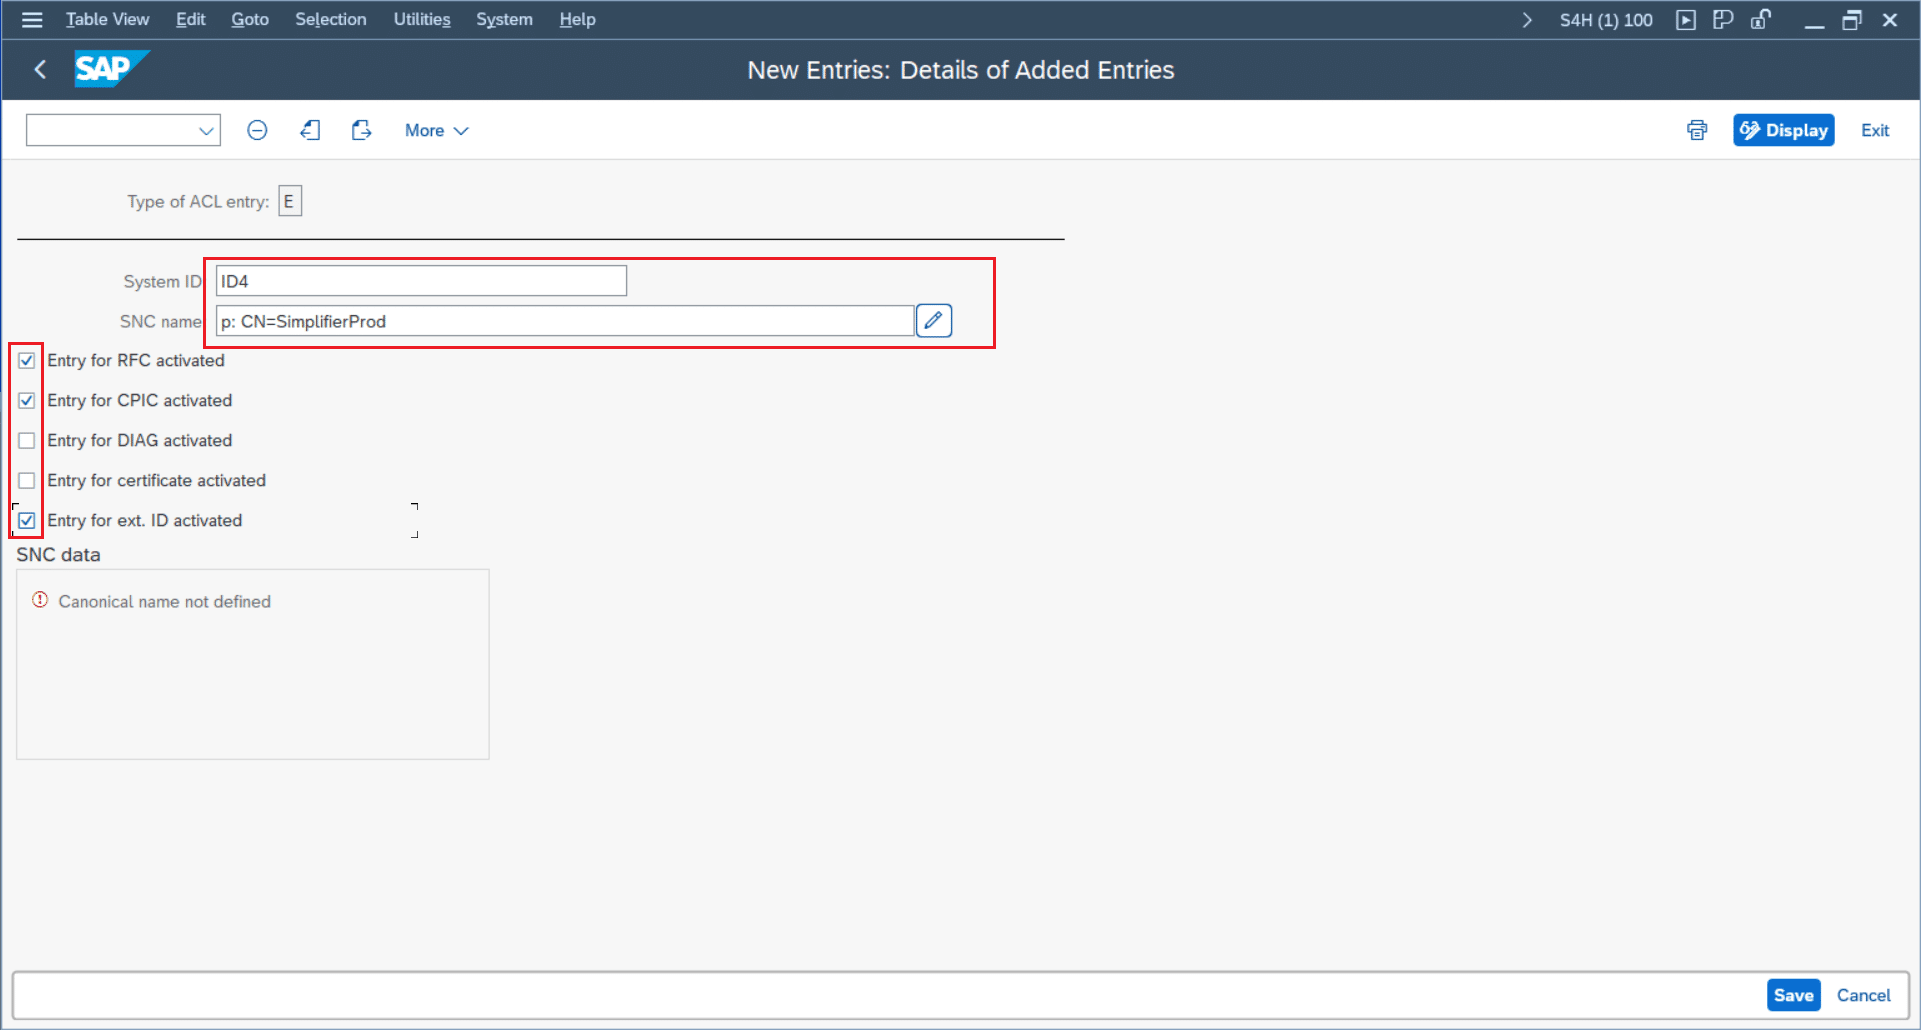
- System-ID: the ID of the desired SAP System
- SNC-Name: prepend the common name of Simplifiers own certificate with “p: CN=” – so for example the SNC-Name can be “p: CN=SimplifierProd” (please mind the empty space after “p:”)
- Activate the checkboxes for RFC, CPIC and for “ext ID”
- After saving the entry, the “canonical name” should be defined
Mapping SAP Users
Now we are done with the SNC configuration. To use the ExtID feature, we still have to configure the user mapping in SAP.
In order to map ExtIDs to SAP Users, SAP offers the VUSREXTID table. This table supports multiple sources for the ExtIDs – e.g. Kerberos, LDAP and other sources.
Remark: “DN” is not supported as External ID type, because SAP is not supporting DN for ExtID-only.
If your Identity Provider is AD, LDAP or oAuth, you can e.g. select External ID type “LD”.
For a production environment with a huge number of users this table will probably be filled by an automated process.
We will now create one single mapping entry:
- In SAP go to transaction “SM30”
- Choose the table VUSREXTID
- Click “Maintain”
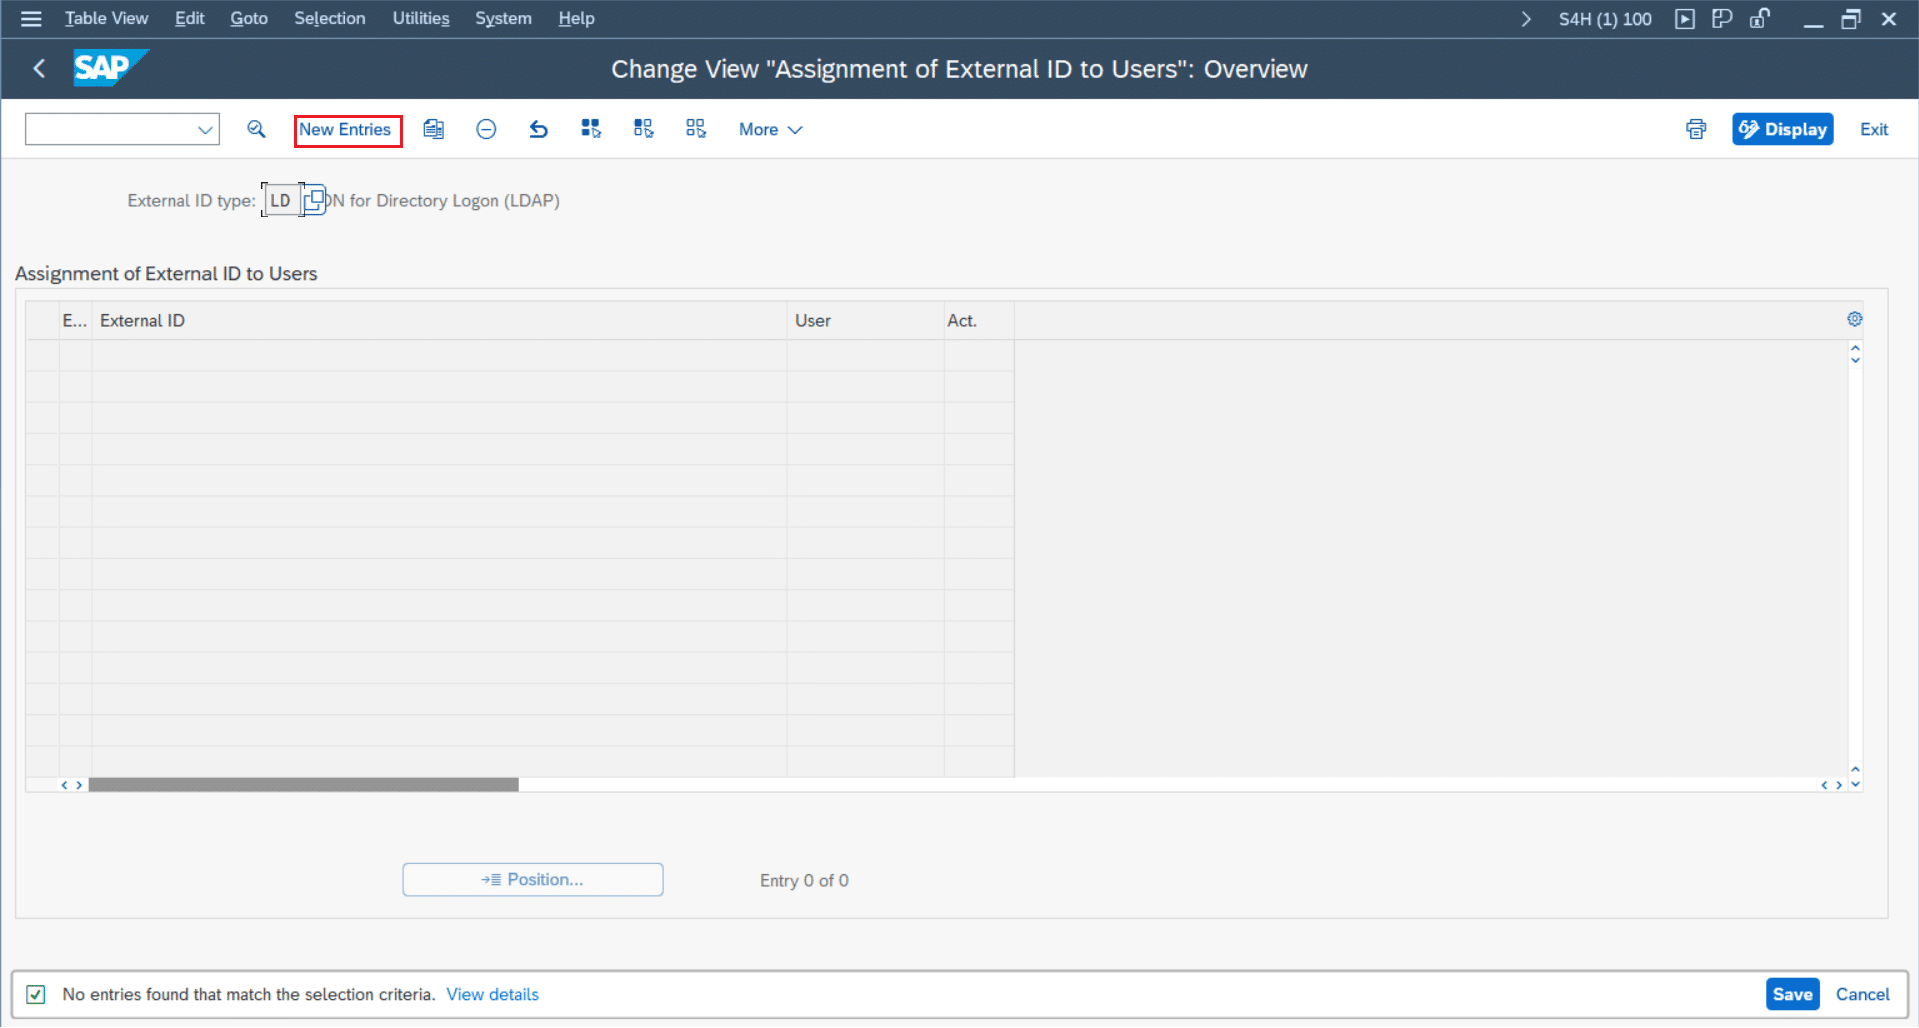
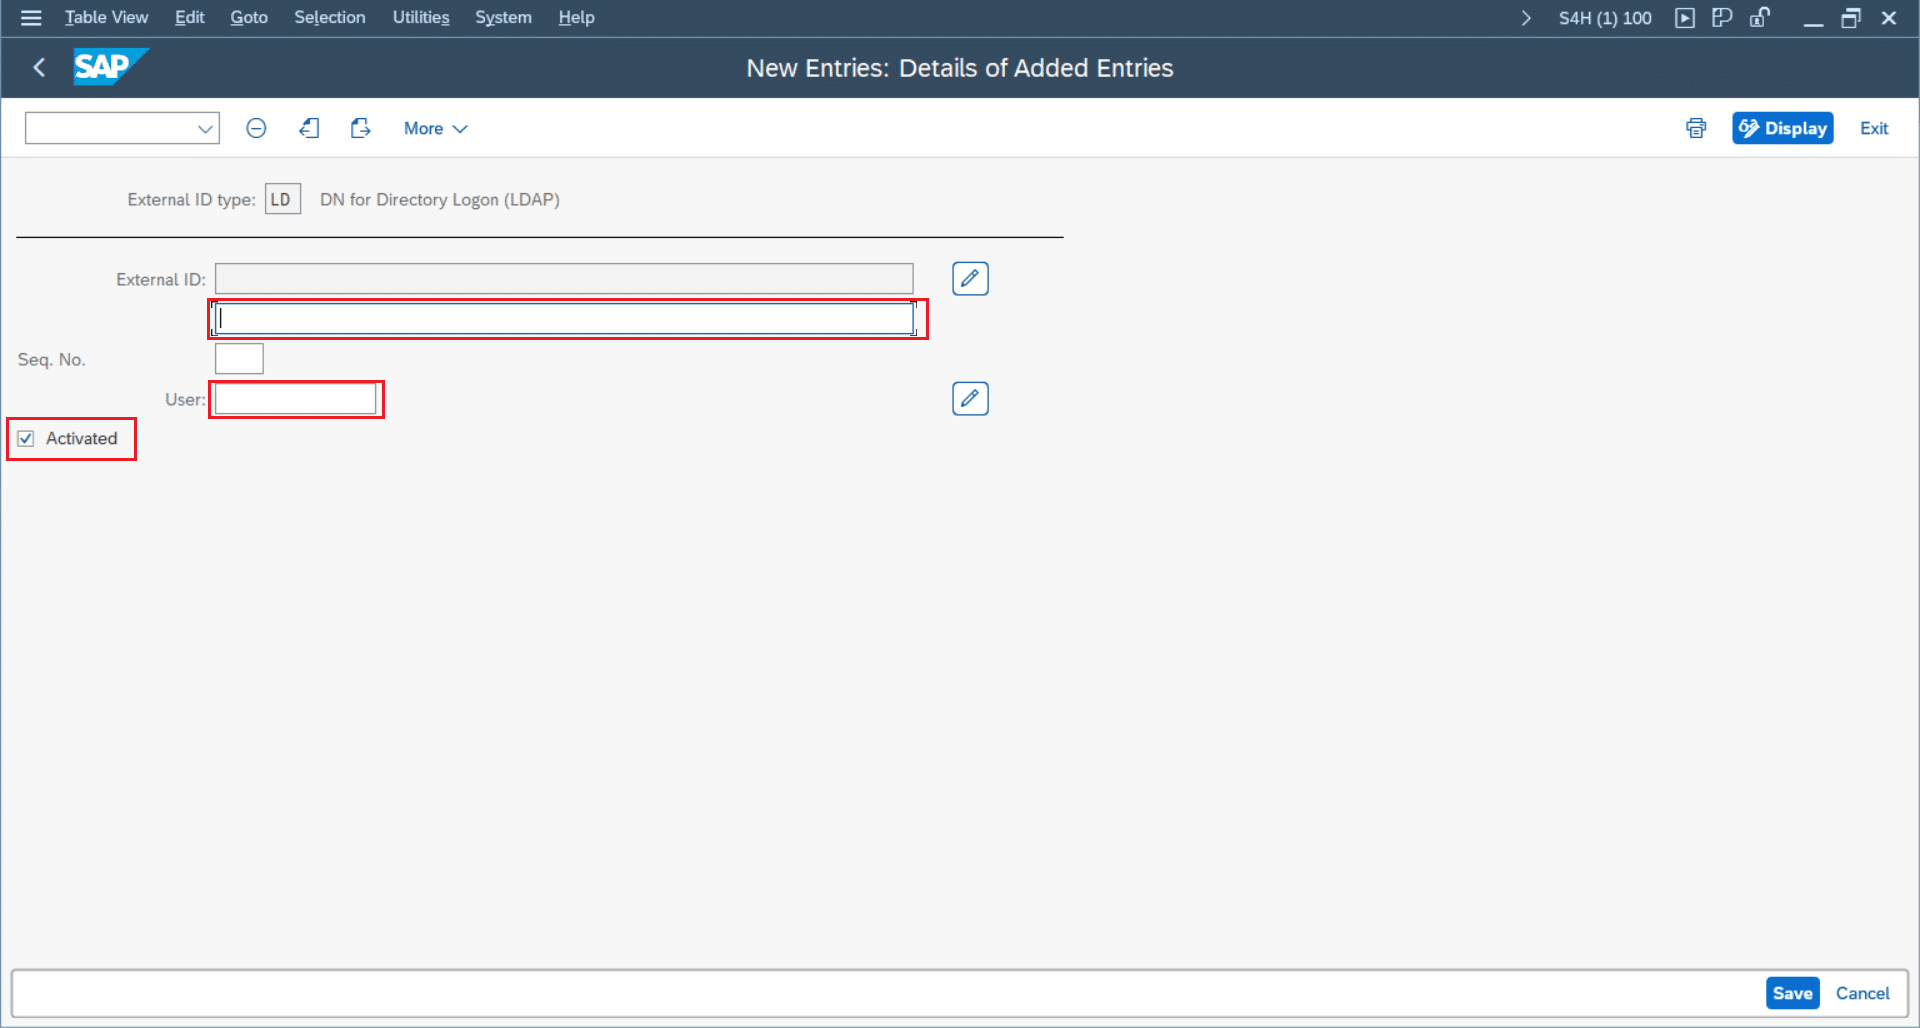
- Choose the External ID type “LD”
- Click “New Entries”
- Set an external ID, that can be created given your Identity Provider’s user profile, e.g. “EXTID_max.mustermann”
- Select the SAP User, that should be mapped to the ExtID
- Check “Activated”
- Save the created user mapping
Alternative: Report RSUSREXT
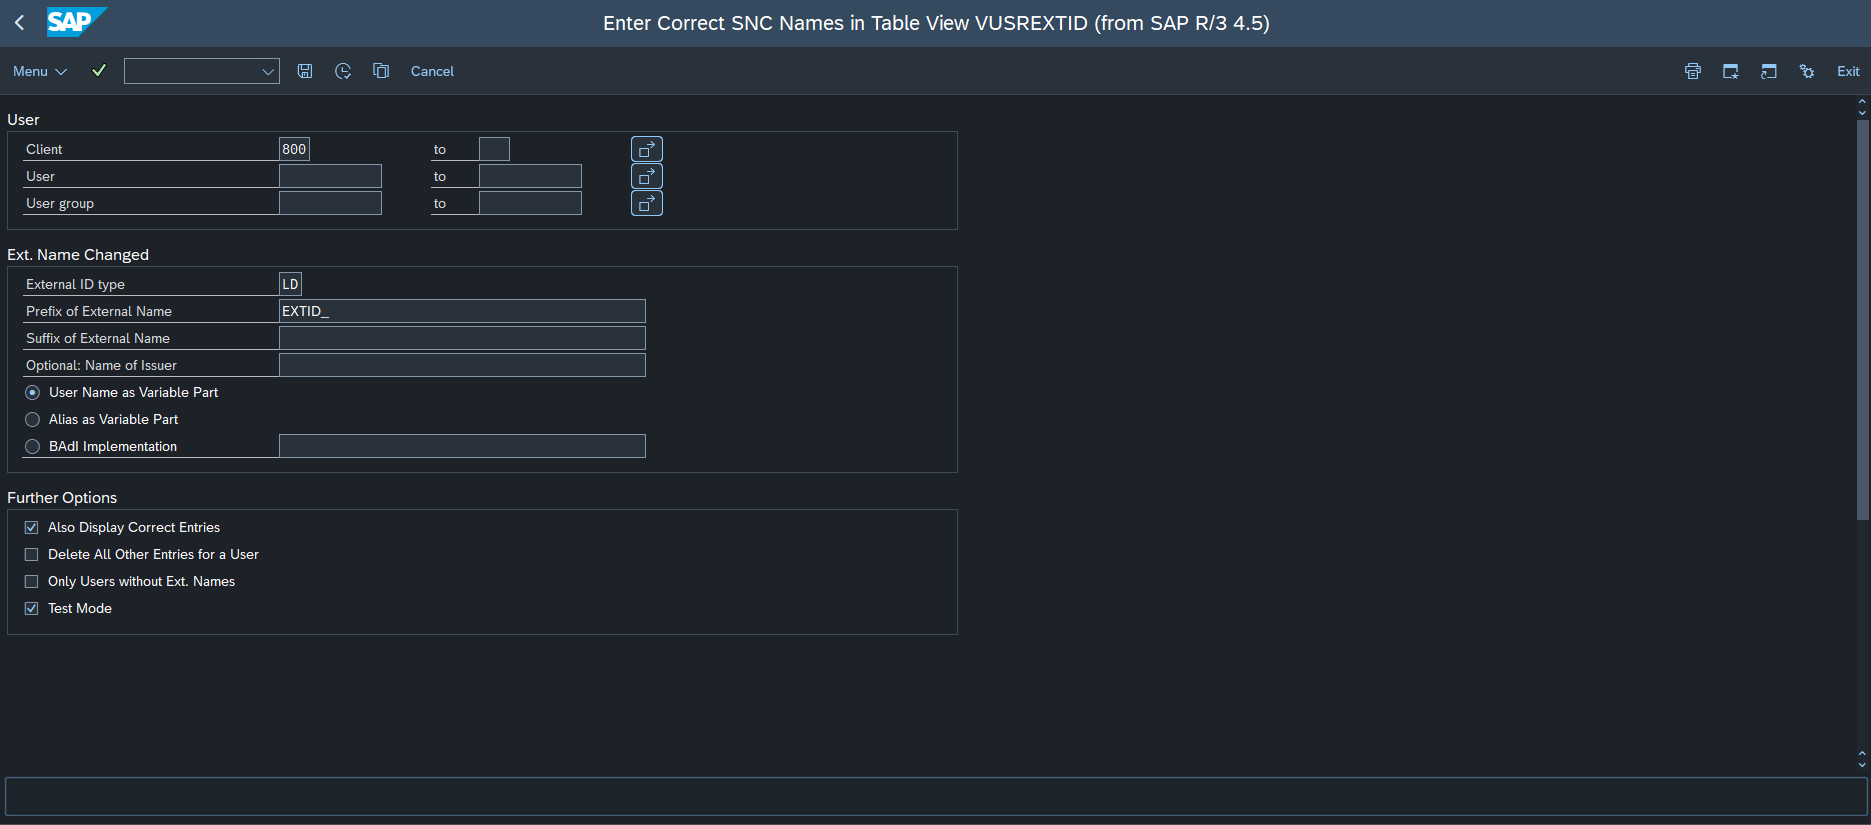
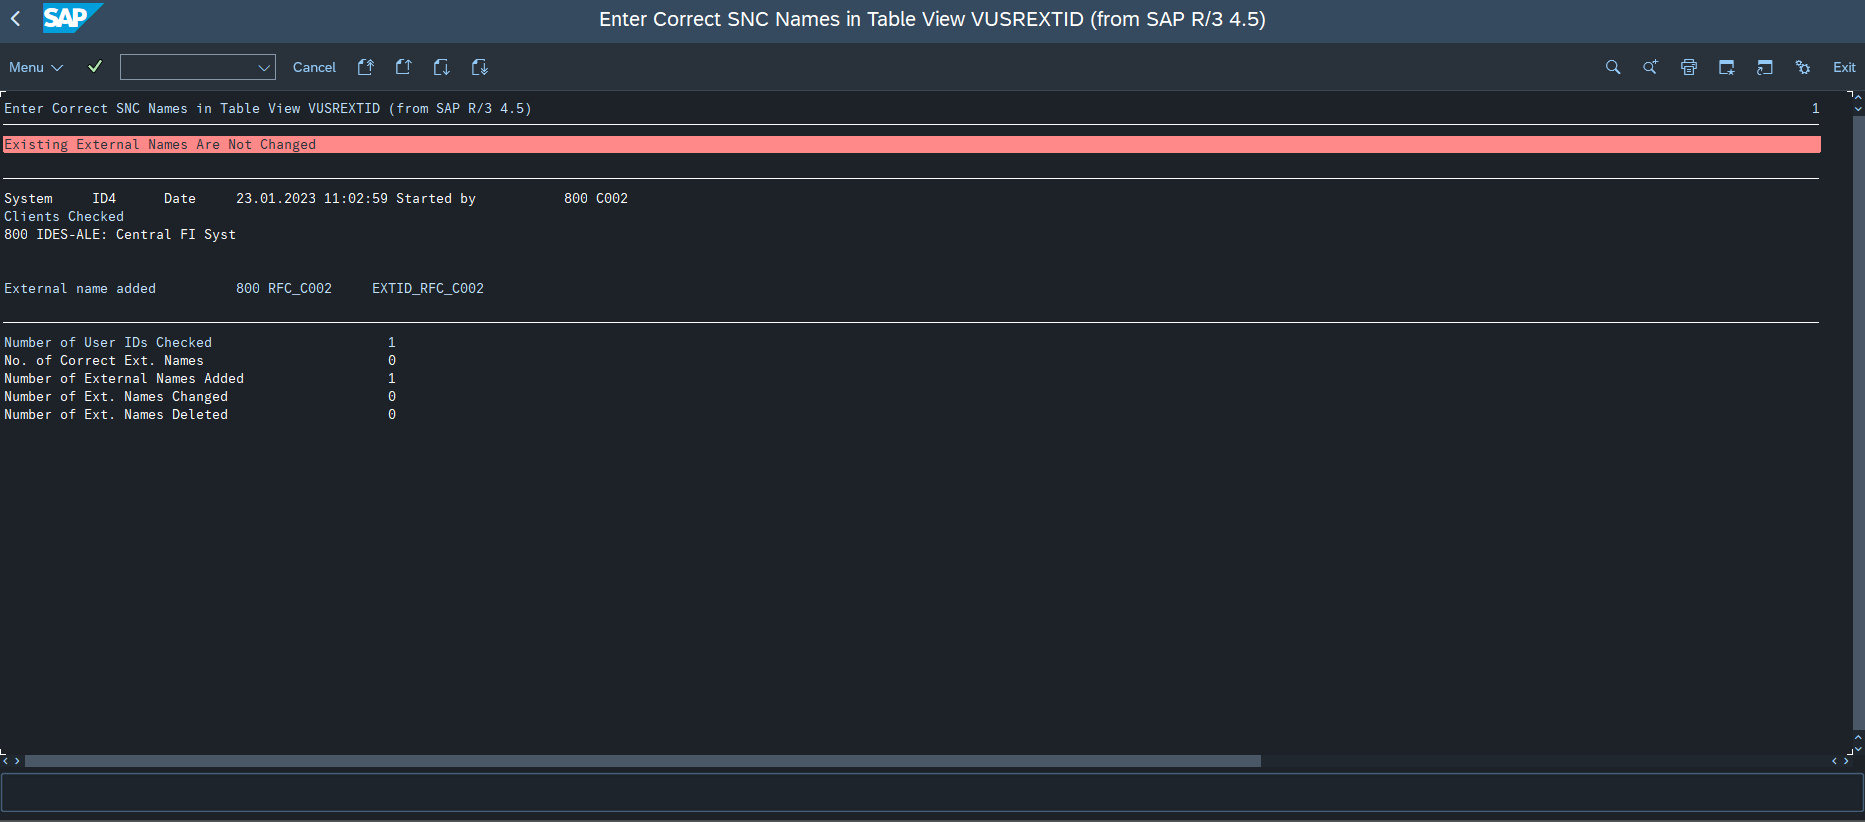
There is also the possiblility to create one or even multiple entries in Table VUSREXTID, report RSUSREXT can be used.
In case of user determination you can choose between SAP Username and SAP User Group.
For the setup of the external name we use “LD” as External ID type and set prefix and/or suffix.
The next part determines, which information of user masterdata will be used as the variable part of the name.
You can choose between username itself or alias.
If both of these options aren’t fitting there is the possibility to use BAdI-Implemetation USREXTIDMAPPING.
Check sample implementation CL_USREXTID_BADI for futher information
Configure and use User Secrets
Create a User Secret
Up to now we have configured, that SAP can identify a user via the external user ID (ExtID).
Now we need to have this ExtID available in Simplifier. To achieve this, we add a Secret User Attribute to each user. The value of the attribute can be created from properties, that are available from the Identity Providers user profile.
For example we add a Secret User Attribute for a oAuth authentication.
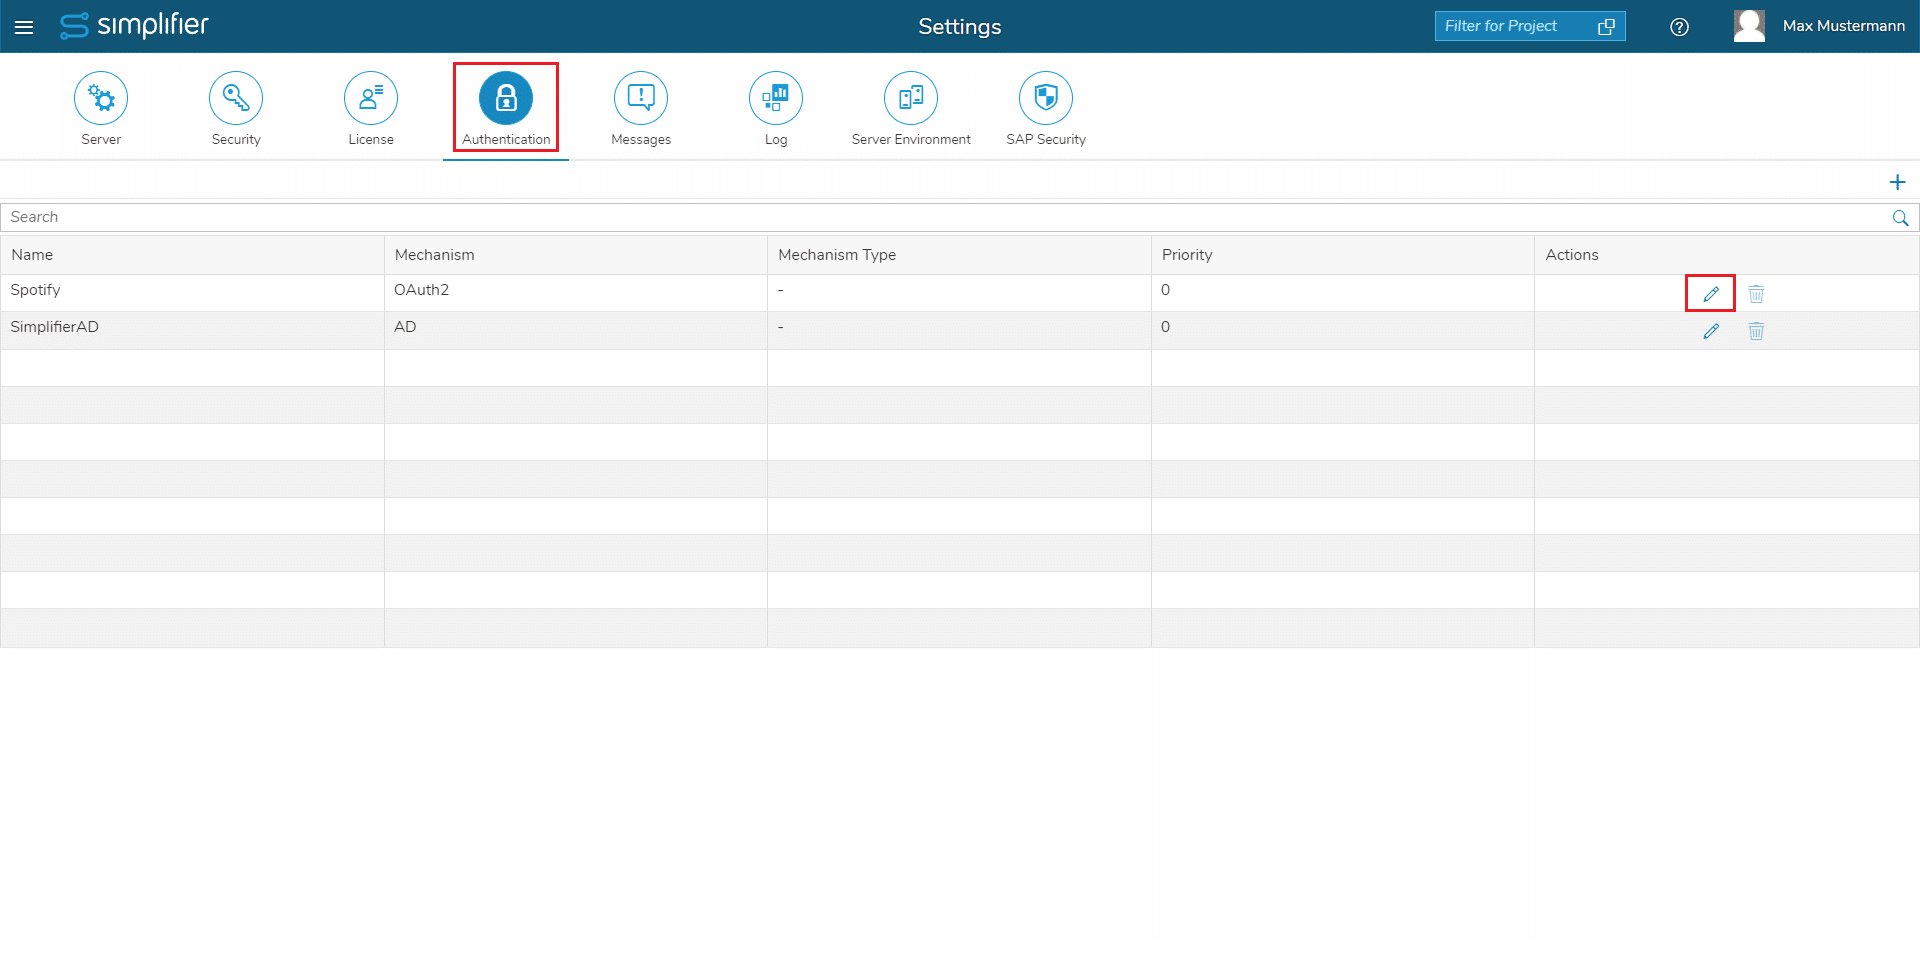
- In Simplifier navigate to “Settings” -> “Authentication”
- Click the “edit” icon for your authentication
- Go to the “Test” tab
- Press “Test profile extraction” and then “Copy to Clipboard”
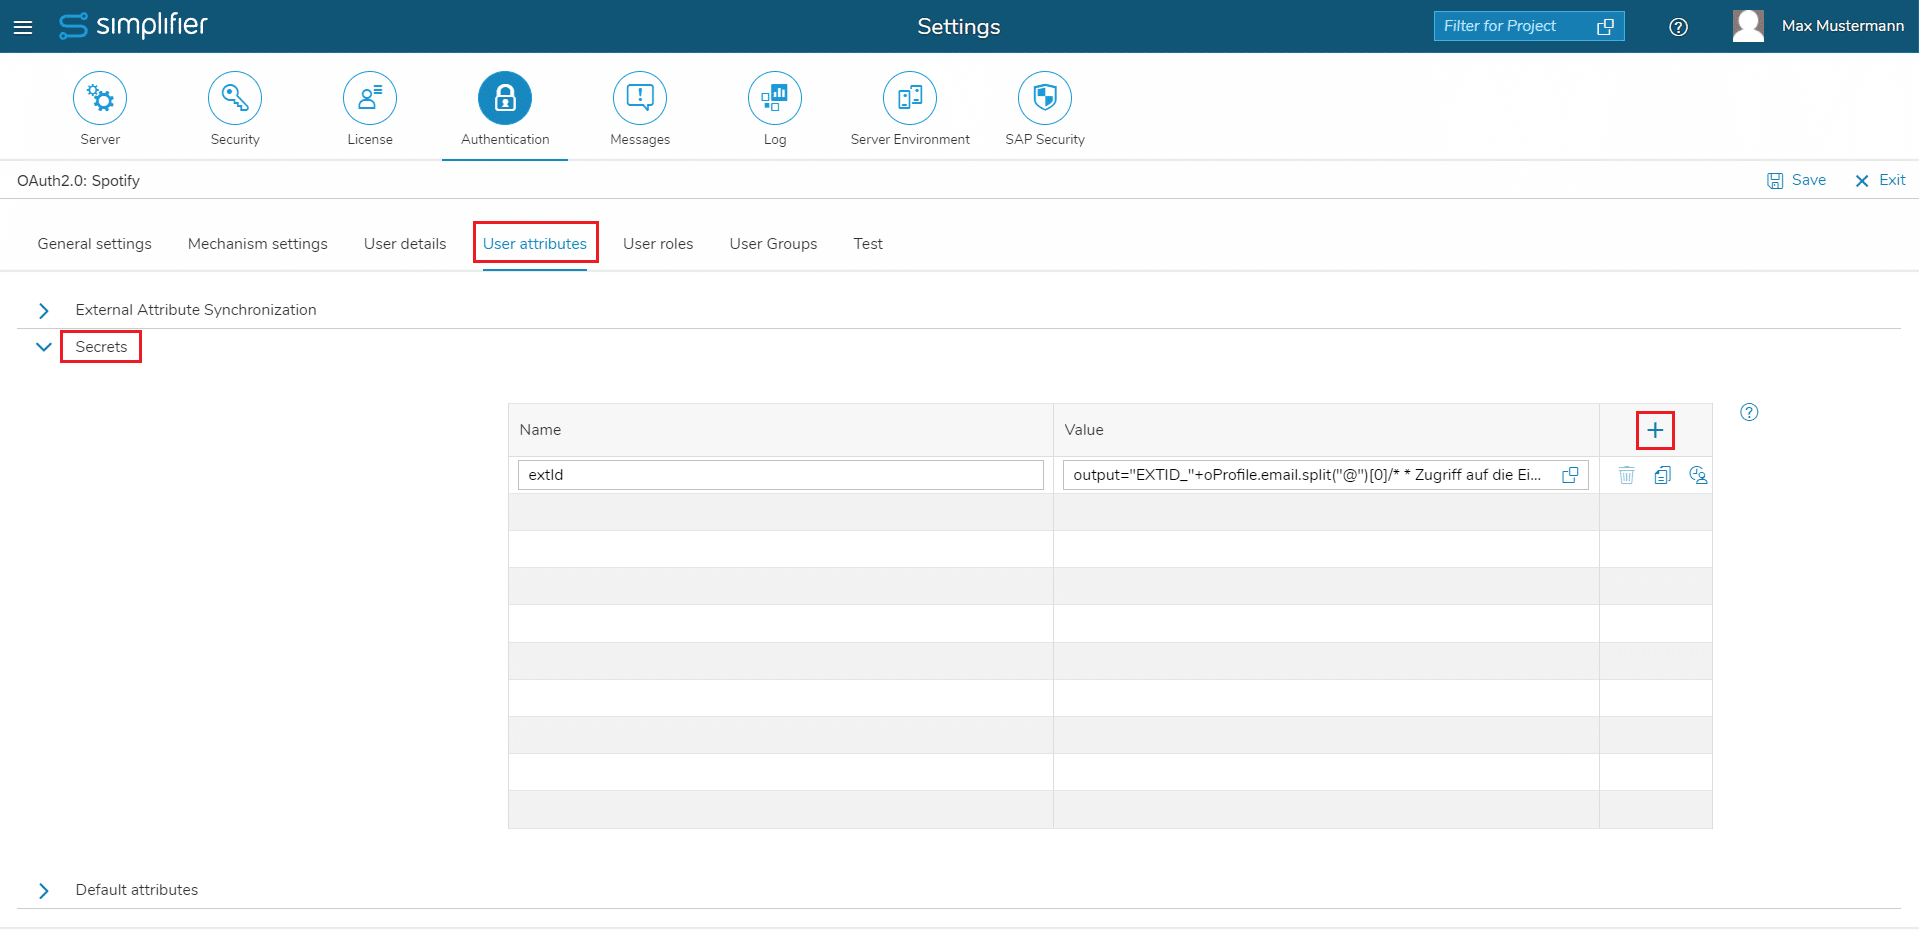
- Go to the “User attributes” tab and to the “Secrets” section
- Click the “+” symbol to create a new entry
- Name the entry for example “extId”
- Click onto the value input field to open the dialog “Extraction of secret User Attributes”
- Paste the copied profile into the left column (this is used as test data – each user’s Secret will be evaluated based on his profile)
- In the middle column enter JavaScript code, that generates an extId value from the profile
- The object “oProfile” gives you access to the user profile of the Identity Provider
- The result needs to be assigned to the variable “output”
- e.g. the JavaScript Code output=’EXTID_’+oProfile.email.split(‘@’)[0]
would create the example ExtID “EXTID_max.mustermann” - Click “Test” to test your code – the result is shown in the right column
- Close the dialog
- Press “Save” in the top right corner of the page
Create a Login Method, that uses the ExtID
To use the configured ExtID in a connector (RFC, SOAP or oData) you will need a new Login Method. Have a look at the Login Method documentation (please follow the link to see the creation of an Login Method, to be used with ExtID), how such a Login Method should be configured.
Note about the SAP-System
For the SAP-System to be used with the connector, you have to take care especially about the details on the “Network” tab:
- The switch “SNC Mode Active” needs to be activeted, which ensures, that the connector calls to SAP are secured.
- The “SNC Own Name” can usually be left empty. Only in case have manually created several PSE Keystores and need to address one of them (this is beyond of this documentation).
- The “SNC Partner” needs to be the same as in the certificate, that you have exported from SAP. You can lookup the name from “Settings” -> “SAP Security” -> “PSE File” and then select the entry of the SAP certificate (usually the second entry) and have a look at the “subject” – there you can find a string like “CN=MySapSystem” – and this string should be used as the “SNC Partner”.
- The “SNC-SSO” switch needs to be activated. See screenshot below.
- Choose the apropriate value for “SNC Quality of protection” – usually you can keep the default value – in doubt get in contact with your SAP administrator.
Use the Login Method with a Connector
The SAP-Logon Login Method with External Identification can now be used with every oData, SOAP or RFC connector, that requires a SAP SSO Token of the SAP System, which you have chosen in the Login Method.
To test the whole scenario, you can either create a new connector or copy e.g. an existing RFC connector. (This can be done in Simplifier at “Connectors” – see also this documentation)
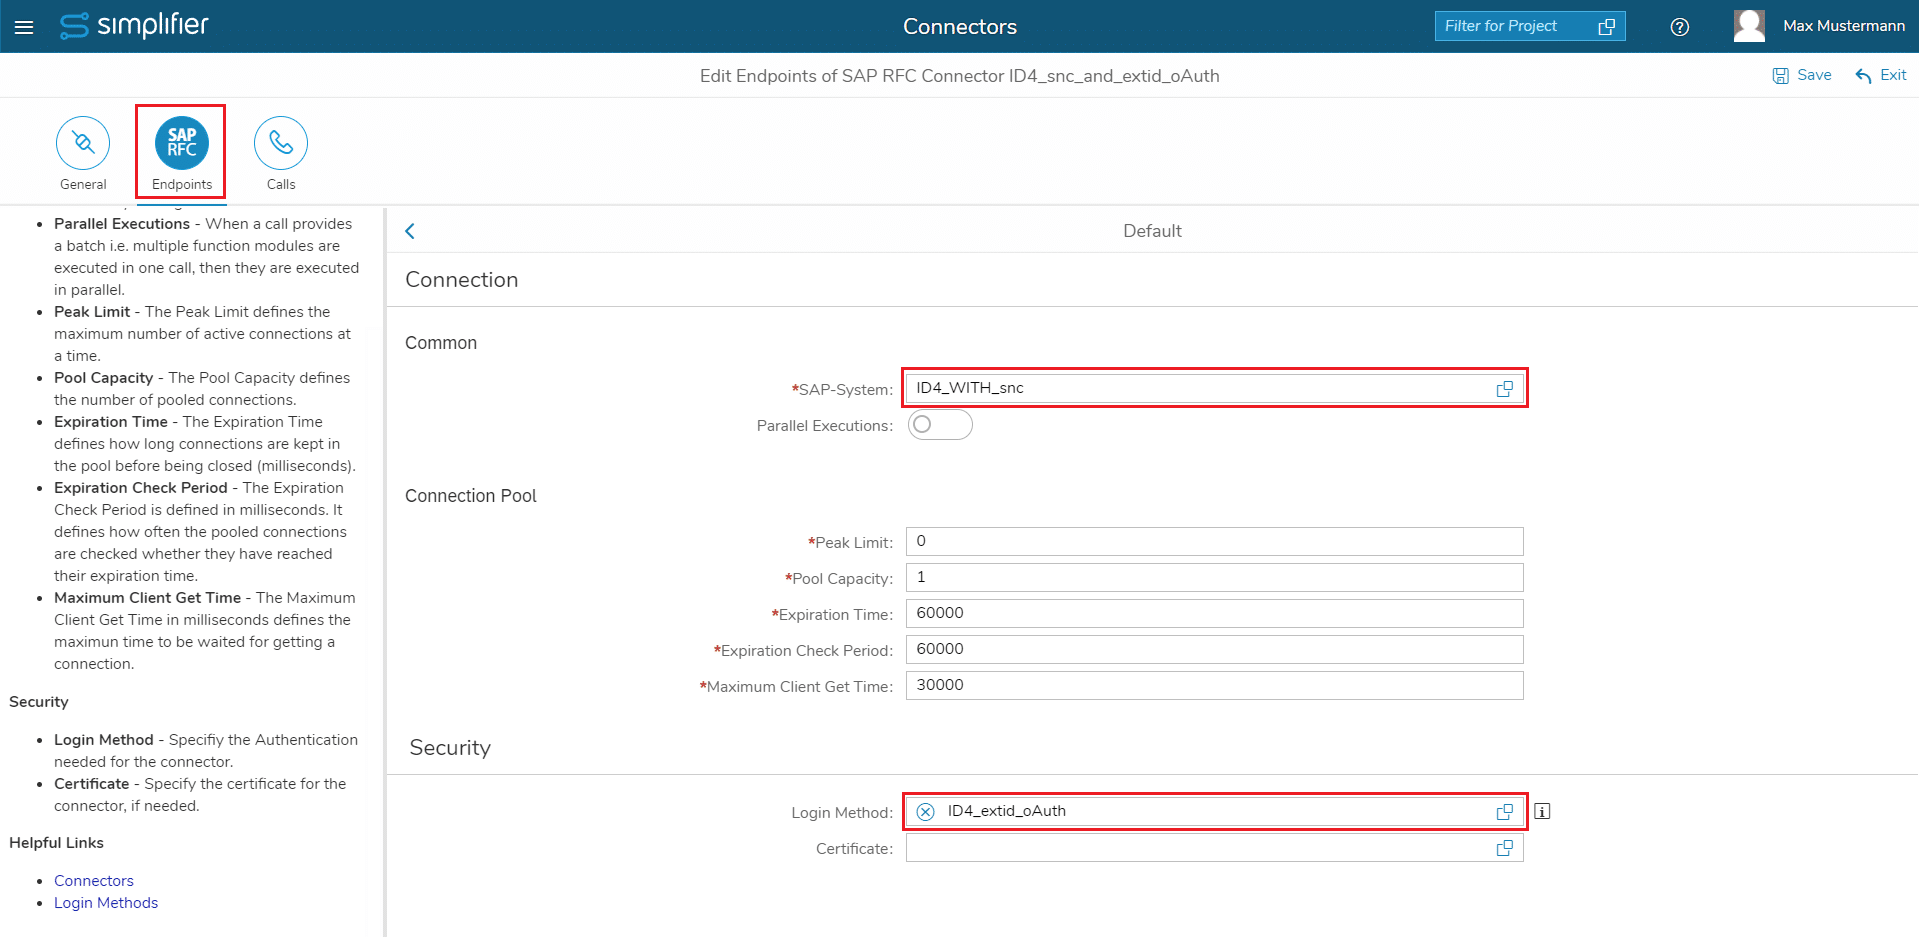
Edit the connector and select the “Endpoints” tab. Select the endpoint, that you want to use.
- As SAP-System you usually have the same SAP System, that you also selected for the Login Method (exception might be, if you have several SAP Systems and all accept the same SAP SSO Tokens)
- As Login Method choose the Login Method, that you have created in the upper step
- Click the “Save” button in the upper right corner
- Click the “Calls” tab, choose a Connector Call and click “Test Connectorcall” (for details have a look here)
- If you encounter any errors, please refer to the “Troubleshoot SNC SSO” page.
