What is Principal Propagation?
With Principal Propagation you have the possibility to propagate the logged in user from SAP BTP to an App, that you have created with Simplifier.
The following steps are needed to use Principal Propagation in your App:
- If you want to use a Corporate Identity Provider (e.g. Microsoft EntraID) you have to establish trust between IAS and the Corporate Identity Provider
- IAS (SAP Cloud Identity Services) needs to trust BTP and vice versa
- You need to setup IAS as an oAuth Authentication Provider in Simplifier
- Your App needs to use the LoginAction for oAuth2.0 with the new parameter UsePrincipalPropagation set to true
- You need to prepare your App for deploying to BTP and Principal Propagation
Do I need the SAP Cloud Connector?
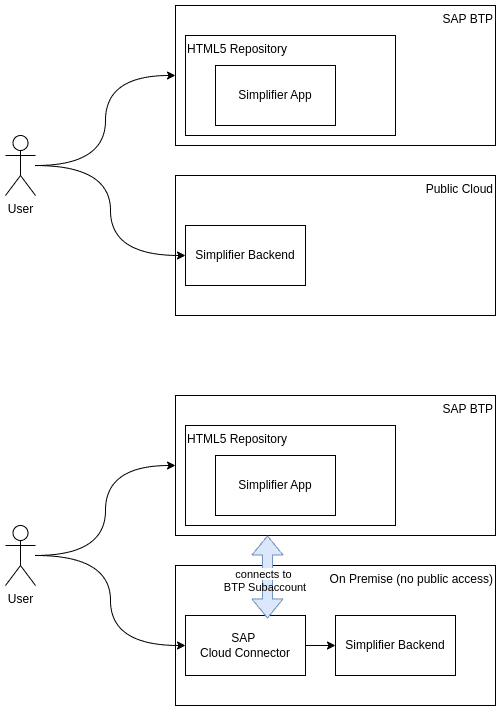
Depending on how Simplifier is deployed, you will need to use SAP Cloud Connector in order to utilize the Apps, which you have created with Simplifier, on SAP BTP.
- If Simplifier is not publicly reachable, then you will need to use SAP Cloud Connect
- If Simplifier can be accessed from anywhere on the Internet, then you will not need to use SAP Cloud Connect
See the diagram below for two examples.
If you are already using SAP BTP with IAS and a Corporate Identity Provider, you might have already established trust between SAP Cloud Identity Services and your Corporate Identity Provider (e.g. Microsoft EntraID) – please read through this chapter anyway, to be sure that everything is setup properly.
Setup Corporate Identity Provider
This documentation establishes trust between a Microsoft EntraID and SAP Cloud Identity Services. For other Corporate Identity Providers than EntraID, please consult their documentation.
In EntraID you have to add SAP Cloud Identity Services as an Enterprise Application. In SAP Cloud Identity Services you have to add EntraID as a Corporate Identity Provider. Please follow these instructions to set this up: https://learn.microsoft.com/en-us/entra/identity/saas-apps/sap-hana-cloud-platform-identity-authentication-tutorial
In order that email, name and groups of the user are transferred correctly from EntraID to BTP, we need to adapt the Claims & Attributes with these steps:
- In EntraID go to your newly created Enterprise Application (e.g. named SAP Cloud Identity Services for BTP)
- Choose “Manage”
- Choose “Single sign-on”
- Choose “SAML”
- Choose “Attributes & Claims”
- In the end we need the Attributes and Claims like shown in the lower screenshot
- It is important that the claim names are correct (groups, email, given_name, family_name) and without a namespace (this applies for any Corporate Identity Provider – not only for EntraID)
If you are already using SAP BTP, you might have already established trust between SAP Cloud Identity Service and SAP BTP – please read through this chapter anyway, to be sure that everything is set up properly.
Setup IAS and BTP
Follow this tutorial, how trust can be established between SAP Cloud Identity Services and your SAP BTP Subaccount:
https://developers.sap.com/tutorials/abap-custom-ui-trust-cf..html
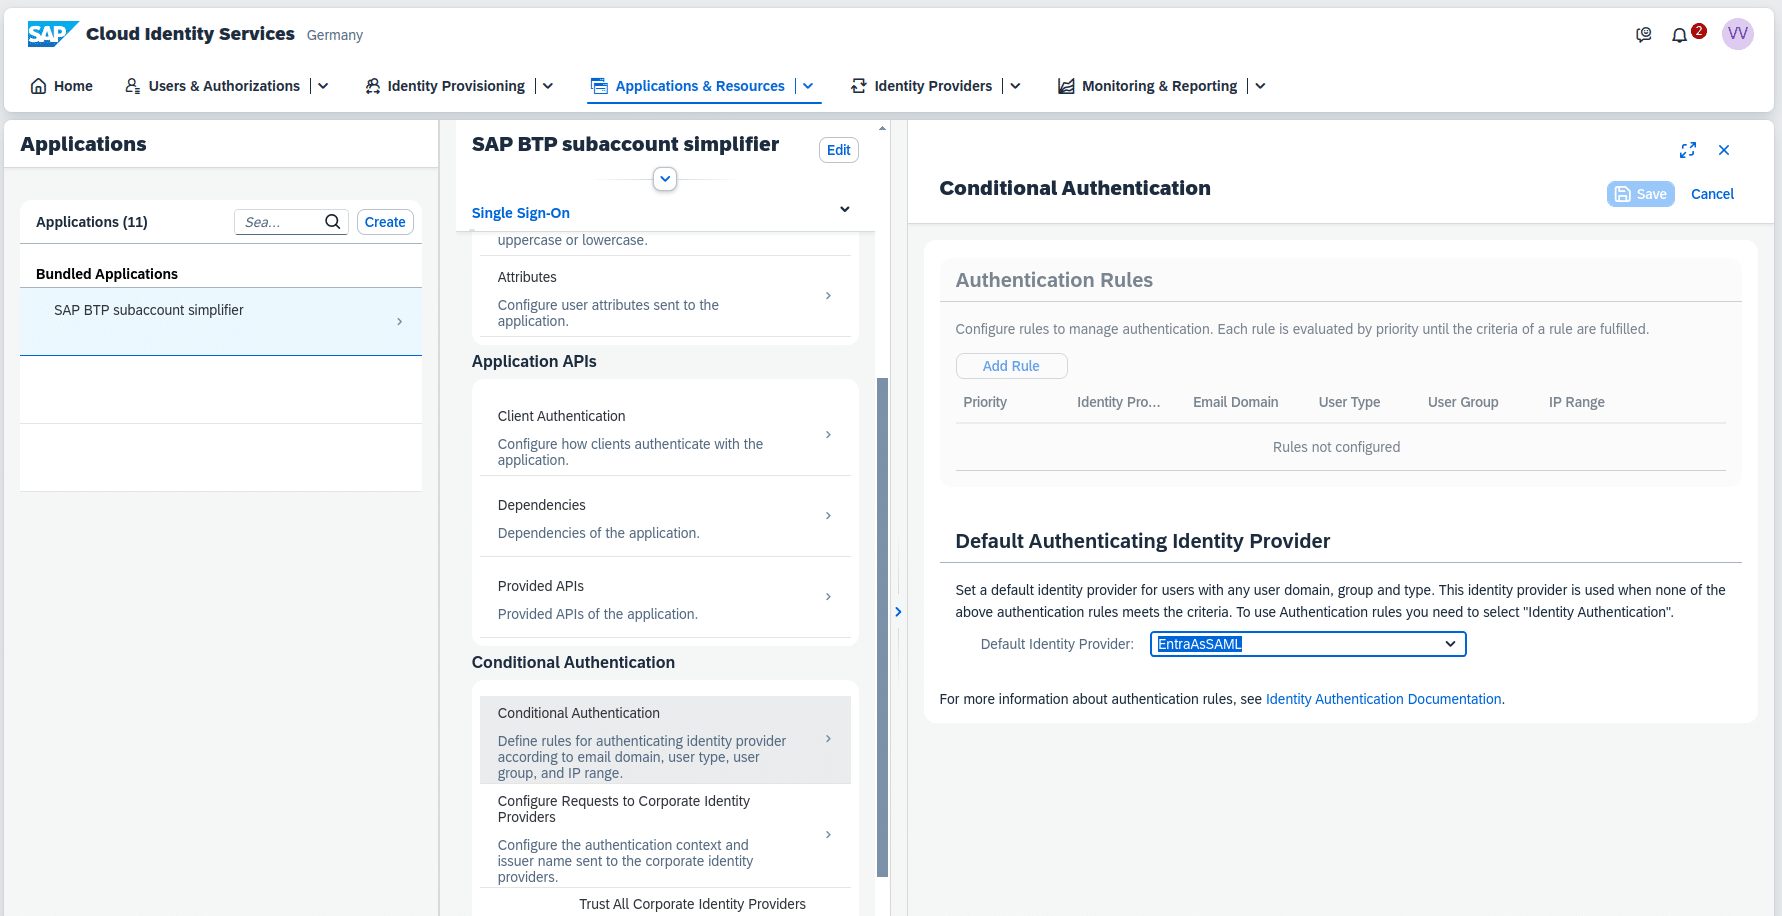
Now in SAP Cloud Identity Services you have a new application e.g. called “SAP BTP subaccout”. For this Application you have to go to “Conditional Authentication” and in the section “Default Authenticating Identity Provider” choose the formerly established Corporate Identity Provider (in our case EntraID) as Default Identity Provider.
Setup SAP Cloud Identity Service as oAuth in Simplifier
Please follow this documentation: https://community.simplifier.io/doc/installation-instructions/setup-external-identity-provider/configure-btp-identity-services-via-openid-connect/
Probably you already have a SAP Cloud Identity Services subscription, so you can skip the first step.
The next steps are:
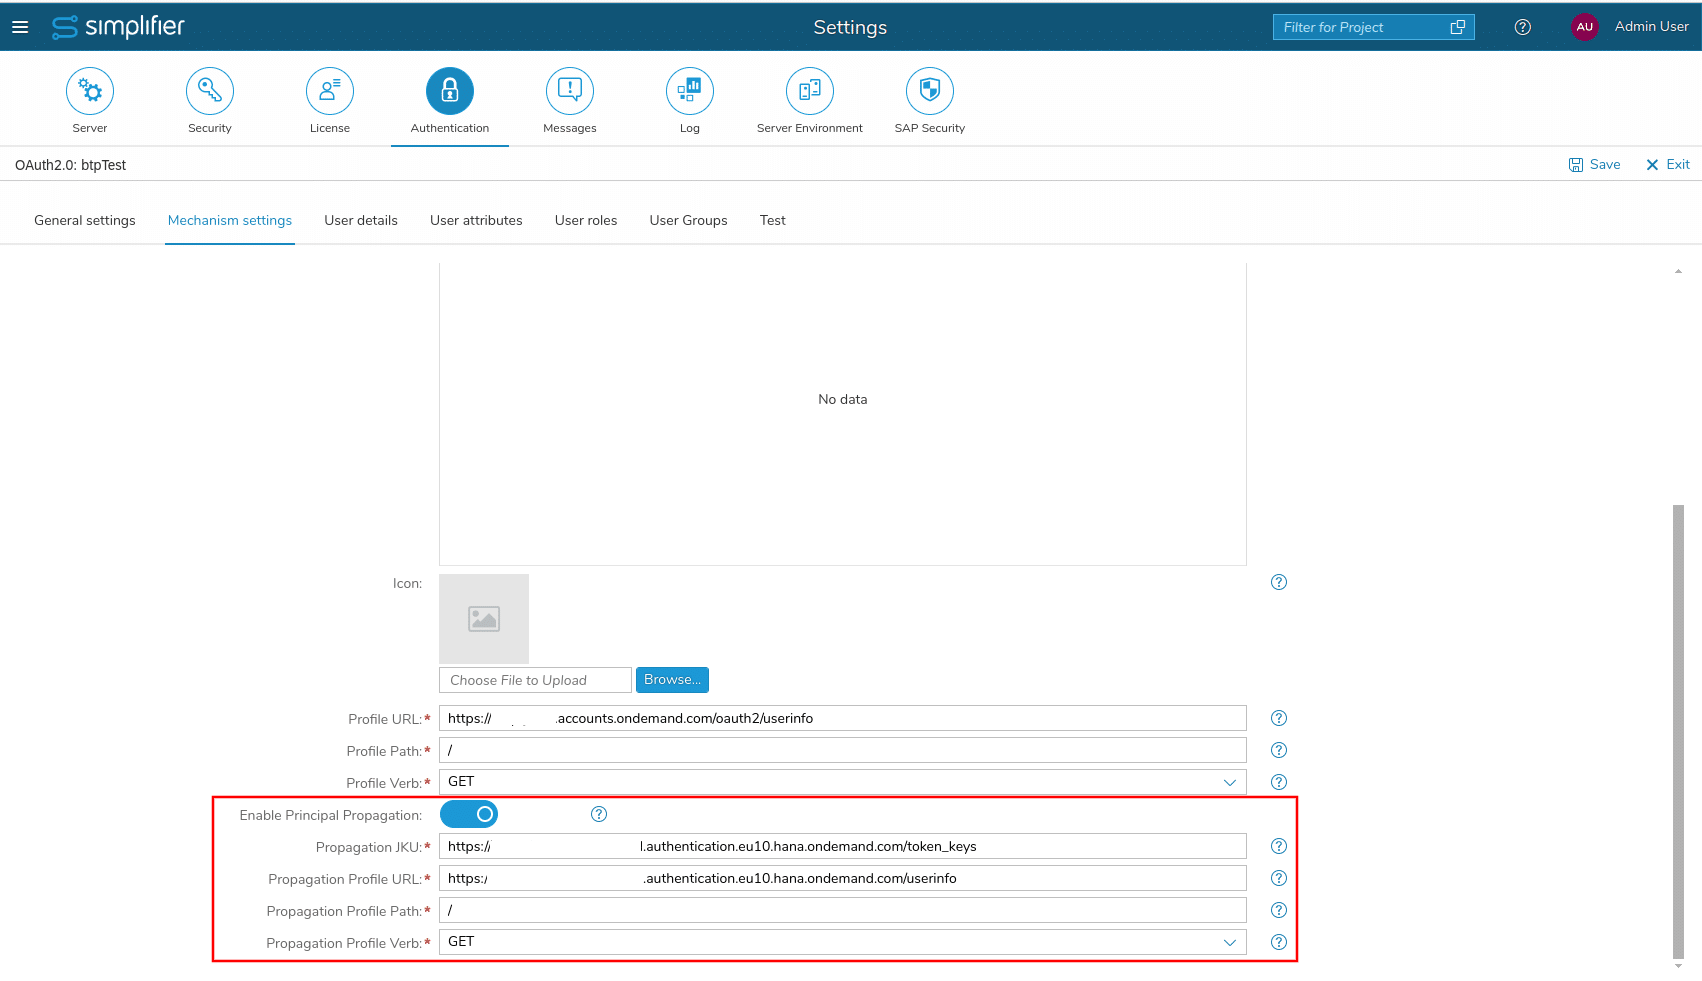
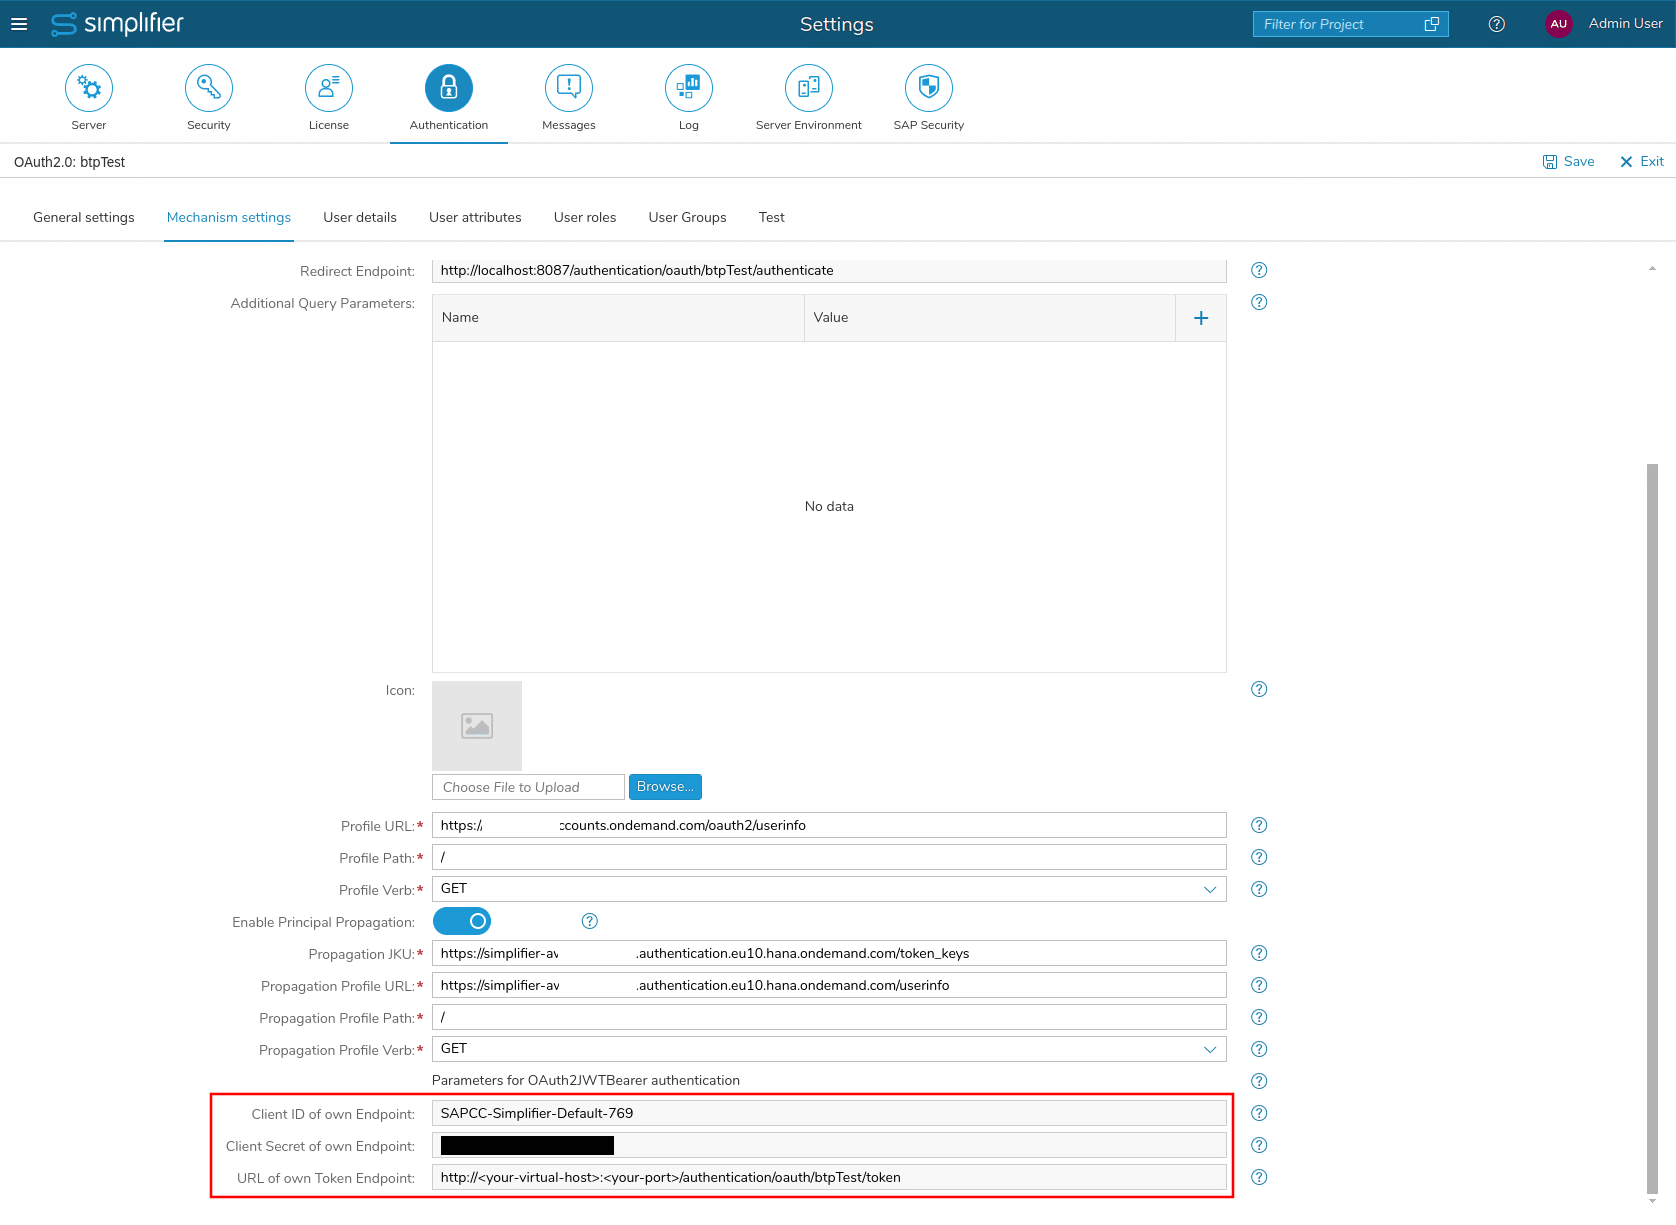
- Stay in the Simplifier Settings for Authentication and in “Mechanism settings” of “sapbtp” enable the switch for Principal Propagation
- Next, we need to look up the domain name, that is used for principal propagation.
- In SAP Cloud Identity Services go to
- Applications & Resources
- Select the application, that has been created for the SAP BTP subaccount (something with “XSUAA_…”)
- Select it’s “OpenID Connect Configuration”
- As “Redirect URI” there should be something like “https://<YOUR_INSTANCE>.authentication.eu10.hana.ondemand.com/login/callback/sap.custom” and “https://<YOUR_INSTANCE>.authentication.eu10.hana.ondemand.com” is the URL we are looking for.
- In SAP Cloud Identity Services go to
- Now switch back to the Simplifier Settings for Authentication and in “Mechanism settings” of “sapbtp”
- As “Propagation JKU” fill in: “https://<YOUR_INSTANCE>.authentication.eu10.hana.ondemand.com/token_keys”
- As “Propagation Profile URL” fill in: “https://<YOUR_INSTANCE>.authentication.eu10.hana.ondemand.com/userinfo”
- “Propagation Profile Path” and “Propagation Profile Verb” should stay with the defaults “/” and “GET”
Mapping User Details and Groups
- Go to the subtab “User Details”
- Fill in:
- First Name: “given_name”
- Last Name: “family_name”
- E-Mail Address: “email”
- Go to the subtab “User Groups”
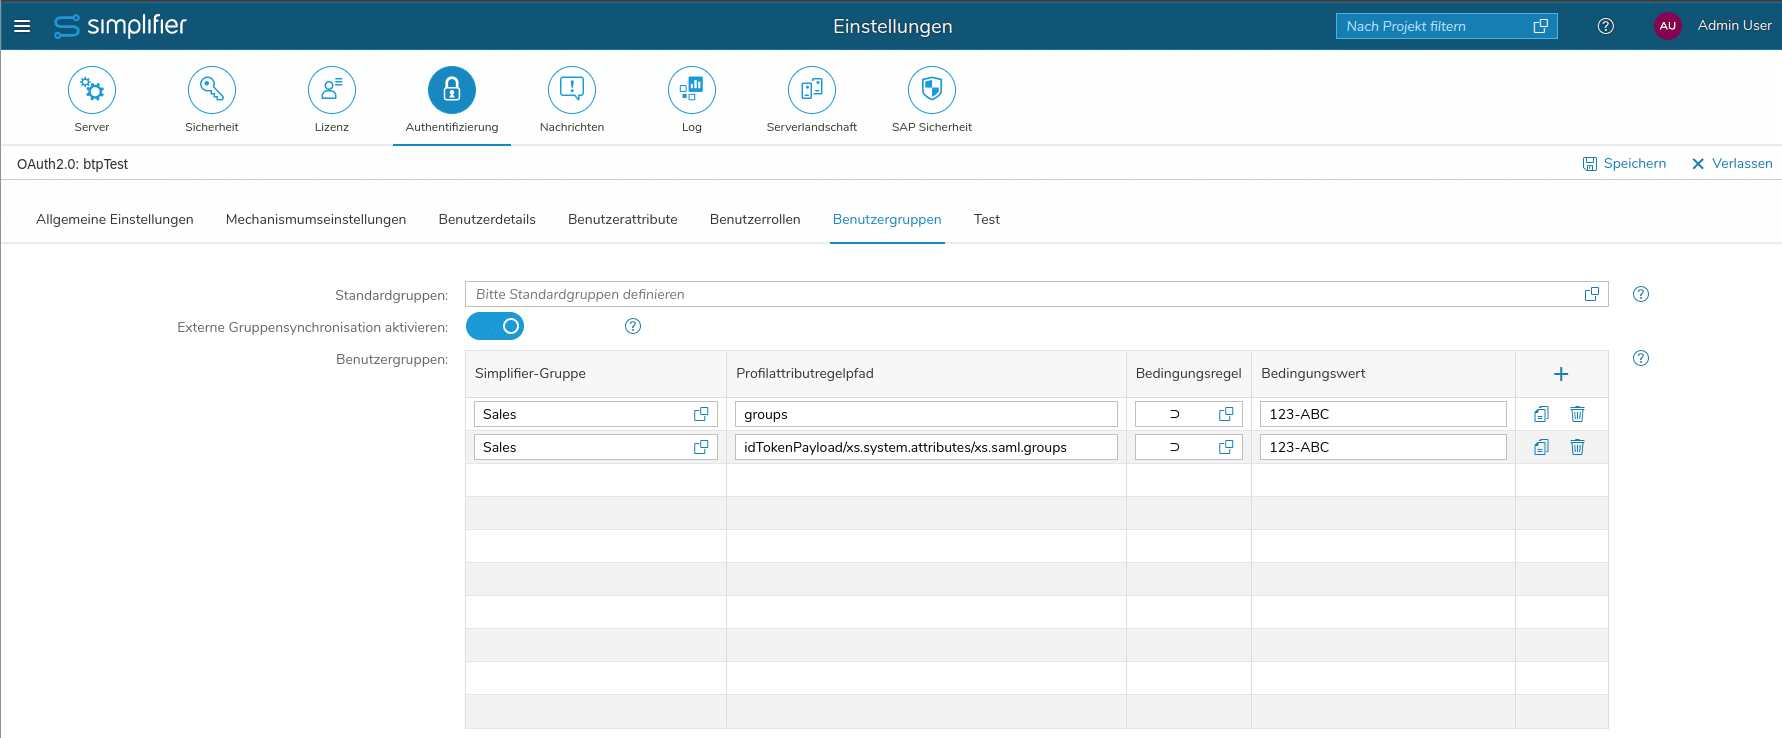
- Depending on whether the user logs into the Simplifier Admin UI via oAuth (case 1) or via a Simplifier App from BTP via Principal Propagation (case 2) the groups need to be mapped from different paths from the extracted user profile. So for each group, that we want to use in a mapping, we need to create two entries – here is one example:
- We want to map the group with the ID “123-ABC” to the “Sales” group defined in Simplifier
- Fill in the two rules for “Sales” like in the screenshot
Create App
An App, that makes use of Principle Propagation needs to use the Login Action with the prepared oAuth Authentication Provider. Here is an example, how to do that:
- You are editing your App in the Simplifier Admin UI
- In the Process Designer create a story and name it “Login”
- From the left icon bar pull in the shape to subscribe an event
- choose e.g. “Screen Events” -> “onBeforeFirstShow” of the first screen, that appears in your app
- From the left icon bar pull in the shape to “Server Action”
- connect both shapes
- Select again the “Login Action” shape and choose “oAuth 2.0” in the right details view
- Double click the “Login Action” shape and pull in all parameters from the right
- set the “Service” to the name of the created oAuth Authentication Provider for which we have enabled Principal Propagation – in our case it’s “sapbtp”
- set “UsePrinciplePropagation” to true
- click “Apply”
- You should also connect the output points of the shape “Success”, “Already logged in” and “Error” like for any other “Login Action”
Setup SAP Cloud Connector
You will only need to setup SAP Cloud Connector, in case your Simplifier is not accessible from the Internet.
After SAP Cloud Connector is installed and you can log into the Cloud Connector, you can connect SAPCC (SAP Cloud Connector) to SAP BTP.
Log into the SAP BTP Cockpit and go into your subaccount. Choose “Connectivity” and click “Cloud Connectors”. Here you can “Download Authentication Data”.
After that, log on into SAPCC. Click onto “+ Add Subaccount” and choose “Configure using authentication data from file”. Follow the steps until the subaccount is connected to the SAPCC.
Add System Mapping:
Now select the connected subaccount in SAPCC and click onto “Cloud to On-Premise”. On the tab “ACCESS CONTROL” add a new system mapping.
- Step
- Back-end Type: choose “Non-SAP System”
- Step
- Protocol: HTTP
- Step
- Internal Host: choose the name of the host, under which the SAPCC can reach the Simplifier Backend
- Internal Port: choose the port, under which the SAPCC can reach the Simplifier Backend
- Step
- Step
- Remove the check for “Allow Principal Propagation” (because we will use a different type of Principal Propagation)
- Step
- Choose to “Use Virtual Host” as the Host in the Request Header
- Step
- Give a description, if you want to
- Step
- Finish the system mapping
Add resource:
Next we have to add a resource for the mapped system. After clicking the “+”, please add this data:
- URL Path should be “/”
- “Active” should be checked
- “Websocket” should be checked
- “Access Policy” should be “Path and all Sub-Paths”
The complete result can now look like this:
Prepare App for BTP and Principal Propagation
Follow the steps described in the general documentation how to deploy a Simplifier App to BTP – after Step 7, see additional information lower here:
Follow these additional steps:
In case you don’t use SAP Cloud Connector
-
- in xs-app.json
{
  "authenticationType": "none",
  "csrfProtection": false,
  "source": "^/authentication/oauth/<PROVIDER>/propagation(.*)$",
  "destination": "SharedInstancePropagateToken"
}
-
- Attention: The order of the entries in xs-app.json is important! The added entry needs to be before the catch-all-entry with the “source”: “^(.*)$”. Otherwise you will notice a 404-error “file not found” when trying to login via Principal Propagation.
- Fill the variable:
- <PROVIDER>: the name of the Authentication Provider, that you have configured in Simplifier – e.g. “sapbtp”
In case you work with SAP Cloud Connector
- After “Step 7” we have to modify an existing destination:
- in destination.json
Change the SharedInstance accordingly to the following
- in destination.json
{
    "Name": "SharedInstance",
    "Description": "",
    "Authentication": "NoAuthentication",
    "ProxyType": "OnPremise",
    "Type": "HTTP",
    "URL": "http://<VIRTUAL_HOST>:<VIRTUAL_PORT>",
    "HTML5.DynamicDestination": true,
    "tokenServiceURLType": "Dedicated",
    "CloudConnectorLocationId": "<CLOUD_CONNECTOR_LOCATION_ID>"
}
- and we have to change the SharedInstancePropagateToken destination:
- in destination.json
{
    "Name": "SharedInstancePropagateToken",
    "Description": "",
    "Authentication": "OAuth2JWTBearer",
    "ProxyType": "OnPremise",
    "Type": "HTTP",
    "URL": "http://<VIRTUAL_HOST>:<VIRTUAL_PORT>",
    "tokenServiceURL": "http://<virtual-host>:<virtual-port>/authentication/oauth/<PROVIDER>/token",
    "tokenServiceURLType": "Dedicated",
    "clientSecret": "<OWN_CLIENT_SECRET>",
    "clientId": "<OWN_CLIENT_ID>",
    "HTML5.DynamicDestination": true,
    "CloudConnectorLocationId": "<CLOUD_CONNECTOR_LOCATION_ID>"
}
-
- in xs-app.json
{
  "authenticationType": "none",
  "csrfProtection": false,
  "source": "^/authentication/oauth/<PROVIDER>/propagation(.*)$",
  "destination": "SharedInstancePropagateToken"
}
-
- Attention: The order of the entries in xs-app.json is important! The added entry needs to be before the catch-all-entry with the “source”: “^(.*)$”. Otherwise you will notice a 404-error “file not found” when trying to login via Principal Propagation.
- Attention: It is important to set every url with http and not with https eaven the url is different configured in the SAP Cloud Connector
- Fill the variables:
- <VIRTUAL_HOST> and <VIRTUAL_PORT> are the values, that you have defined in SAP Cloud Connector
- <PROVIDER>: the name of the Authentication Provider, that you have configured in Simplifier – e.g. “sapbtp”
- <CLOUD_CONNECTOR_LOCATION_ID>: if you have defined a LocationId for your SAPCC
- <OWN_CLIENT_ID> and <OWN_CLIENT_SECRET> can be looked up from the Authentication Provider in Simplifier – see screenshot below
Hints common for both cases (with and without SAPCC)
- Hint for “Step 8” – if “cf login” isn’t working for you, you can also try “cf login –sso“
- The API endpoint, that is required in “Step 8“, can be looked up in the “Overview” -> “General” -> “Cloud Foundry Environment” of your subaccount in here: https://emea.cockpit.btp.cloud.sap/cockpit/

