• Resources
    • Documentation
    • Knowledge Base
    • Forum
    • Courses
    • Webinars
    • FAQ
    • Changelog
    • Blog
    • Swag Shop
  • Marketplace
  • Start for Free
  • Login
  • Resources
    • Documentation
    • Knowledge Base
    • Forum
    • Courses
    • Webinars
    • FAQ
    • Changelog
    • Blog
    • Swag Shop
  • Marketplace
  • Start for Free
  • Login
home/Knowledge Base/Integrations

Use ContentRepository Plugin to handle Files from your Windows Share Volume

15 views 0 November 25, 2020 December 10, 2020 Verena

Precondition

This article uses Samba to connect via SMB networking protocol to a Windows File Share. SMB uses Port 445 by default, so check your firewall rules to allow connections between simplifier docker host and the windows volume.

Step 1 Prepare Content Repository Role

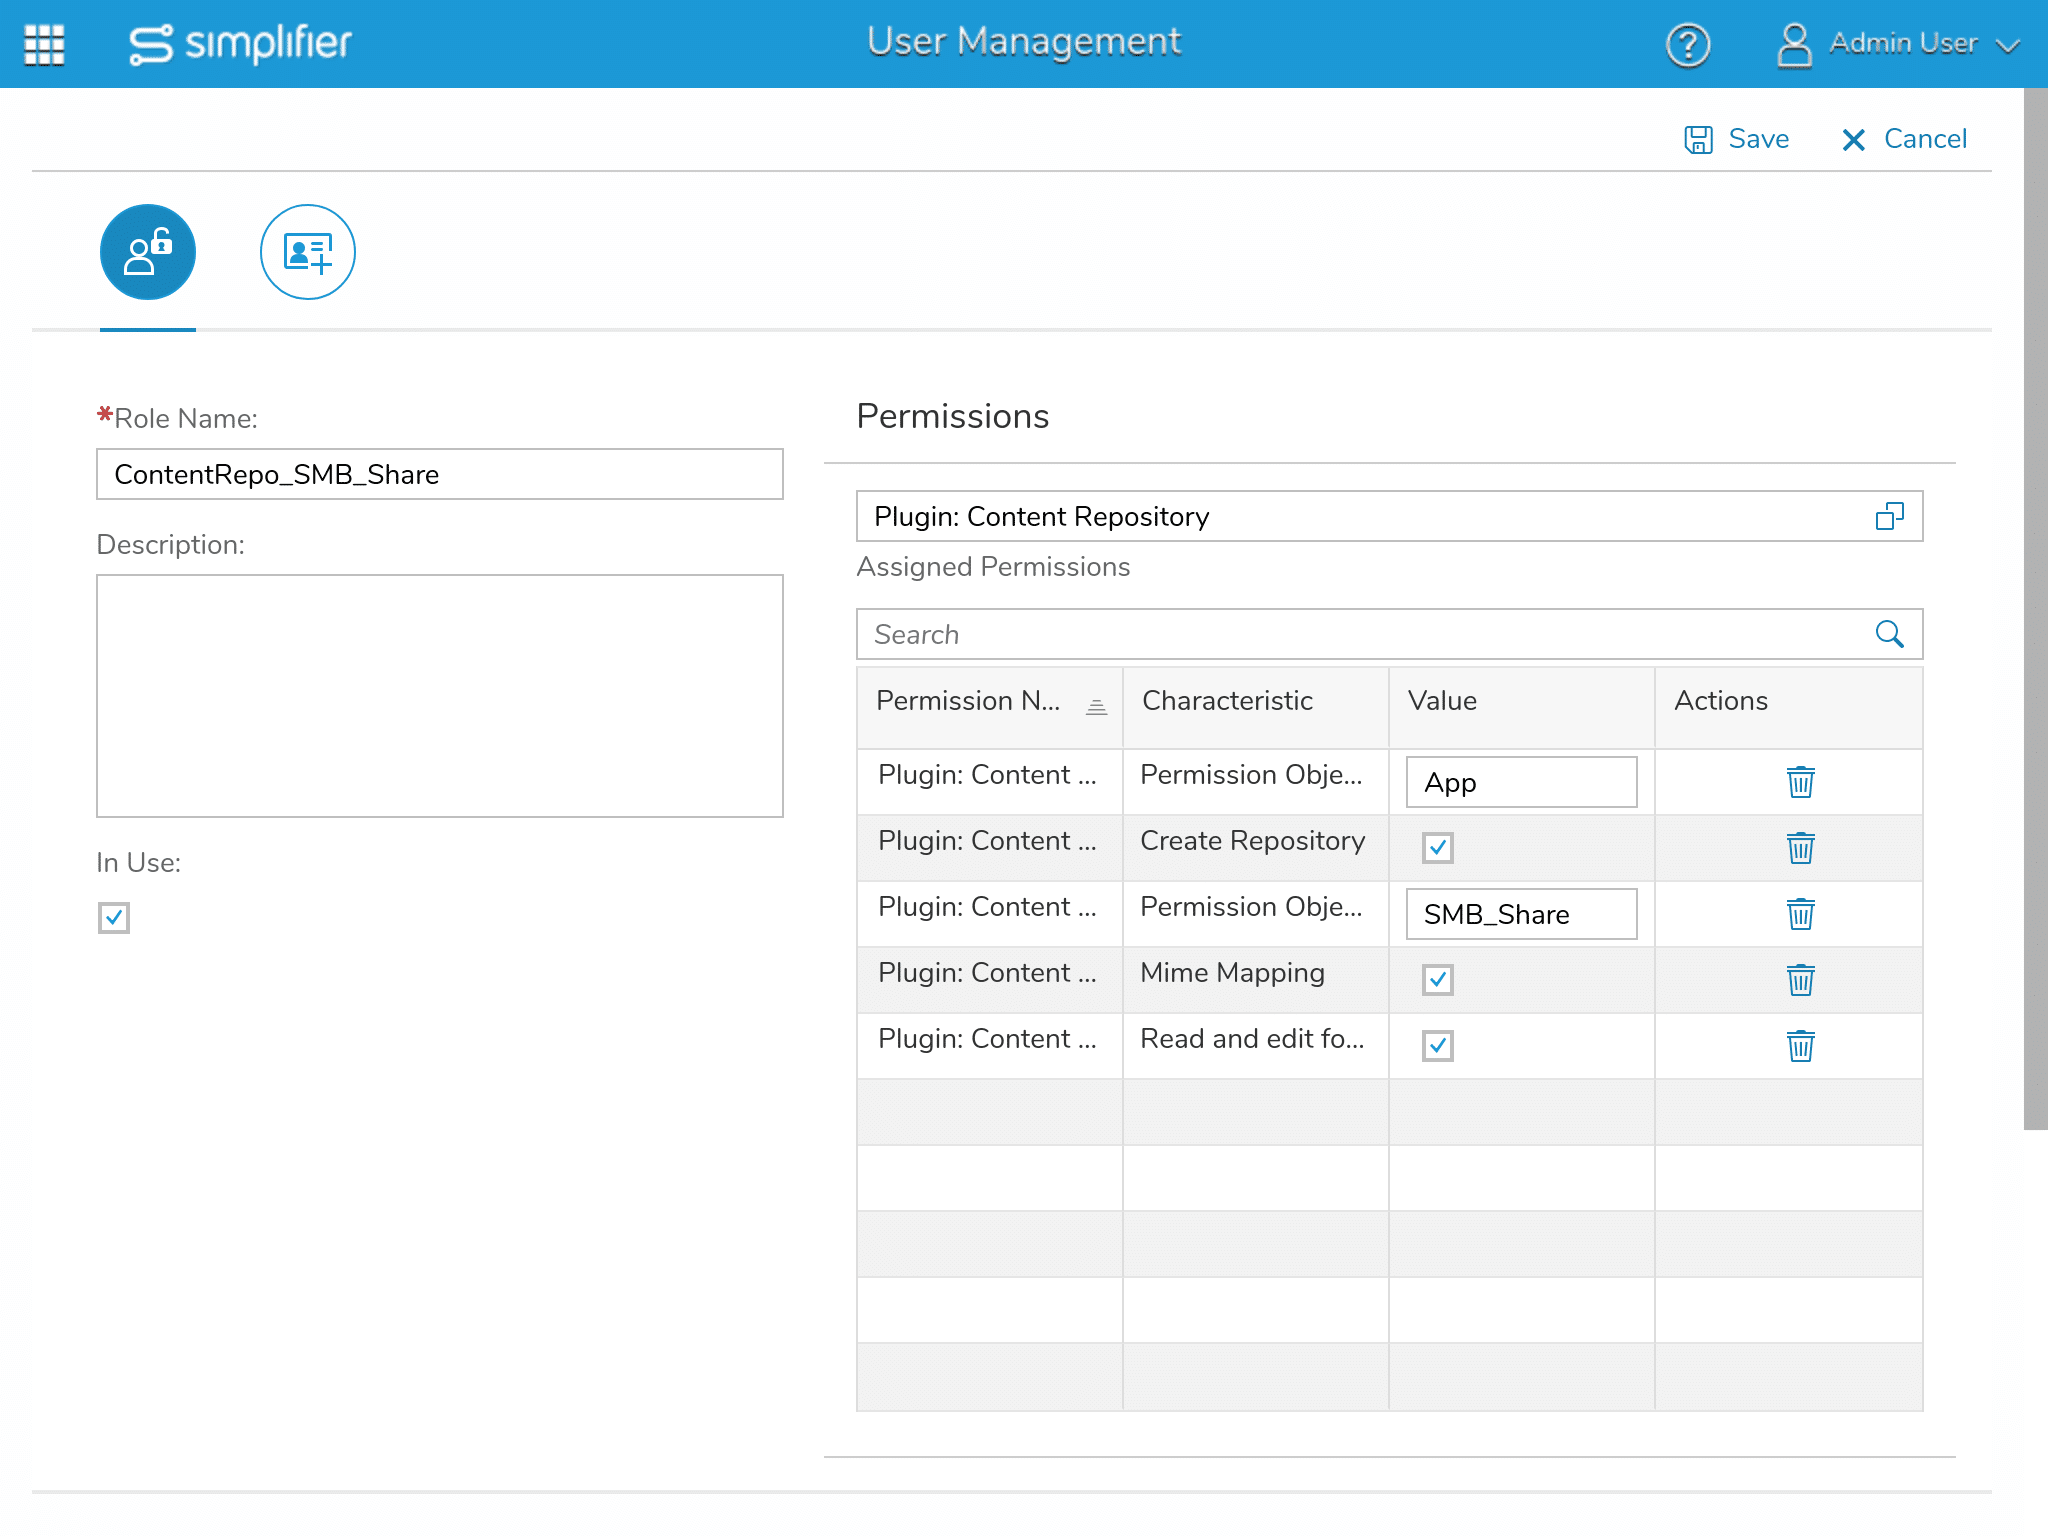
In the Simplifier Admin Interface, go to Users -> Roles and add a new Role. Enter “Plugin: Content Repository” in the “Add Permissions” input field and choose the “Plugin: Content Repository” entry.

For the characteristic “Permission Object ID”, enter a meaningful value. This value will be referenced in the next step (for this tutorial SMB_Share is used).

For the characteristic “Permission Object Type”, please leave the default value “App” untouched.

Give the role a meaningful name and save it.

Switch to the Users tab, search for your user and add the newly created role to your user and any other user who should be able to use this content repository. To do so this, double click on the user and enter the name of your role in the “Add Role” input field.

Step 2 Prepare Content Repository

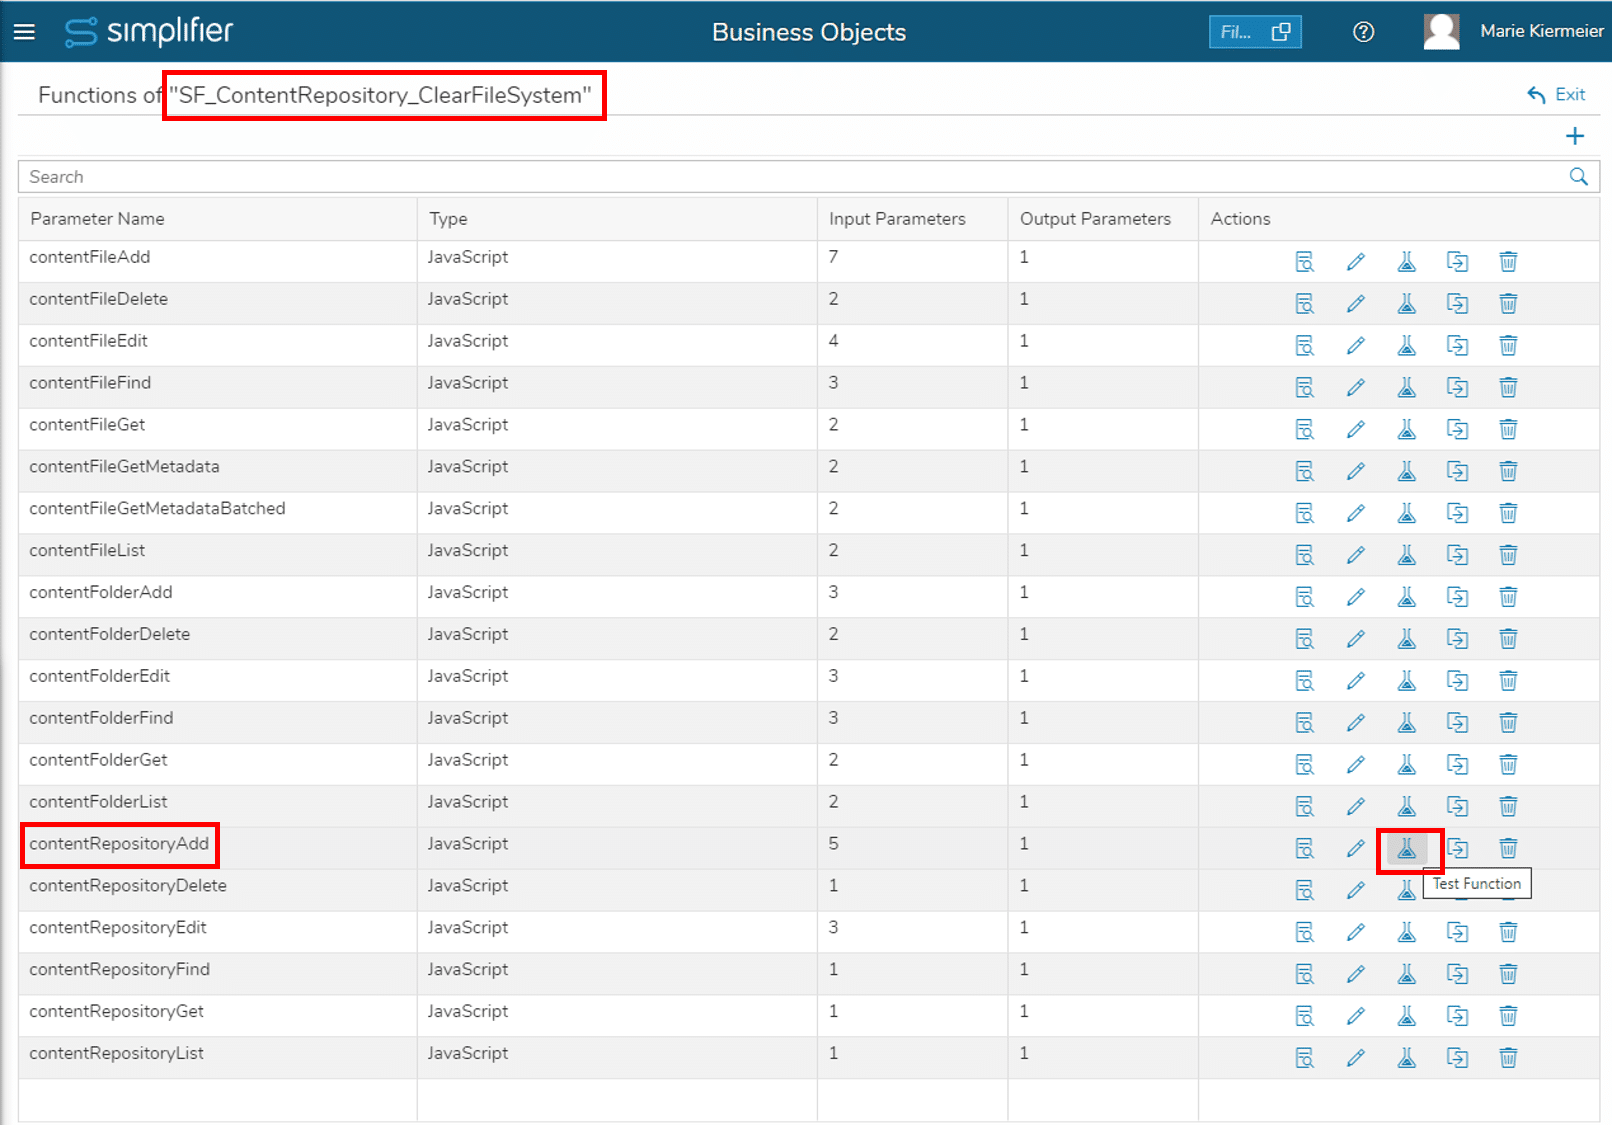
Create a new Server Side Business Object and add a reference to the contentRepoPlugin

Add a new Function and paste this code into the function body:

var repoName = "<Insert Name>";
var repoDescription = "<Insert Repo Description>";
var permissionObjectID = "<Insert Permission Object ID>"


var payloadClearFileSystem = {
  slot: "contentRepositoryAdd",
  payload: {
    "provider": "ClearFileSystem",
    "name": repoName,
    "description": repoDescription,
    "permissionObjectType": "App",
    "permissionObjectID": permissionObjectID
  }
};

var result = JSON.parse(PLUGIN_contentRepoPlugin.run(JSON.stringify(payloadClearFileSystem)));
output.result = result;

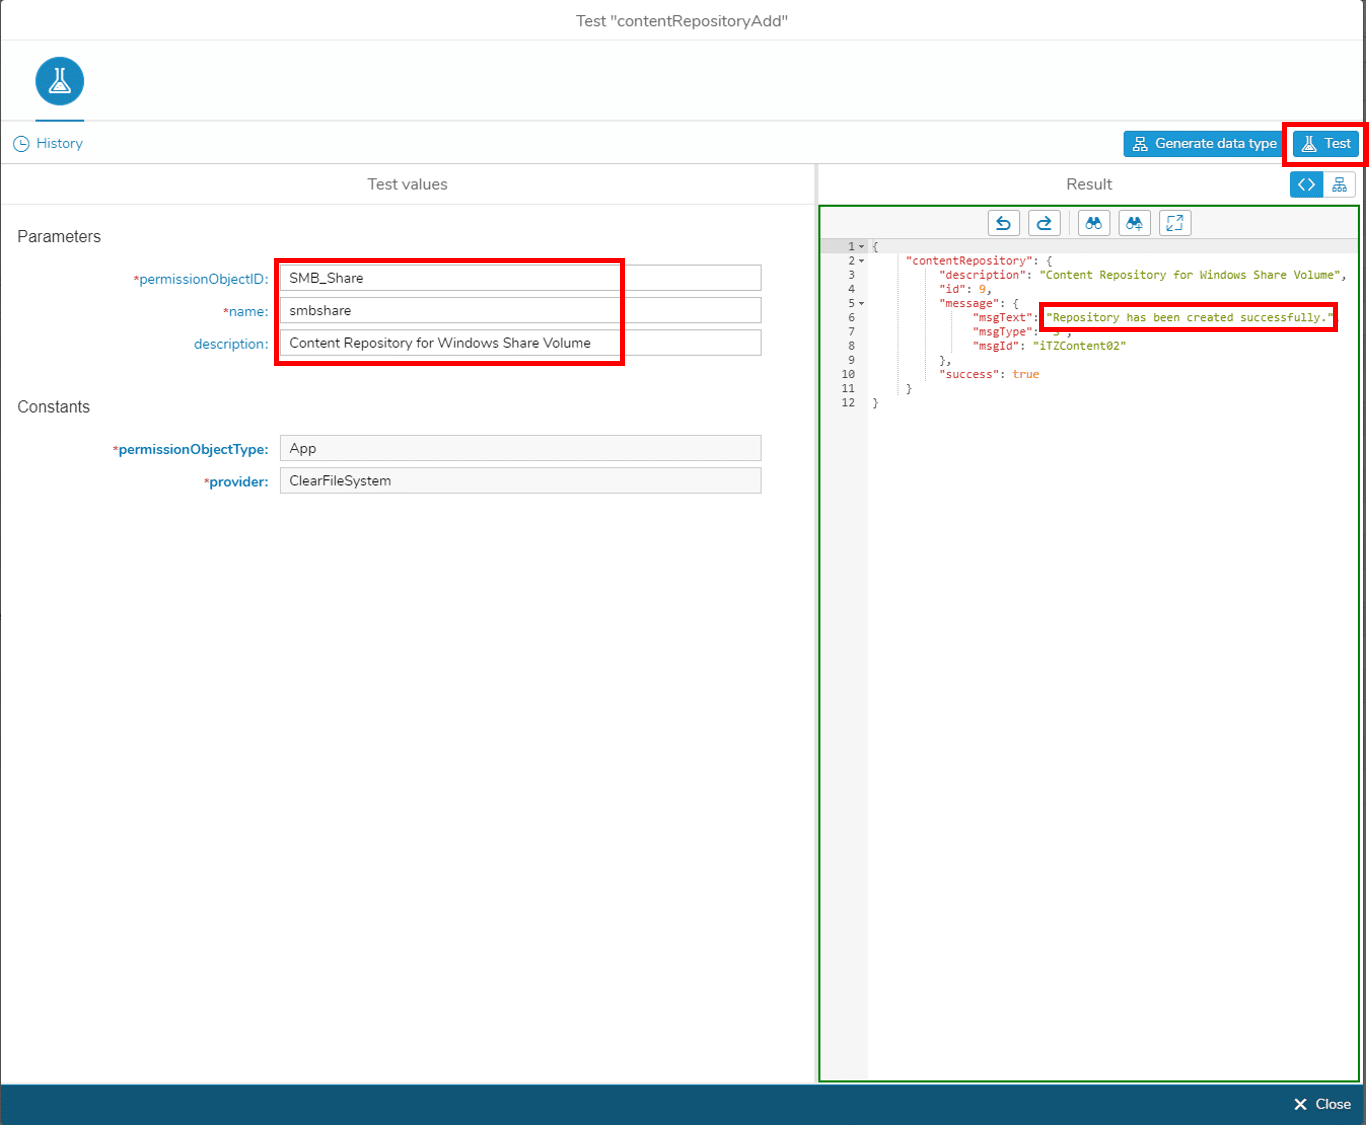
Replace the values of the three variables in the beginning of the script with your data:

repoName: The name of repository, which will also be used as root folder name in the file system. You should not have spaces or special characters in this name. For this tutorial,  “smbshare” is used.

repoDescription: A descriptive Text about this repository

permissionObjectID: insert the value of the permission object ID of step 1.

Switch to the tab Parameter and add an output parameter called result.

Cllick on “Save and Test” and then on the “Test” Button. A result should be shown containing a message like “Repository has been reated successfully.”:

This will create a new folder in the file system of the Simplifier host. Log into your Simplifier host via SSH and check:

ls /opt/simplifier/data/plugins/contentRepo

The output shows a folder named like the value you entered as “repoName”.

Step 3 Prepare Simplifier host

Login via SSH to your Simplifier host

3.1 Create a new directory

mkdir /mnt/smbshare

3.2 Prepare your Authentication Credentials

Create a new file .smbcredentials

vim /etc/samba/.smbcredentials

with the following settings:

username=windowsUser
password=windowsUserPasswort

Change the access right to this file to be read by root only.

chown root /etc/samba/.smbcredentials
chmod 0400 /etc/samba/.smbcredentials

3.3 Create fstab entry

vim /etc/fstab

add a line the following content and adapt the hostname to your setup

//host.windowsserver.com/share /mnt/smbshare cifs credentials=/etc/samba/.smbcredentials,uid=linuxuser,gid=linuxgroup 0 0

3.4 Test access to windows volume

mount /mnt/smbshare
ls /mnt /smbshare

should now show you the content of your Windows volumne

Step 4 Change Docker config

Last step is to make the smbshare available to the Docker file system. This is done by adding another volume parameter to the docker run command.

 -v /mnt/smbshare:/opt/simplifier/data/plugins/contentRepo/smbshare

In a typical setup the complete run command looks like:

docker run --name simpifier \ 
-v /opt/simplifier/data:/opt/simplifier/data \
-v /mnt/testfileserver:/opt/simplifier/data/plugins/contentRepo/RemoteRepo \
-p 80:80 -p 443:443 -p 8090:8090 \
-d simplifierag/onpremise:latest
Tags:smbsambamountlocal filesfile directorybrowse files

Was this article helpful?

Yes  No
Related Articles
  • How to integrate and use external libraries in Simplifier Apps
  • Execute Google Scripts via API
  • How to integrate with SAP Business API Hub
Leave A Comment Cancel reply

You must be logged in to post a comment.

Trending
  • Example Apps
  • Introduction
  • Install Simplifier on Azure
  • OpenUI5, SAPUI5 and Fiori
  • Create your first Application
  • Execute Google Scripts via API
  • Prerequisites & Helpful Links
  • How to integrate with SAP Business API Hub
  • Identity Provider Setup
  • Using SAP UI Theme Designer

Our support Staff is available 9 AM - 6 PM, Monday to Friday. Please be patient when posting an issue as staff may not be in the same timezone as you.

  • Contact | Imprint | Privacy | © 2020 Simplifier AG. All Rights Reserved.