• Resources
    • Documentation
    • Knowledge Base
    • Forum
    • Webinars and Videos
    • Courses
    • FAQ
    • Changelog
    • Blog
    • Swag Shop
  • Marketplace
  • Login
  • Resources
    • Documentation
    • Knowledge Base
    • Forum
    • Webinars and Videos
    • Courses
    • FAQ
    • Changelog
    • Blog
    • Swag Shop
  • Marketplace
  • Login
home/Knowledge Base/Plugins/Create a PDF Template via Plugin

Create a PDF Template via Plugin

357 views 0

Written by Dan
June 1, 2021

Prerequisites

  • Installed and configured PDF Plugin on your Simplifier instance (you can find an Installation Guide in our Documentation). If the PDF Plugin is active it will be available in the plugin list overview:
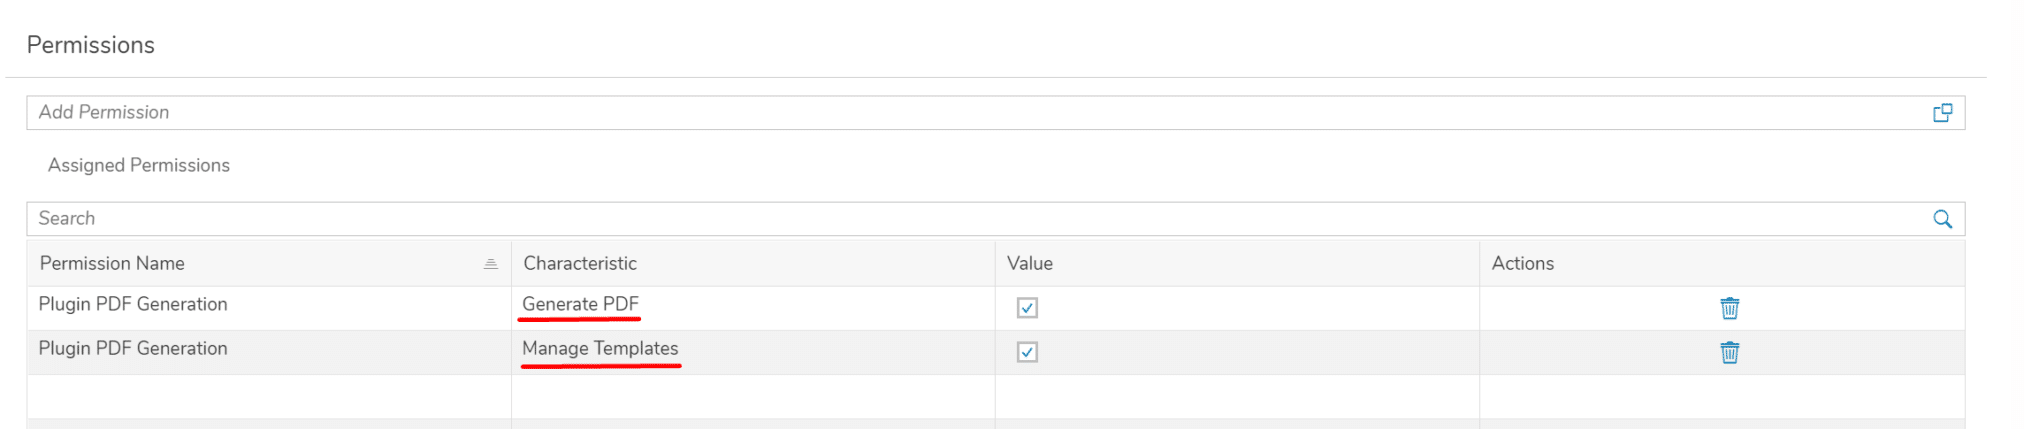
  • A User Role with permissions to manage and generate template that is assigned to the user working with the PDF Plugin.
    • Manage Templates gives permission to create/edit and delete new PDF templates
    • Generate Templates gives permission to use the plugin for PDF generation. This permission has to be granted in order to create a PDF inside an application.

Step 1 – Create a new template

To create a new template simply follow these steps:
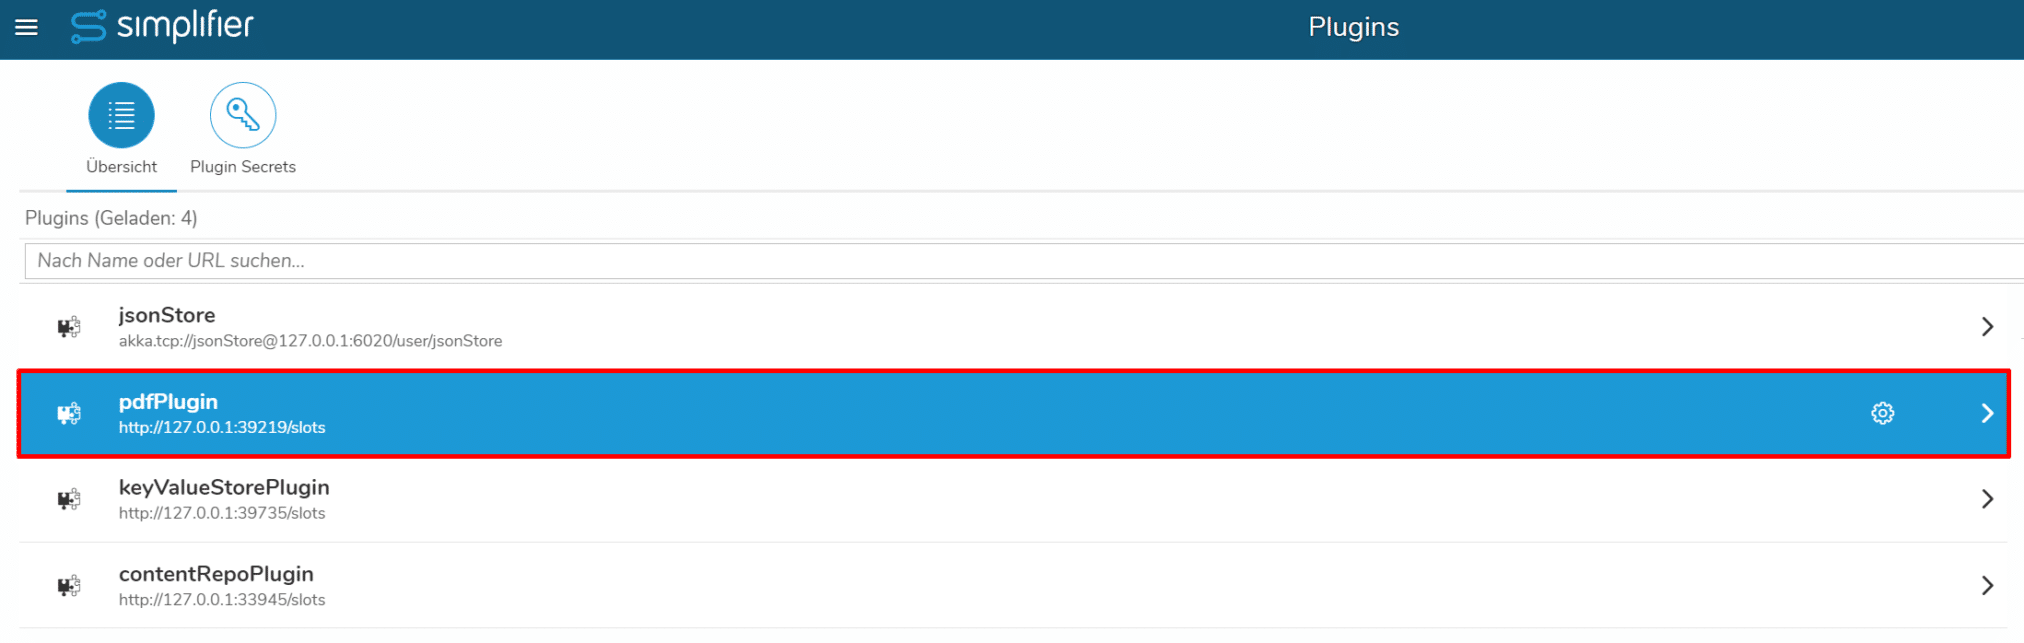
  1. Press the ‘+’-button
  2. Change the name of the template
  3. Save

As a result your template will be displayed in the template list. At this time, your template has some default content.

Please note that the template must be saved manually.

Step 2 – Create content

If your template is not expected to display dynamic data send from an application you can skip step 2.1.

2.1 Adding MockUp Data to the JSON Preview

Since the PDF plugin is designed to render data from applications, put in some dummy data that resemble data you’ll be using to generate this template.

Example:

{
  "data": [
    {
      "articleNumber": 124578,
      "price": "10,95 €",
      "title": "DummyArticle1",
      "available": true
    },
    {
      "articleNumber": 789456,
      "price": "21,50 €",
      "title": "DummyArticle2",
      "available": true
    },
    {
      "articleNumber": 613376,
      "price": "2,95 €",
      "title": "DummyArticle3",
      "available": false
    }
  ]
}

2.2 Define HTML content

A PDF template is build using HTML code to define what should be displayed and how it’s layouted. Values from the JSON data can be accessed using handlebars.
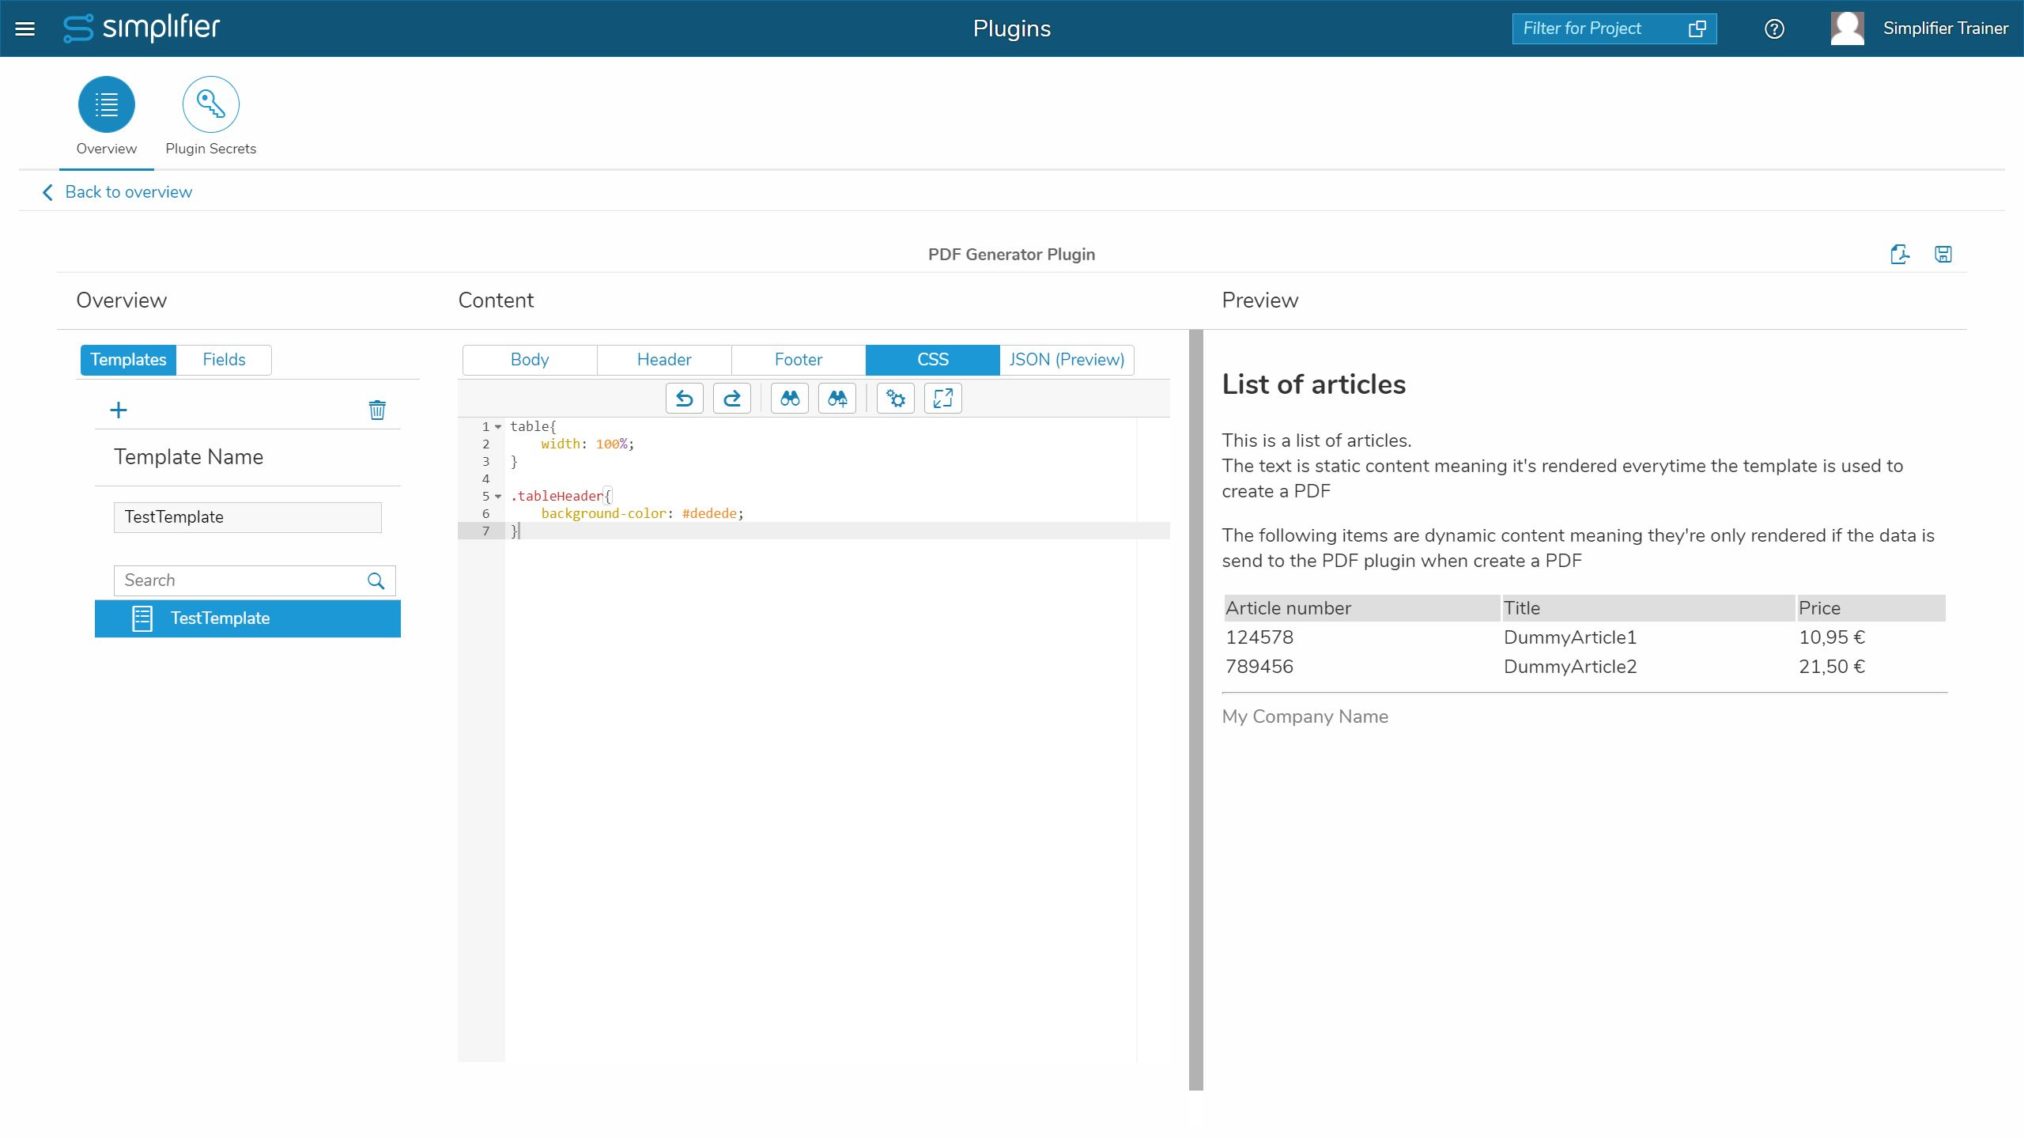
2.2.1 Body

The main part of the template should be in the body of the template. You can use HTML code to define the structure and refer to CSS classes for styling (see Step 2.3).

Example:

<h2> List of articles</h2>

<span>This is a list of articles.</span><br>
<span>The text is static content meaning it's rendered everytime the template is used to create a PDF</span>

<p>The following items are dynamic content meaning they're only rendered if the data is send to the PDF plugin when create a PDF</p>

<table>
    <!--This part of the table is static-->
    <tr class="tableHeader">
       <td>Article number</td>
       <td>Title</td>
       <td>Price</td>
    </tr>

    <!--This part of the table is dynamic-->
    <!--for every item in our JSON one row will be rendered-->
    {{#data}}

       <!--only if available == true of entry-->
       {{#available}}
          <tr>
             <!--the value of every item is used and rendered-->
             <td>{{articleNumber}}</td>
             <td>{{title}}</td>
             <td>{{price}}</td>
          </tr>
       {{/available}}
    {{/data}}
</table>

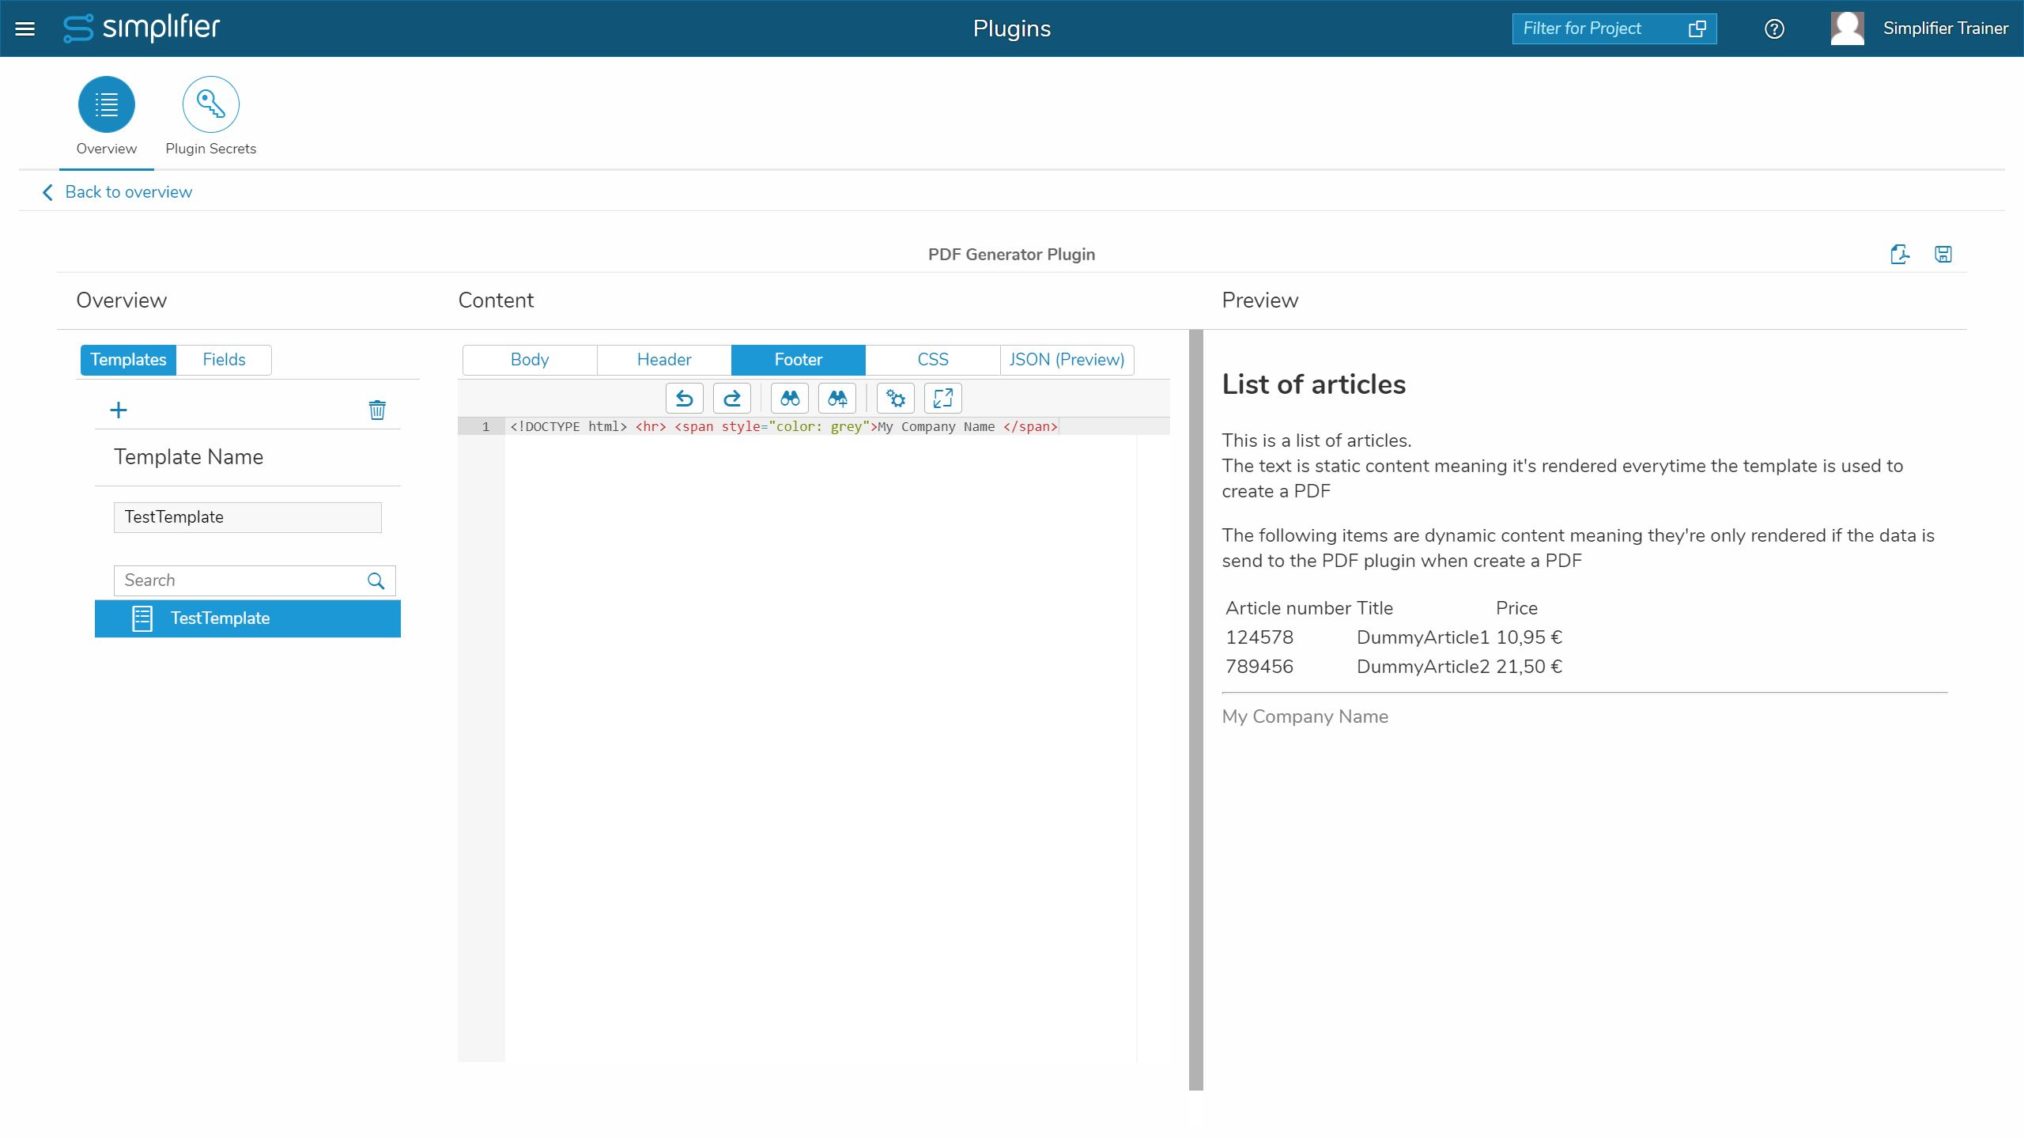
2.2.2 Header / Footer

If a header or footer should be rendered on every page of a PDF, you can define the content in those two tabs. Same as in the body you can use HTML and CSS to define the content.

There is currently one restricition: <!DOCTYPE html> must be inserted before any content!

Example:

<!DOCTYPE html> 
<hr> 
<span style="color: grey">My Company Name </span>

2.3 Styling your template

Using CSS you’re able to define the look and style of your template. You can also use inline style tags in your HTML (as seen in the example above).

Example:

table{
    width: 100%;
}

.tableHeader{
    background-color: #dedede;
}

The library used for rendering the template is not supporting CSS3 features!
The preview and the rendering don’t display the same result. Always test render your PDF.

Step 3 – Configurations for the PDF

The Server-Side Business Object ‘SF_PDF‘ has two functions: ‘generate‘ and ‘generateWithConfig‘.

If you simply want to show your data on a PDF, using the function ‘generate’ will be sufficient. However, if you want to add some configurations, like the page size or page orientation, use ‘generateWithConfig’.

‘GenerateWithConfig’ has an additional parameter: ‘configJSON’. In this parameter, you can set your configurations in JSON format.

Example:

var oConfig = {
    "orientation": "Landscape",
    "page-size": "A4",
    "margin-top": "1in",
    "margin-bottom": "1in",
    "margin-left": "1in",
    "margin-right": "1in",
    "footer-center": "[page] / [toPage]"
};

FAQ

Q: How can i prevent my table from beeing split in the middle of a row if it’s rendered on multiple pages?

A: Preventing a table from being torn apart can be done by using the following CSS.

table, tr, td, th, tbody, thead, tfoot{
    page-break-inside: avoid !important;
}

Q: How can i enforce a page break after a specific element?

A: Forcing a page break after a specific element is also done by using CSS. Copy and paste the following CSS into your template and add the class to the desired HTML element

.break-after{
    page-break-after: always;
}

Q: I want to have the number of pages inside the footer. How can i achieve this?

A: This can be done using functionality of WKHTMLTOPDF. Have a look at the documentation file linked and search for “Footers And Headers”. There’s an example you can simple copy and paste

Restrictions

PDF Plugin templates can not be part of a Simplifier transport and therefore have to be transported manually.

Tags:pdfUIRESTheader

Was this article helpful?

Yes  No
Related Articles
  • REST: Use a CSRF Token and a Cookie to authorize Requests
  • Use the Adobe PDF Embed API in your Simplifier Application
  • Simplifer setup with recommended environment using docker-compose
  • Logs and Monitoring in Simplifier
  • Version and Release Management in Simplifier
  • Dynamic where-clause and repeatable statement
Leave A Comment Cancel reply

You must be logged in to post a comment.

Latest Articles
  • REST: Use a CSRF Token and a Cookie to authorize Requests
  • Use the Adobe PDF Embed API in your Simplifier Application
  • Process Designer: Keeping an overview
  • Contact | Imprint | Privacy | © 2022 Simplifier AG. All Rights Reserved.

Insert/edit link

Enter the destination URL

Or link to existing content

    No search term specified. Showing recent items. Search or use up and down arrow keys to select an item.