Prerequisites
If you are using our recommended default setup based on docker compose (https://github.com/simplifier-ag/docker-compose), the content repository plugin is started and configured by default.
If you are using another way of running Simplifier, please follow Step 1.
Step 1: Setting up the Content Repository plugin
If you are using the recommended docker compose setup, you do not have to do anything. Just use the default setup, and everyting is prepared automatically and you can skip step 1 and continue with Step 2.
Simplifer uses a naming convention. To continue in this guide, you need to know the name of the main Simplifier database and the username which is used for this connection. Please substitue ${simplifierDatabaseName} with the actual name of the Simplifier main database and ${simplifierDatabaseUser} with the actual name of the database user, which is already used for the main Simplifier database.
1.1 Creating the database
Create a database called
${simplifierDatabaseName}_content
Please follow the naming convention to avoid a more manual setup.
1.2 Assign access rights to DB user
Give the user, which you configured for the Simplifier main database, full rights on this new database.
GRANT ALL PRIVILEGES ON ${simplifierDatabaseName}_content TO ${simplifierDatabaseUser}@'%'
1.3 Enable Content Repository plugin
Configure your setup to set the environment variable PLUGINLIST. If you are not using this variable, it has to be set the following way:
PLUGINLIST=contentRepoPlugin
If you already defined the variable, make sure contentRepoPlugin is part of the comma separated list give as value. The setup for starting all default plugins would like like:
PLUGINLIST=keyValueStorePlugin,pdfPlugin,captcha,contentRepoPlugin,jsonStore
Step 2: Clear File System or File System?
There are two types of Content Repositories available:
- The file system stores the received content repository data in a database.
- The clear file system stores this data in an actual file system (compare Windows Explorer).
In case of the file system-based repository the files and folders are identified by IDs, while for the clear file system folder and file paths are used.
In addition, each file system-based repository has an explicit access control mechanism, as permission objects have also to be defined when creating folders, and files.
Step 3: Use Out-of-the-Box Business Objects Functions
For out-of-the-box usage of the plugin functions, you can simply use the Business Objects ‘SF_ContentRepository_FileSystem’ or ‘SF_ContentRepository_ClearFileSystem’ from our Marketplace.
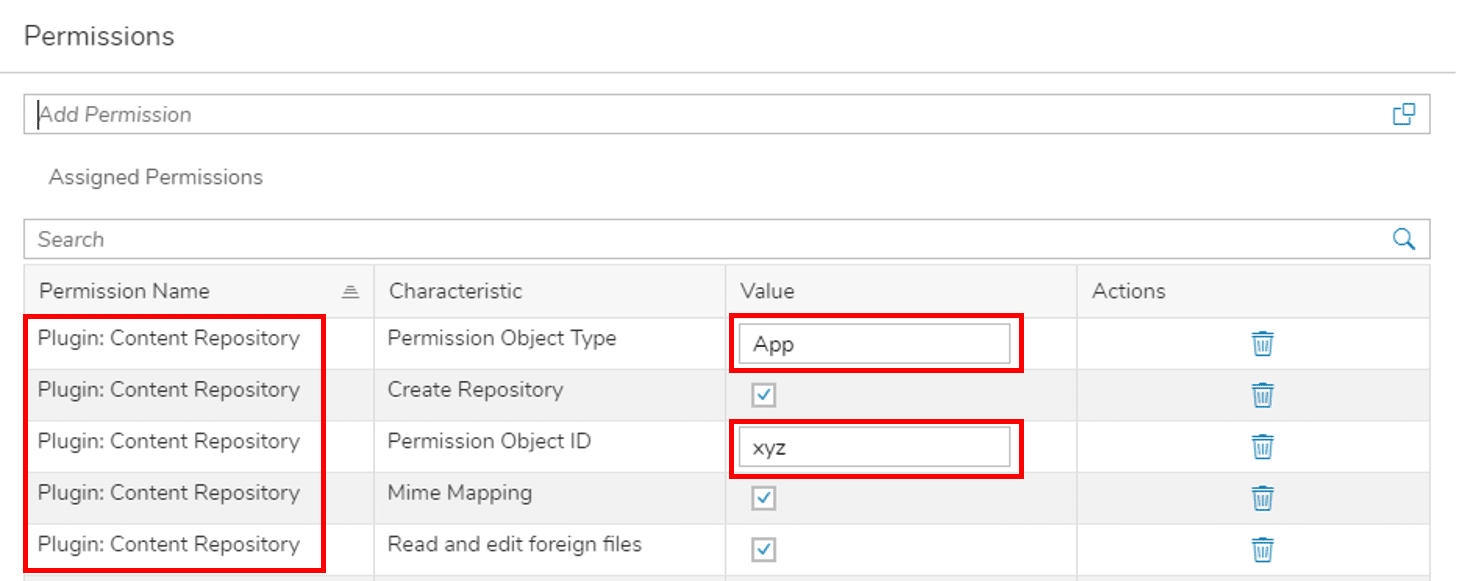
1. Specify access control: Implement your security concept by adding the permission ‘Plugin: Content Repository’ to the relevant user roles’ definitions. You can refine the ‘assigned permissions’ by selecting or deselecting single permissions. In addition, you can control the access to repositories by using the PermissionType ‘App’, and a suitable PermissionID.
Step 3a: Using File System
2. Specify access control for folder and files: In case of File System you have to specify access control (using PermissionType ‘Session’ and PermissionID) for folders and files, separatly.
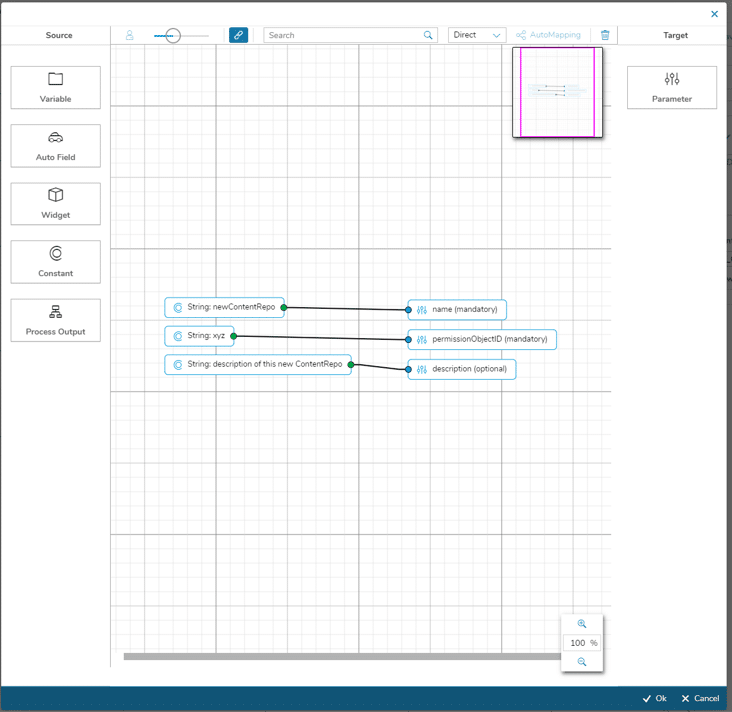
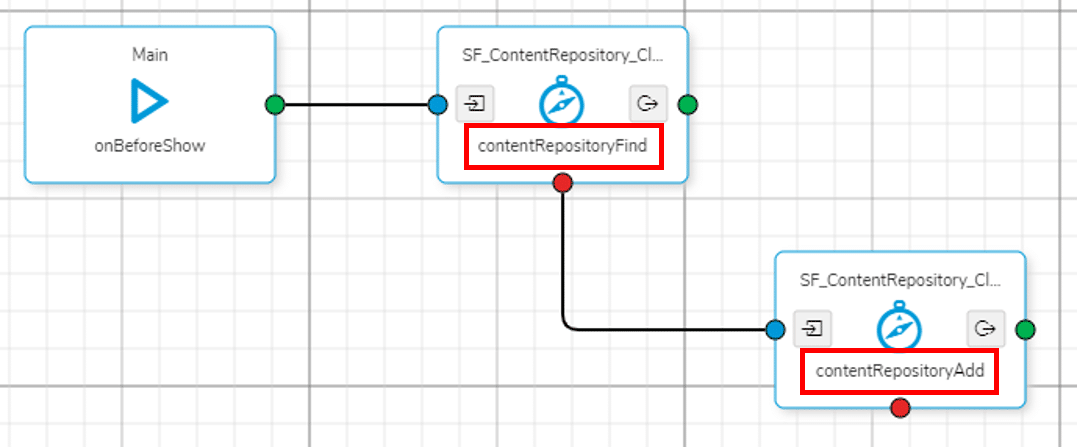
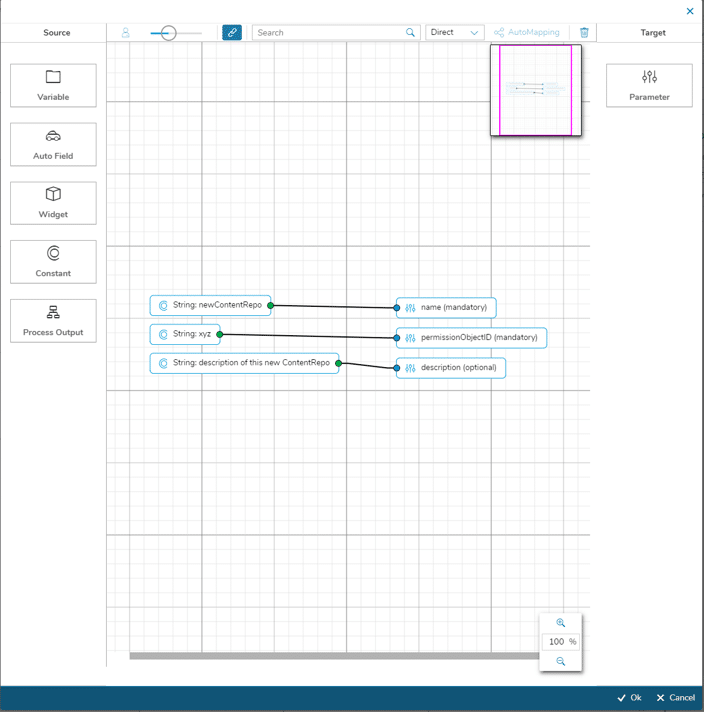
3. Initialize content repository: Check whether the required content repository already exists, or whether it has to be created first. For this, you can, for example, use the function ‘contentRepositoryFind’ of the Business Object (BO) ‘SF_ContentRepository_FileSystem’. In case, that the content repository doesn’t exist the BO execution is not successful, i.e., the connection of the red output port can be utilized to execute the ‘contentRepositoryAdd’ function in order to create a content repository named ‘newContentRepo’:
4. Create a folder: After creating the repository, add a folder using ‘contentFolderAdd’ of the BO ‘SF_ContentRepository_FileSystem’. For the input mapping, please check the following example:
5. Upload a file: In general, you can add a file, either by passing the content directly as a base64 (use input parameter ‘data’), referencing an upload session key (use input parameter ‘uploadSession’), or by copying another existing content file by means of its ID (use input parameter ‘copyFrom’).
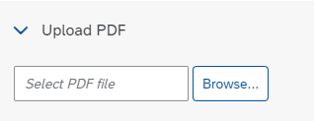
Exemplary, we will implement an use case where an user can upload a file. For this, we make use of the ‘ui_unified_FileUploader’ widget:
If you want to upload files to the Simplifier server, please make sure the executing user has the permission object ‘Uploader’ with characteristic ‘allow’ set to active assigned to them as part of a role. This is to avoid 403 Forbidden errors returned from the Uploader API during the upload action.
To get the selected file, use a script block with the following lines of code, to store the file object in the global variable ‘uploaderFile’:
var uploaderInput = this.getView().byId("FileUploader");

if (uploaderInput.getValue() !== "") {
     var files = uploaderInput.oFileUpload.files;
     if (files.length === 1) {
          this.getGlobals().setVar("uploaderFile", files[0]);
     }
}
Use this variable as input for the ‘uploadFileToSimplifier’ helper function of the client-side BO ‘SF_File’.
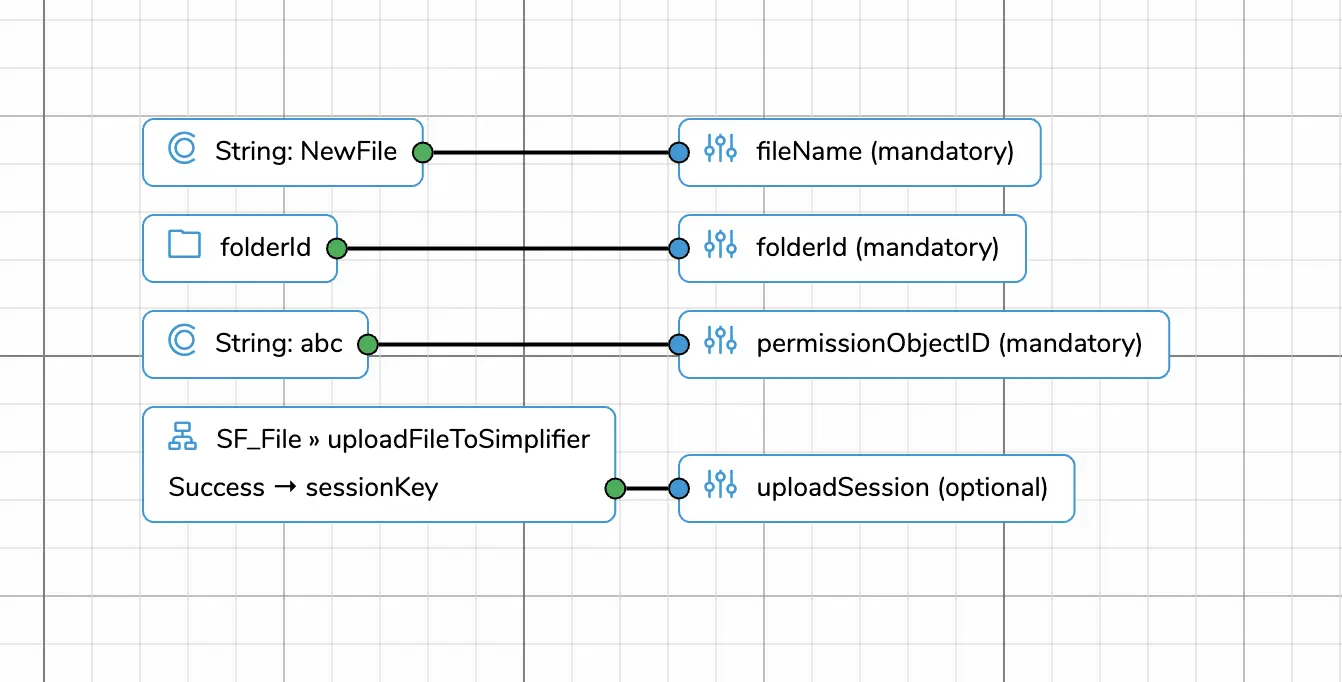
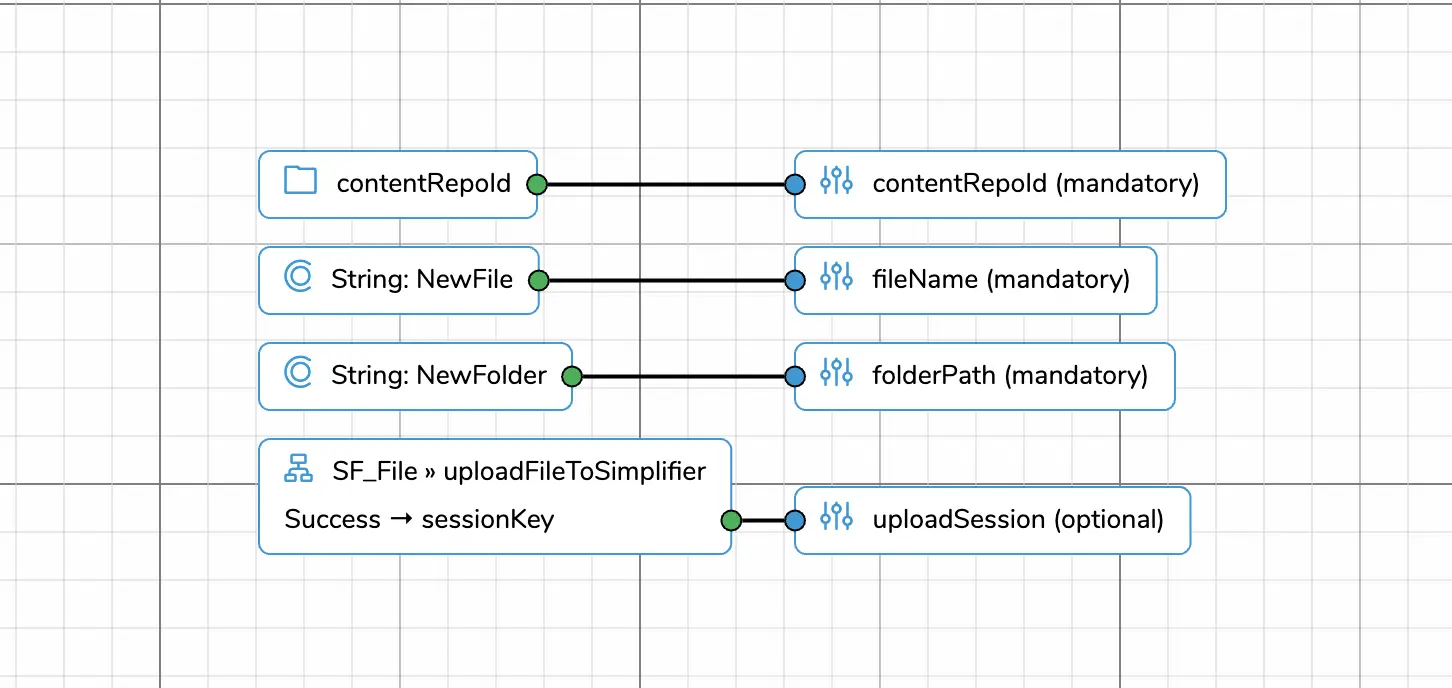
With the returned upload session key, you can define the input mapping of the ‘contentFileAdd’ function of the BO ‘SF_ContentRepository_FileSystem’ for creating a new file in the content repository:
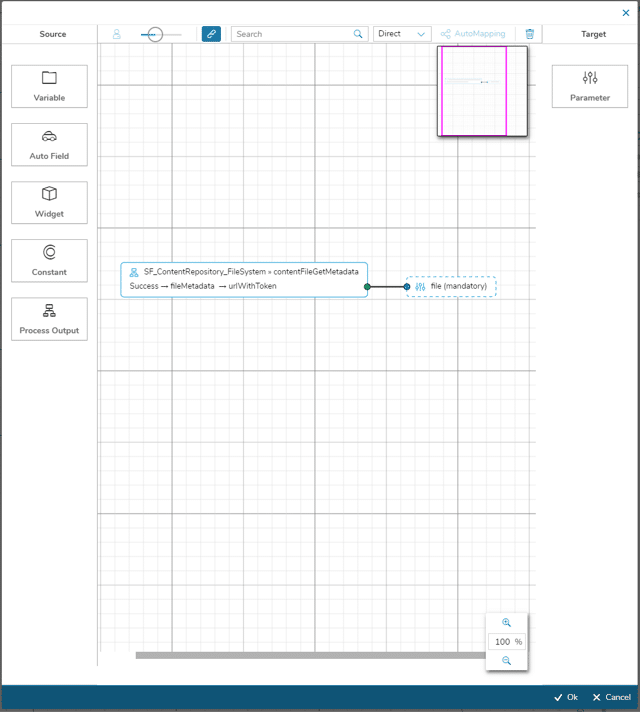
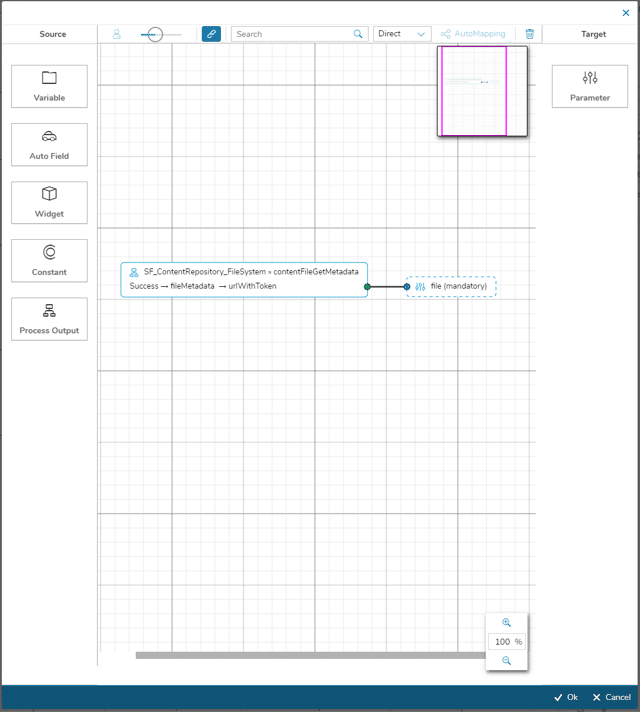
6. Download a file: To download a file from the content repository, you can either request the download URL, or the base64-encoded content of the file. In case of the base64-encoded data use the ‘contentFileGet’ function of the BO ‘SF_ContentRepository_FileSystem’. In case of the download URL, it is recommended to use the ‘contentFileGetMetadata’ function, as this avoids a performance-eating full-data download within the app. Exemplary the workflow (and output mapping for the BO function) for this ‘external’ data download is presented here:
To use the download process of the browser, you can use the ‘downloadFile’ helper function of the client-side BO ‘SF_File’ (StandardContent) and configure the input mapping as following:
Step 3b: Using Clear File System
2. Initialize content repository: Check whether the required content repository already exists, or whether it has to be created first. For this, you can, for example, use the function ‘contentRepositoryFind’ of the Business Object (BO) ‘SF_ContentRepository_ClearFileSystem’. In case, that the content repository doesn’t exist the BO execution is not successful, i.e., the connection of the red output port can be utilized to execute the ‘contentRepositoryAdd’ function in order to create a content repository named ‘newContentRepo’:
3. Create a folder: After creating the repository, add a folder using ‘contentFolderAdd’ of the BO ‘SF_ContentRepository_ClearFileSystem’. For the input mapping, please check the following example:
4. Upload a file: In general, you can add a file, either by passing the content directly as a base64 (use input parameter ‘data’), referencing an upload session key (use input parameter ‘uploadSession’), or by copying another existing content file by means of its file path (use input parameter ‘copyFrom’).
Exemplary, we will implement an use case where an user can upload a file. For this, we make use of the ‘ui_unified_FileUploader’ widget:
If you want to upload files to the Simplifier server, please make sure the executing user has the permission object ‘Uploader’ with characteristic ‘allow’ set to active assigned to them as part of a role. This is to avoid 403 Forbidden errors returned from the Uploader API during the upload action.
To get the selected file, use a script block with the following lines of code, to store the file object in the global variable ‘uploaderFile’:
var uploaderInput = this.getView().byId("FileUploader");

if (uploaderInput.getValue() !== "") {
     var files = uploaderInput.oFileUpload.files;
     if (files.length === 1) {
          this.getGlobals().setVar("uploaderFile", files[0]);
     }
}
Use this variable as input for the ‘uploadFileToSimplifier’ helper function of the client-side BO ‘SF_File’.
With the returned upload session key, you can define the input mappping of the ‘contentFileAdd’ function of the BO ‘SF_ContentRepository_ClearFileSystem’ for creating a new file in the content repository:
5. Download a file: To download a file from the content repository, you can either request the download URL, or the base64-encoded content of the file. In case of the base64-encoded data use the ‘contentFileGet’ function of the BO ‘SF_ContentRepository_ClearFileSystem’. In case of the download URL, it is recommended to use the ‘contentFileGetMetadata’ function, as this avoids a performance-eating full-data download within the app. Exemplary the workflow (and output mapping for the BO function) for this ‘external’ data download is presented here:
To use the download process of the browser, you can use the ‘downloadFile’ helper function of the client-side BO ‘SF_File’ (StandardContent) and configure the input mapping as following:
Appendix
Manually setting up datase connection
WARNING: please use this method only if you were asked to do so by the Simplifier Support.
Go to the directory ‘plugins/contentRepoPlugin/src/main/resources’ and copy the file ‘settings.conf.dist’ as ‘settings.conf’. Adjust the settings configuration to your database environment:
database {
     dbms: "mysql"
     user: "simplifier"
     pass: "simplifier"
     host: "localhost"
     port: 3306
     database: "contentrepo"
}
If a relative path is specified for a ‘FileSystem’ repository (not starting with a ‘/’), it will be evaluated relative to a previously configured directory for storing files. To set this, the property ‘fileSystemRepository.baseDirectory’ must be configured in the ‘settings.config’ file as well:
fileSystemRepository {
     baseDirectory: "/opt/simplifier/data/plugins/contentRepoPlugin"
}
