• German
  • Docs
  • Knowledge
  • F.A.Q
  • Forum
  • Media
  • Courses
  • Marketplace
  • Login
  • Try for free
  • German
  • Docs
  • Knowledge
  • F.A.Q
  • Forum
  • Media
  • Courses
  • Marketplace
  • Login
  • Try for free
home/Knowledge Base/Layout & Design/How to create your own app template

How to create your own app template

Written by Andreas Dallner
October 22, 2023

Everybody is using AppWizards, but applications still look and behave differently in terms of general layout and authentication? Then think of creating a template everybody can use as basis.

Creating an application template with all required basic topics like authentication or general layout will make it simplier for you to have a common look and feel as well as it will fasten application development for your (Citizen) Developers.

This Knowledge Base article shows how to create your own application template, that can be copied and directly used.

To help you with that we provide an own Application Template that will provide a basis for the creation of your own template.

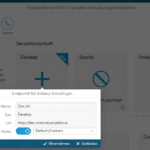
STEP 1: Import Simplifier Generic App Template

Download our Generic App Template from marketplace and import it to your instance in overwrite mode.

The following steps are not necessary, if endpoint ‘Default’ is active instance. Nethertheless we suggest to make your own copy to create an own template as described in Step 2 and following.

By this your endpoints and enhancements won’t get overriden in case of reimport of the template.

STEP 2: Copy connector ‘SF_Login’

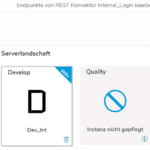
Copy connector SF_Login. Set name matching your naming guidelines (e.g. Internal_Login)

Set required endpoints for your landscape. When creating the endpoint you can copy the settings from ‘Default’-Endpoint. No further changes required.

STEP 3: Copy server-side Business Object ‘SF_Login’

Copy server-side Business Object ‘SF_Login’. Set name matching your naming guidelines (e.g. Internal_Login)

Edit dependencies in created Business Object:

  • Remove connector ‘SF_Login’
  • Add your connector created in step 2
  • Save changes

Change used connector in function ‘getAuthServices’:

  • Open function in edit mode
  • Search (Strg + F) for SF_Login
  • Replace it with name of your connector created in step 2
  • Save

STEP 4: Create new roles for app and users

Create role for application:

  • Name it matching your naming guidelines (e.g. ‘AppIntern_Template’)
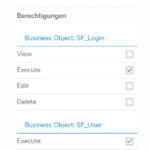
  • Set same permissions as in role ‘AppSF_TemplateApp’
  • Remove Permissions for connector and server-side Business Object ‘SF_Login’
  • Add execution permissions permissions for the created connector and server-side Business Objects in step 2 and 3
  • Add execution permissions only for further assets, that are required before login

Create role for password reset (only if you require password reset for local Simplifier users (not IDP users) and if you want to change the name of the role):

  • Name it matching your naming guidelines (e.g. AppIntern_Template_ResetPassword)
  • Set same permissions as in role ‘AppSF_TemplateApp_ResetPassword’

STEP 5: Copy app template ‘SF_TemplateApp’

Change datasource of widget ‘AuthServices_Button’:

  • Search ‘AuthServices_Button’ in UI Tree
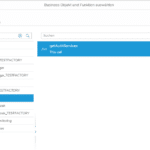
  • Change Datasource to getAuthServices function of server-side Business Object created in step 3

Change used server-side Business Object to get auth services in Story ’11 Load auth services’:

  • Search for SF_Login
  • Replace business object with yours created in step 3
  • Set same input and output mappings
  • Save

Change application role:

  • Remove Default roles
  • Add app role created in step 4

Remove extensions if not required:

  • SimplifierLetterbox to deactivate Letterboxing
  • SimplifierExtension to remove Nunito as font

Set your auth services if not all should be shown:

  • Set value of global variable ‘authServices’
  • Add an entry for each required auth service. Keep in mind to add the names for auth services on qa and prod instances ass well, if their names are different

Activate ‘Forgot Password’ function if required

  • Set global variable ‘useForgotPassword’ to true

Activate local login with credentials

  • Set global variable ‘alwaysShowLocalLogin’ to true, if local login with credentials should always be shown. This deactivates auto login.

STEP 6: Enhance template

Enhance your new template with further requirements!

Conclusion

Creating your own app template only takes little time, but will speed up application development of applications with same look and feel. Give it a try!

Get our Simplifier App Template
Tags:UIconnectortemplatepagetextto

Was this article helpful?

Yes  No
Related Articles
  • Use SAP UI Theme Designer
  • How to keep the UI simple and focused with letterboxing
  • How to Use Simplifier CSS Editor
Leave A Comment Cancel reply

You must be logged in to post a comment.

Layout & Design
  • How to create your own app template
  • How to Use Simplifier CSS Editor
  • How to keep the UI simple and focused with letterboxing
  • Use SAP UI Theme Designer
Knowledgebase Categories
  • Getting Started 4
  • Best Practices 3
  • How to's 26
  • Layout & Design 4
  • Widgets 8
  • Cloud Services 6
  • Database Handling 1
  • Integrations 10
  • Plugins 6
  • Mobile Client 2

  Use SAP UI Theme Designer

How to keep the UI simple and focused with letterboxing  

GetApp Review

User Reviews

capterra

User Reviews

For AWS Customers

For SAP Customers

  • Contact | Imprint | Privacy | © 2025 Simplifier AG. All Rights Reserved.

  • English
  • German

Insert/edit link

Enter the destination URL

Or link to existing content

    No search term specified. Showing recent items. Search or use up and down arrow keys to select an item.