Simplifier Makers ClubSimplifier Makers Club
  • Docs
  • Knowledge
  • F.A.Q
  • Forum
  • Courses
  • Marketplace
  • Pricing
  • Login
  • Try for free
  • German
  • English
  • Try for free
  • Docs
  • Knowledge
  • F.A.Q
  • Forum
  • Courses
  • Marketplace
  • Pricing
  • Login
  • Try for free
  • German
  • English
  • Try for free
home/Knowledge Base/Widgets/Working with Drag and Drop

Working with Drag and Drop

Written by Jennifer Häfner
March 8, 2021

In this article, you are going to learn how to add Drag and Drop behavior to Simplifier Widgets.

This can be useful if the users of your application should be able to change the order of List Items (or other objects) in an intuitive way, without having to use buttons or other elements.

We will cover two Scenarios: in Scenario 1, List Items are moved within one List. In Scenario 2, List Items are moved between two different Lists.

You can download the example application that we describe in this article in the Simplifier marketplace.

Prerequisites

To work with the Drag and Drop functionality, you should already know how to create an application and be familiar with the concept of the UI Designer.

Drag and Drop in Simplifier Widgets

To enable Drag and Drop behavior in a Simplifier Widget, the widget basically needs two additional controls:

  • DragInfo: the configuration of the Drag behavior, added to the element that is dragged
  • DropInfo: the configuration of the Drop behavior, added to the element where a dragged element can be dropped

With the DragInfo and DropInfo controls, you can specify which element should be draggable, where draggable elements can be dropped, how the drop animation should look like etc.

In the DragInfo and DropInfo controls, there are two important properties: the property groupName and the property sourceAggregation/targetAggregation.

With groupName, you can establish a connection between Drag and Drop objects. If two Drag and Drop objects have the same group name, elements from one object can be dragged and dropped to the other object. If the group name is different, elements from one object cannot be dragged and dropped to the other object.

With sourceAggregation/targetAggregation, you can specify the name of the aggregation from which all children can be dragged/dropped. For example, the children of a List are the List Items, therefore the sourceAggregation/targetAggregation needs to be ‘items’. You can find a widget’s specific aggregation by clicking on the Base Type link in the widget properties in the UI Designer. This link leads to the OpenUI5 documentation for the widget. If no sourceAggregation/targetAggregation is given, the widget itself becomes draggable/droppable.

Since Simplifier Widgets are based on the OpenUI5 framework, you can use the  OpenUI5 Drag and Drop documentation to find more detailed information about the available Drag and Drop options.

Scenario 1 – Drag and Drop List Items within a List

In this scenario, the users should be able to change the order of List Items within one List.

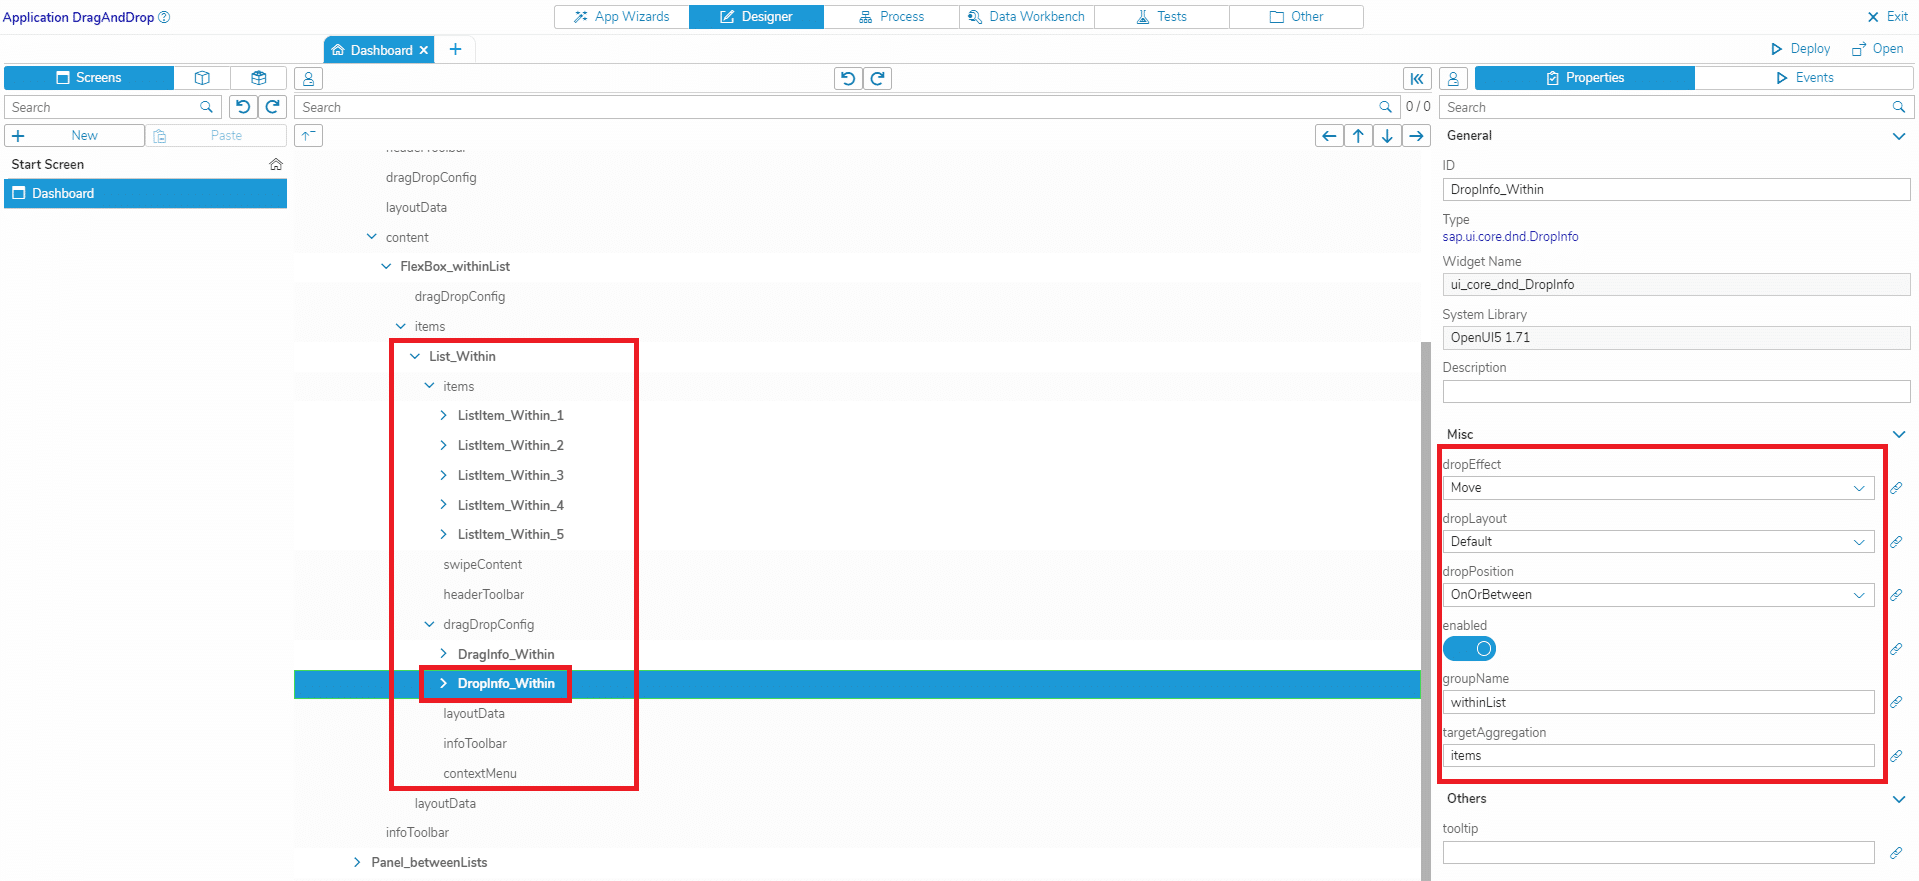
  • Create a List in the UI Designer and add List Items (or use an existing List)
  • Add the Widget ‘ui_core_dnd_DragInfo’ to the List
  • Enter a group name in the widget property ‘groupName’
  • Set the property ‘sourceAggregation’ to ‘items’
  • Add the Widget ‘ui_core_dnd_DropInfo’ to the List
  • Enter a group name in the widget property ‘groupName’ (the group name has to be the same as in the DragInfo control)
  • Set the property ‘targetAggregation’ to ‘items’
  • Set the property ‘dropPosition’ to ‘OnOrBetween’

Now you have to configure what should happen when an element was dragged and then dropped on another element:

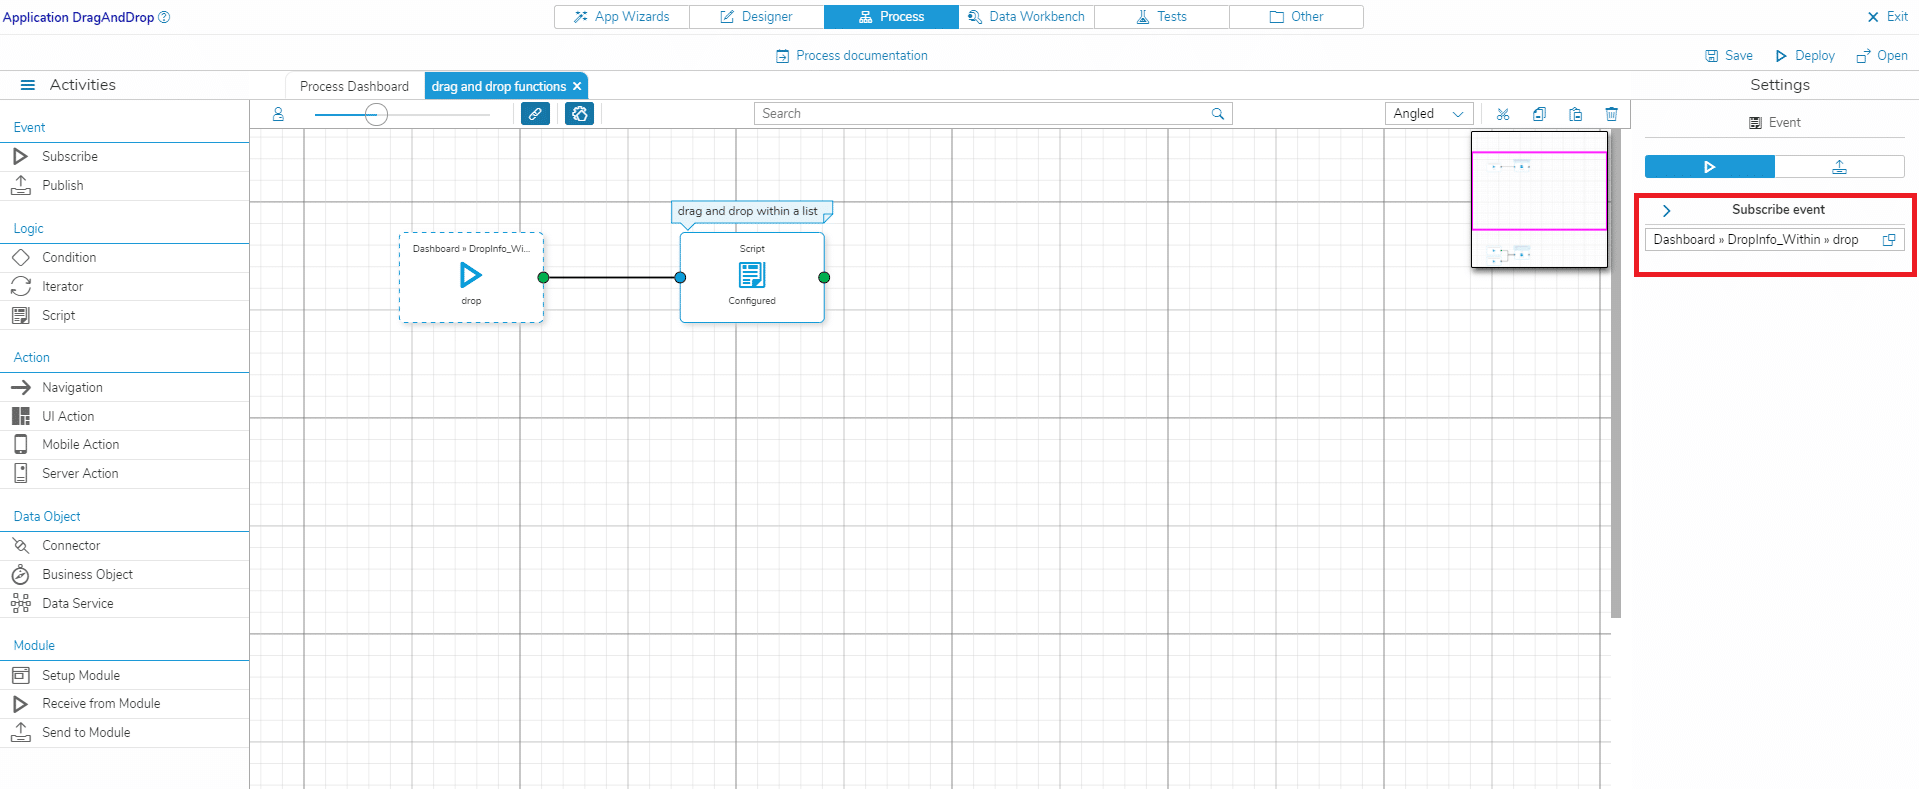
  • Go to the Process Designer, create a new Story or open an existing one
  • Add a ‘Subscribe Event’ shape and select the ‘drop’ event of the DropInfo widget of your List
  • Add a ‘Script’ shape and connect it to the ‘Drop’ event shape
  • Insert the following code to the script:
    var oDraggedItem = oEvent.getParameter("draggedControl"),
        oDroppedItem = oEvent.getParameter("droppedControl"),
        oList = oDraggedItem.getParent(),
        iPositionRemove = oList.indexOfItem(oDraggedItem),
        iPositionAdd = oList.indexOfItem(oDroppedItem);
    
    oList.removeItem(iPositionRemove);
    oList.insertItem(oDraggedItem, iPositionAdd);
    
  • This code removes the dragged List Item from the position in the List where it was before and adds it to the position in the List where it has been dropped
  • Finally, deploy and open the application. In your List, you should now be able to drag and drop the List Items

Scenario 2 – Drag and Drop List Items between two Lists

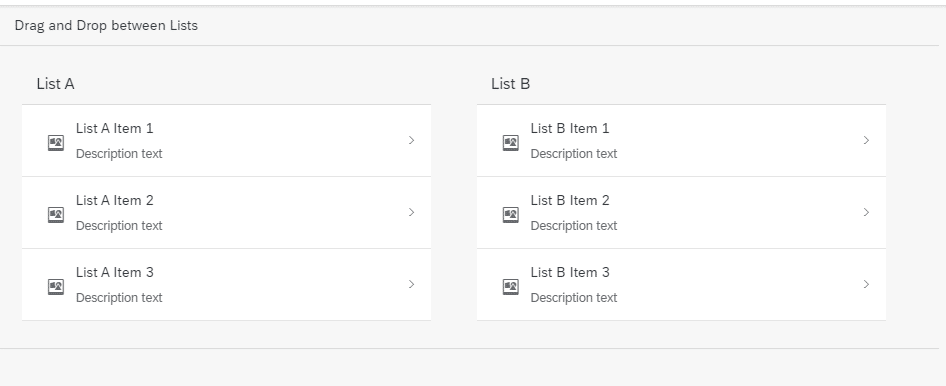
In this scenario, the users should be able to drag and drop List Items between two Lists.

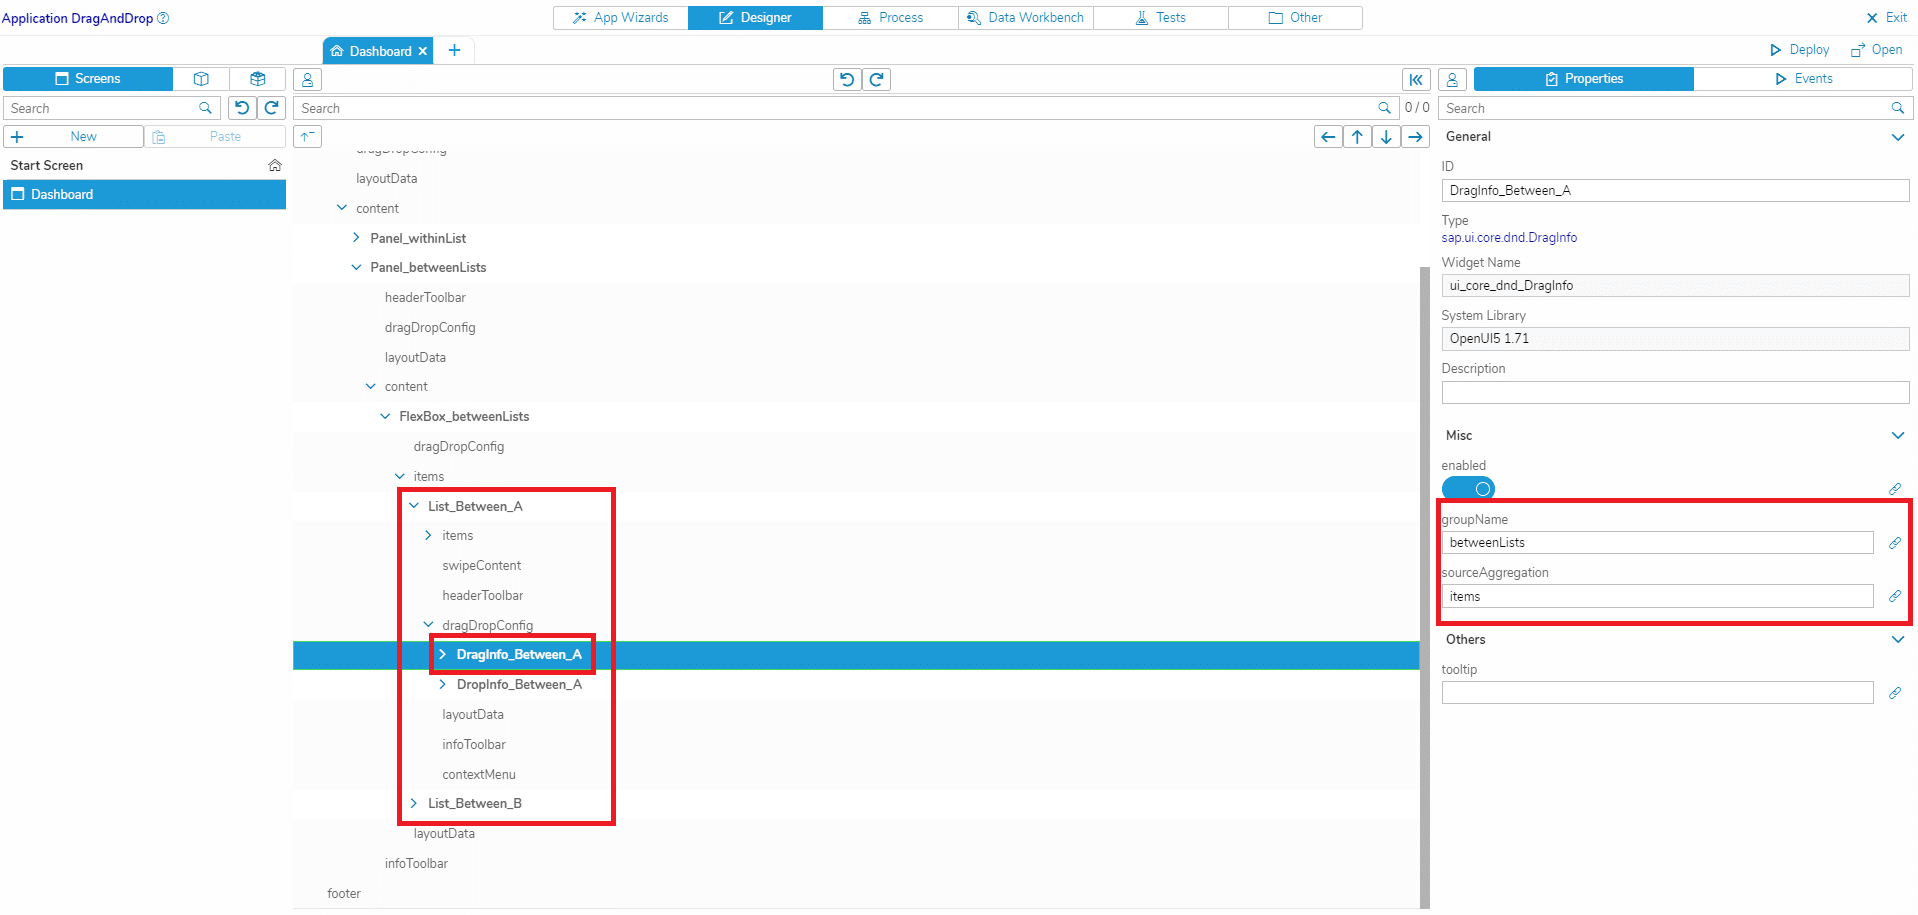
  • Create two Lists in the UI Designer and add List Items to each List (or use existing Lists)
  • Add the Widget ‘ui_core_dnd_DragInfo’ to both Lists
  • Enter a group name in the widget property ‘groupName’. The group name should be different to the group name that you used in Scenario 1
  • Set the property ‘sourceAggregation’ to ‘items’
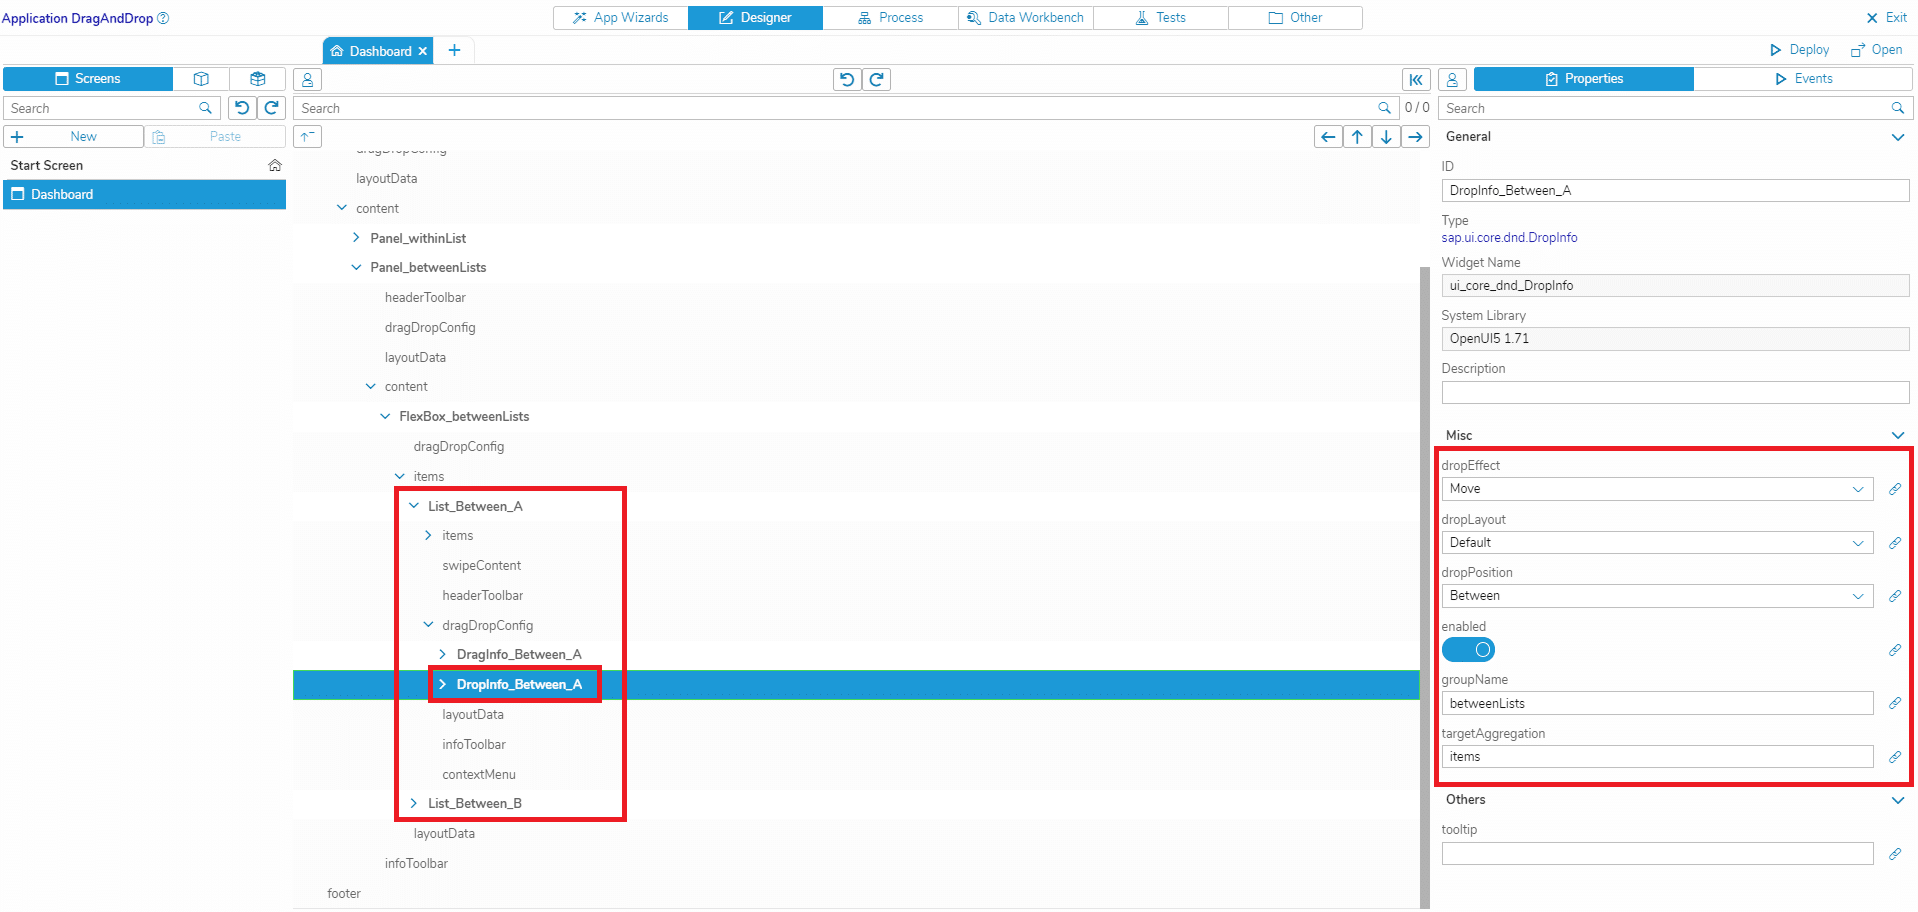
  • Add the Widget ‘ui_core_dnd_DropInfo’ to both Lists
  • Enter a group name in the widget property ‘groupName’ (the group name has to be the same as in the DragInfo control)
  • Set the property ‘targetAggregation’ to ‘items’
  • Set the property ‘dropPosition’ to ‘OnOrBetween’

Now you have to configure what should happen when an element was dragged from one List and then dropped on an element in the other List:

  • Go to the Process Designer, create a new Story or open an existing one
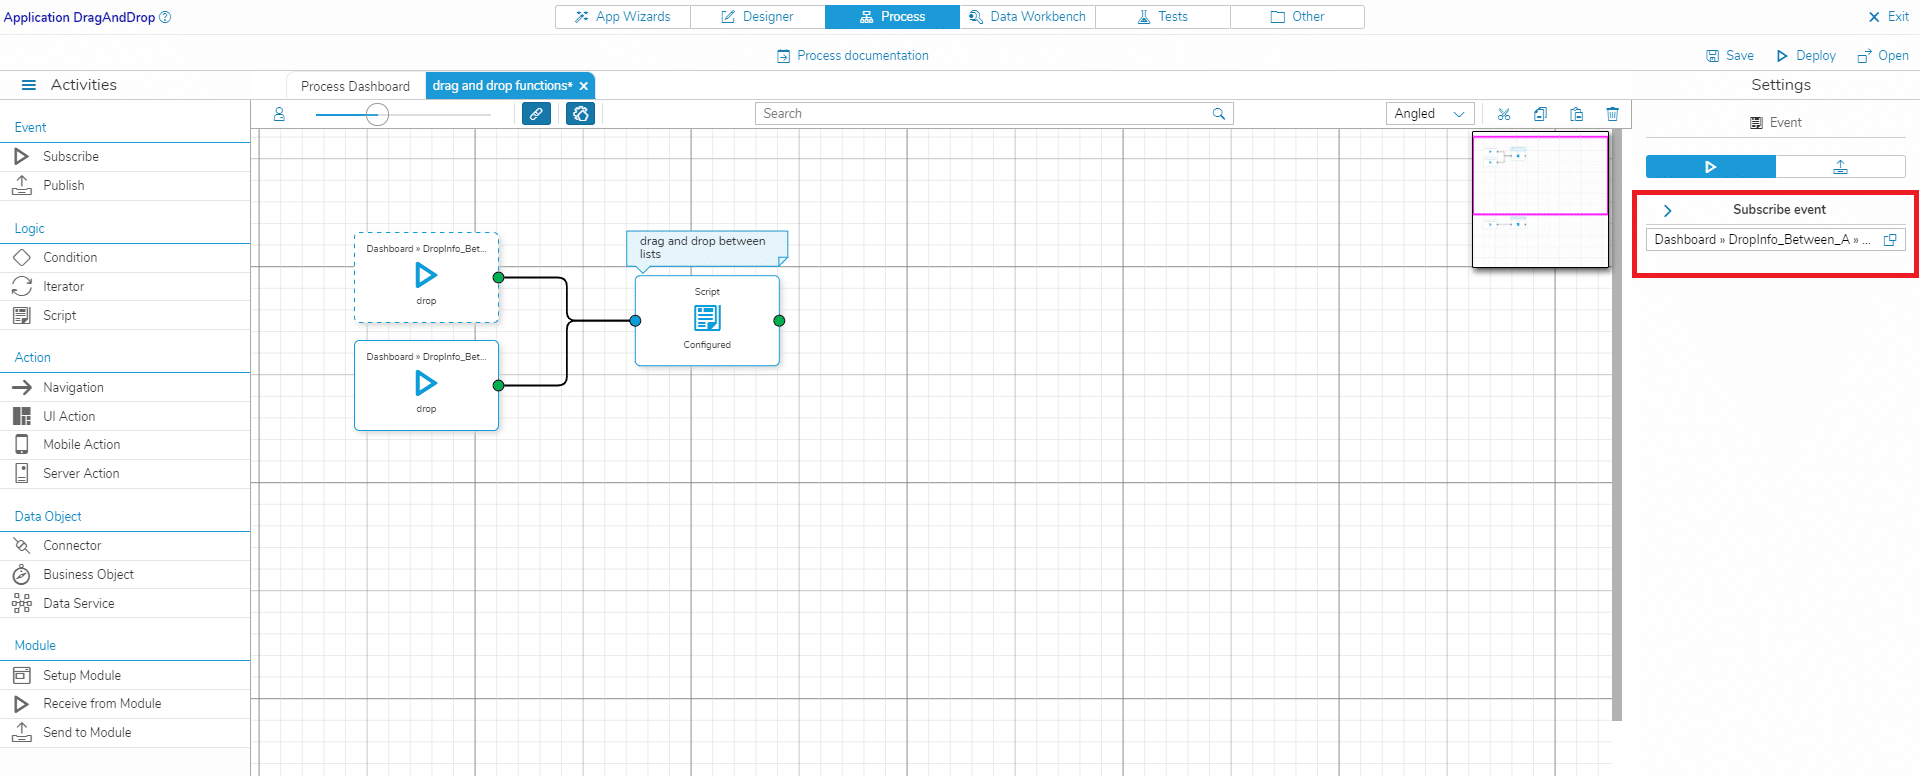
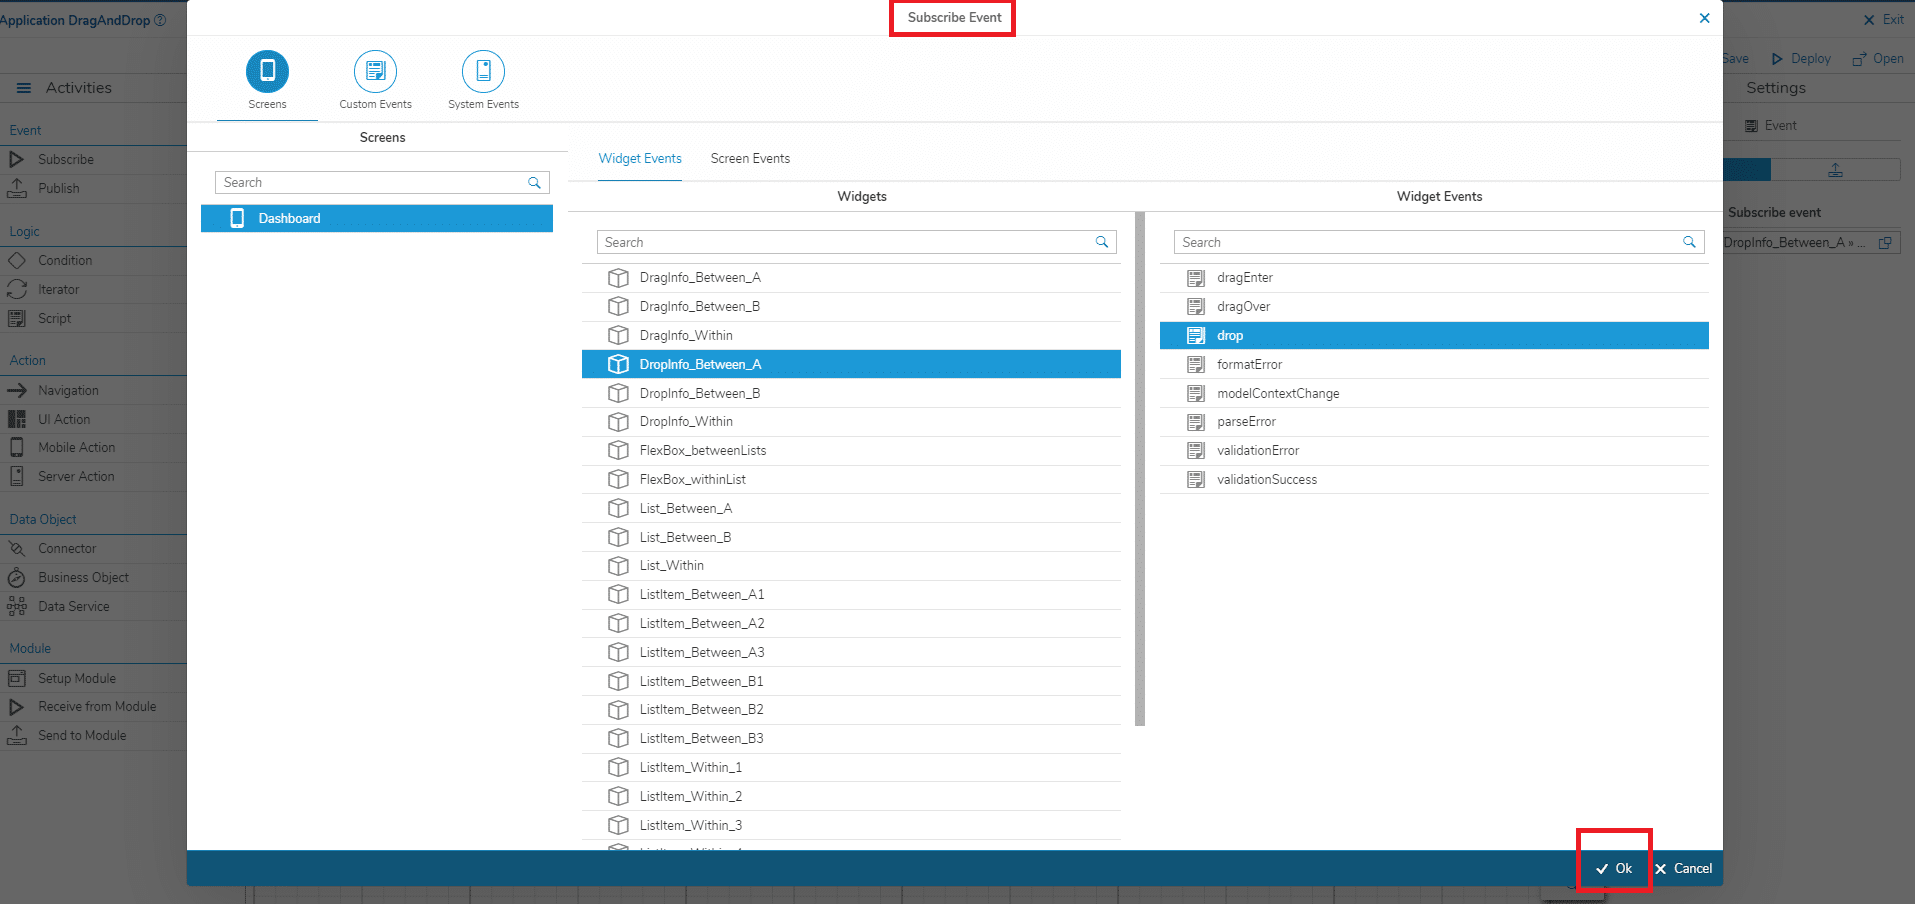
  • Add a ‘Subscribe Event’ shape and select the ‘drop’ event of the DropInfo widget of both Lists
  • Add a ‘Script’ shape and connect it to both ‘Drop’ event shapes
  • Insert the following code to the script:
    var oDraggedItem = oEvent.getParameter("draggedControl"),
        oDroppedItem = oEvent.getParameter("droppedControl"),
        oSourceList = oDraggedItem.getParent(),
        oGoalList = oDroppedItem.getParent(),
        iPositionRemove = oSourceList.indexOfItem(oDraggedItem),
        iPositionAdd = oGoalList.indexOfItem(oDroppedItem);
    
    oSourceList.removeItem(iPositionRemove);
    
    //if goal list is empty: oDroppedItem is already oGoalList
    if (oDroppedItem.getMetadata().getParent()._sClassName === "sap.m.List"){
        oDroppedItem.addItem(oDraggedItem);
    } else {
        oGoalList.insertItem(oDraggedItem, iPositionAdd);
    }
  • This code removes the dragged List Item from the position in the List where it was before and adds it to the position in the other List where it has been dropped
  • Finally, deploy and open the application. You should now be able to drag and drop List Items from one List to the other
Tags:designerconnectionUIscripttextto

Was this article helpful?

1 Yes  No
Related Articles
  • How to handle files selected with the FileUploader
  • Fine-tuning and Running Custom AI Models in Simplifier
  • Using the Simplifier Teams App
  • How to integrate value help and suggestions in user inputs
  • How to integrate Simplifier in CI/CD pipelines
  • How to use Google reCAPTCHA v3 Essentials
Leave A Comment Cancel reply

You must be logged in to post a comment.

Widgets
  • Working with Drag and Drop
  • Currency formatting with UI5 type binding
  • Using the Charts Widget
  • Drawing on Images with the SignaturePad Widget
  • How to use TimePicker widget
  • Converting Text to Speech with the Google TTS Connector
  • How to use Google reCAPTCHA v3 Essentials
  • How to integrate value help and suggestions in user inputs
Knowledgebase Categories
  • Getting Started 4
  • Best Practices 4
  • How to's 27
  • Layout & Design 4
  • Widgets 8
  • Cloud Services 6
  • Database Handling 1
  • Integrations 10
  • Plugins 6
  • Mobile Client 2

  Create Test Cases With The UI5 Test Recorder

How to integrate and use external libraries in Simplifier Apps  

Insert/edit link

Enter the destination URL

Or link to existing content

    No search term specified. Showing recent items. Search or use up and down arrow keys to select an item.