-
 Mehwish FarooqParticipant
 Has successfully completed the online course Introduction
 Has successfully completed the online course Intermediate (200)
 Has successfully completed the online course Basics (100)2 years, 10 months ago #36634
Hello !
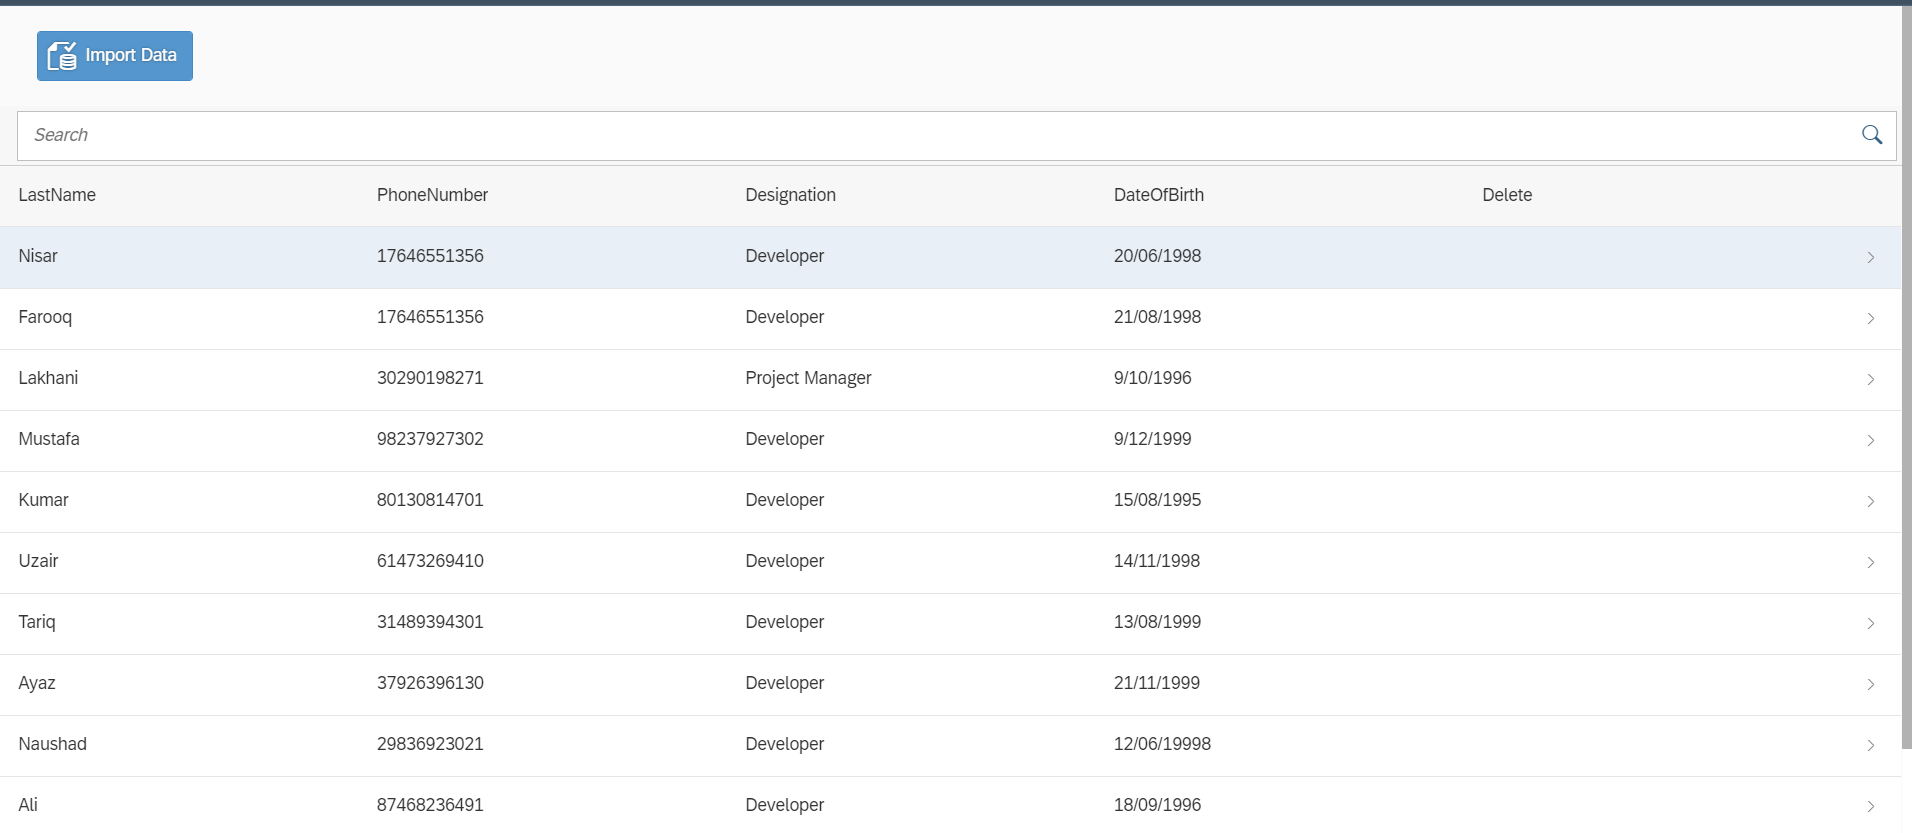
I am fetching data in table from a button “Import Data” , Now what I need is once the data is in table i can select and delete the row which ever I want and also to add a row I tried using table with add widget but for some issues it’s not working fine now i am using table with search which is working fine but need to implement this logic as per my visual every row should have delete button icon to delete that record and one add button on top to add
1) I can add button on top of table call press action and then UI action but not how to set my UI action.
2) I added another column to place delete button but unable to do that.

 Jennifer HäfnerModerator
 Has successfully completed the online course Intermediate (200)
 Has successfully completed the online course Advanced (300)
 Has successfully completed the online course Basics (100)
 Has successfully completed the online course Advanced (310)
 Has successfully completed the online course Advanced (320)
 Has successfully completed the Intermediate Certification
 Has successfully completed the Advanced Certification2 years, 10 months ago #36690::
The widget ‘TableEnhanced’, which we added to our Standard Content in February, has the option to display an add button, just as the ‘Table_withAdd’. So you can also use this new table for your add button.
Note that when adding a new row in the table, you only add the row in the UI. To make the changes permanent, you have to implement the logic where the data of the table is stored in the backend.
 Mehwish FarooqParticipant
 Has successfully completed the online course Introduction
 Has successfully completed the online course Intermediate (200)
 Has successfully completed the online course Basics (100)
 Mehwish FarooqParticipant
 Has successfully completed the online course Introduction
 Has successfully completed the online course Intermediate (200)
 Has successfully completed the online course Basics (100)2 years, 10 months ago #36716
 Jennifer HäfnerModerator
 Has successfully completed the online course Intermediate (200)
 Has successfully completed the online course Advanced (300)
 Has successfully completed the online course Basics (100)
 Has successfully completed the online course Advanced (310)
 Has successfully completed the online course Advanced (320)
 Has successfully completed the Intermediate Certification
 Has successfully completed the Advanced Certification2 years, 10 months ago #36781::
Hi Mehwish,
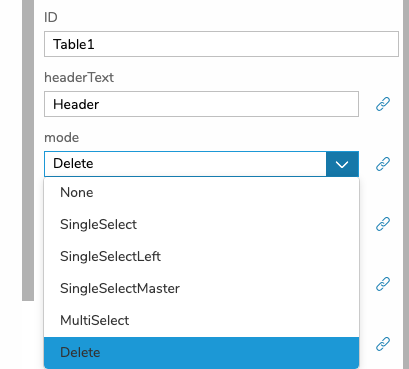
In the process described in the screenshot above, you just subscribe to the delete event of the table and get the selected list item. You still need to add the logic to delete the item in the table model.
For example, in the script of the widget ‘TableEnhanced’, you can find the following function that deletes an item:
//public delete item method
deleteItem: function(oEvent) {
//init vars
var oListItem = oEvent.getParameters().listItem,
index = this.indexOfItem(oListItem),
oBindingInfo = this.getBindingInfo("items"),
oModel = this.getBinding("items").getModel(),
oData = oModel.getProperty(oBindingInfo.path) || [];
//remove item
oData.splice(index, 1);
//set data
oModel.setProperty(oBindingInfo.path, oData);
}
You can adapt this function for your context and append it to your delete logic. This function basically needs the index of the selected list item to delete the entry in the table model.
We are planning to include the delete logic in the TableEnhanced, but it will take some time until the adapted widget will be released.
 Jennifer HäfnerModerator
 Has successfully completed the online course Intermediate (200)
 Has successfully completed the online course Advanced (300)
 Has successfully completed the online course Basics (100)
 Has successfully completed the online course Advanced (310)
 Has successfully completed the online course Advanced (320)
 Has successfully completed the Intermediate Certification
 Has successfully completed the Advanced Certification2 years, 10 months ago #36782::
To store the changes permanently, you have to write the data to your csv file. I have explained the format that is required for writing csv in this other thread: https://community.simplifier.io/forums/topic/csv-file-upload-with-fileuploader/
Use this code to get the data from the table entries:
sap.ui.getCore().byId("yourScreenId--yourTabeId").getBinding("items").oList;This gives you an array of objects. Now, you need to transform the array of objects into the format that is required for writing csv, which is
[["name_column1","name_column2"],["value_row1column1","value_row1column2"],["value_row2column1","value_row2column2"], ...]You can implement the transformation in a Client-Side Business Object using JavaScript code.
 Jennifer HäfnerModerator
 Has successfully completed the online course Intermediate (200)
 Has successfully completed the online course Advanced (300)
 Has successfully completed the online course Basics (100)
 Has successfully completed the online course Advanced (310)
 Has successfully completed the online course Advanced (320)
 Has successfully completed the Intermediate Certification
 Has successfully completed the Advanced Certification2 years, 10 months ago #36876::
Hey,
I just wanted to inform you that we added the delete functionality to the TableEnhanced: when the table is set to the mode ‘delete’, the table row is automatically removed from the table model when clicking on the delete icon. Note that the deletion is not permanent, only in the UI/table model.
The changes will be available in our Standard Content packages on the marketplace tomorrow.
You must be logged in to reply to this topic.

